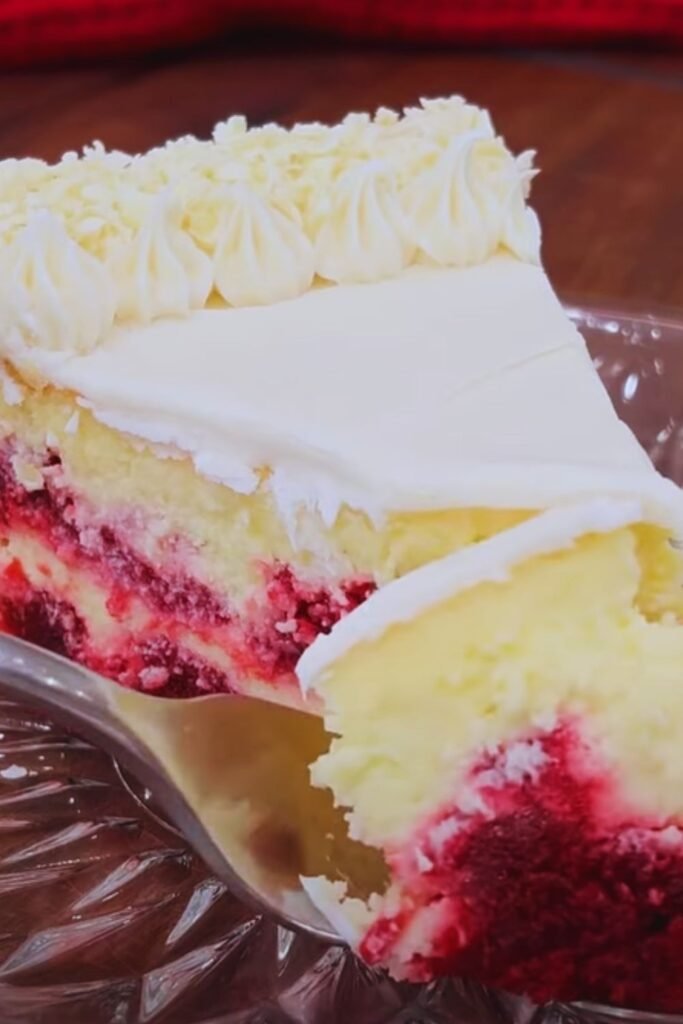
Have you ever found yourself torn between ordering cheesecake or red velvet cake for dessert? I certainly have, and it’s a dilemma that used to leave me genuinely stressed at restaurants. Well, stress no more! Today I’m sharing my absolute favorite recipe that combines these two iconic desserts into one showstopping creation: Red Velvet Cheesecake Cake.
This stunning layered dessert features moist red velvet cake layers sandwiching a creamy New York-style cheesecake, all wrapped in tangy cream cheese frosting. It’s the ultimate special occasion dessert that never fails to impress guests at dinner parties, holiday gatherings, or birthdays.
I’ve spent years perfecting this recipe, troubleshooting every possible issue to ensure your cake turns out perfectly the first time. From preventing the cheesecake from cracking to achieving that signature red velvet color without using an entire bottle of food coloring, I’ve got you covered with all the tips and tricks you need.
What Makes This Red Velvet Cheesecake Cake Special
Before diving into the recipe, let’s talk about what makes this particular red velvet cheesecake cake worth the effort:
- It features a real cheesecake layer, not just cream cheese frosting
- The red velvet cake layers are moist and tender with just the right amount of cocoa
- The cream cheese frosting has the perfect balance of sweetness and tanginess
- The recipe includes make-ahead options to divide the work over multiple days
- Each component is foolproof with detailed instructions
The Essential Components
This showstopper consists of three main components:
- Red velvet cake layers – Moist, tender cake with that signature hint of cocoa and vibrant red color
- Cheesecake layer – Creamy, tangy New York-style cheesecake that holds its shape when sliced
- Cream cheese frosting – Velvety, tangy frosting that ties everything together
Let’s break down each component with detailed instructions and tips to ensure success.
Red Velvet Cake Layers Recipe
Let’s start with the iconic red velvet cake layers. This recipe makes enough for two 9-inch layers that are moist, tender, and hold up well when layered with cheesecake.
Ingredients for Red Velvet Cake:
- 2½ cups all-purpose flour
- 3 tablespoons natural unsweetened cocoa powder (not Dutch-processed)
- 1½ teaspoons baking soda
- 1 teaspoon salt
- 1½ cups granulated sugar
- 1 cup vegetable oil
- 2 large eggs, room temperature
- 1 cup buttermilk, room temperature
- 2 tablespoons liquid red food coloring (or 1 tablespoon gel food coloring)
- 1 teaspoon white vinegar
- 2 teaspoons pure vanilla extract
- ½ teaspoon instant espresso powder (optional, enhances chocolate flavor)
Step-by-Step Instructions:
- Preheat your oven to 350°F (175°C). Grease two 9-inch round cake pans, line the bottoms with parchment paper, then grease the parchment paper.
- In a medium bowl, whisk together the flour, cocoa powder, baking soda, and salt. Set aside.
- In a large bowl using an electric mixer, beat together the sugar and oil until well combined, about 2 minutes.
- Add the eggs one at a time, beating well after each addition.
- In a separate small bowl, combine the buttermilk, red food coloring, vinegar, vanilla extract, and espresso powder (if using).
- Alternate adding the dry ingredients and buttermilk mixture to the sugar-oil mixture, beginning and ending with the dry ingredients (3 additions of dry, 2 of wet). Mix on low speed just until combined after each addition.
- Divide the batter evenly between the prepared pans. Tap the pans gently on the counter to remove air bubbles.
- Bake for 28-32 minutes, or until a toothpick inserted in the center comes out with a few moist crumbs attached.
- Cool the cakes in the pans for 10 minutes, then remove from pans and cool completely on wire racks.
Pro Tips for Perfect Red Velvet Cake:
- Room temperature ingredients are crucial for a smooth batter
- The combination of vinegar and buttermilk activates the baking soda, which helps the cake rise and gives it a tender crumb
- Natural cocoa powder (not Dutch-processed) is acidic and reacts with the baking soda
- For the most vibrant red color, use gel food coloring rather than liquid
- Don’t overmix the batter once you add the flour, or your cake may become tough
Cheesecake Layer Recipe
The middle layer is a classic New York-style cheesecake that’s firm enough to hold up when sliced but still creamy and luscious.
Ingredients for Cheesecake Layer:
- 24 oz (3 packages) cream cheese, softened to room temperature
- 1 cup granulated sugar
- 3 large eggs, room temperature
- 1 teaspoon pure vanilla extract
- ¼ cup sour cream, room temperature
- 2 tablespoons all-purpose flour
Step-by-Step Instructions:
- Preheat your oven to 325°F (165°C). Grease a 9-inch springform pan and line the bottom with parchment paper. Wrap the outside of the pan with two layers of heavy-duty aluminum foil.
- In a large bowl using an electric mixer, beat the cream cheese on medium speed until completely smooth and free of lumps, about 3 minutes.
- Add the sugar and beat until smooth and combined, about 1-2 minutes.
- Add the eggs one at a time, beating well after each addition and scraping down the sides of the bowl as needed.
- Beat in the vanilla extract and sour cream until combined.
- Add the flour and mix on low speed just until incorporated.
- Pour the batter into the prepared springform pan. Place the foil-wrapped springform pan in a larger roasting pan and add hot water to the roasting pan until it reaches about halfway up the sides of the springform pan.
- Bake for 45-50 minutes, or until the edges are set but the center still has a slight jiggle.
- Turn off the oven, crack the door open, and let the cheesecake cool in the oven for 1 hour.
- Remove from the oven, run a knife around the edge of the pan, and cool completely on a wire rack.
- Once cool, cover and refrigerate for at least 6 hours or overnight.
Pro Tips for Perfect Cheesecake:
- The water bath prevents cracks by providing a humid environment and ensuring even, gentle heat
- Room temperature ingredients are absolutely essential for a smooth cheesecake
- Avoid overmixing after adding the eggs as this can incorporate too much air and cause cracks
- Cooling the cheesecake gradually prevents dramatic temperature changes that can cause cracks
- Make the cheesecake a day ahead for best results and easier assembly
Cream Cheese Frosting Recipe
This classic cream cheese frosting is tangy, smooth, and pipes beautifully. It’s the perfect complement to both the red velvet cake and the cheesecake layer.
Ingredients for Cream Cheese Frosting:
- 16 oz (2 packages) cream cheese, softened but still cool
- 1 cup (2 sticks) unsalted butter, softened but still cool
- 5 cups powdered sugar, sifted
- 2 teaspoons pure vanilla extract
- ¼ teaspoon salt
Step-by-Step Instructions:
- In a large bowl using an electric mixer, beat the cream cheese and butter together on medium-high speed until smooth and creamy, about 2-3 minutes.
- With the mixer on low speed, gradually add the sifted powdered sugar, vanilla extract, and salt.
- Once all ingredients are incorporated, increase the speed to medium-high and beat for 2 more minutes until light and fluffy.
- If the frosting is too soft for spreading or piping, refrigerate for 20-30 minutes before using.
Pro Tips for Perfect Cream Cheese Frosting:
- Use cream cheese and butter that are softened but still cool to the touch
- Always sift the powdered sugar to avoid lumps
- Don’t overbeat the frosting as it can become too soft
- If the frosting becomes too soft while working with it, refrigerate for 15-20 minutes to firm it up
Cake Assembly Instructions
Now comes the exciting part – bringing all these components together to create your showstopping red velvet cheesecake cake!
You’ll Need:
- 2 layers of red velvet cake, completely cooled
- 1 cheesecake layer, completely chilled
- Cream cheese frosting
- Optional: Red velvet cake crumbs for decoration
- Optional: Fresh berries for garnish
Step-by-Step Assembly:
- Level the red velvet cake layers if needed using a serrated knife to create flat surfaces.
- Place one red velvet cake layer on a cake board or serving plate. Apply a thin layer of frosting on top.
- Remove the cheesecake from the springform pan and peel off the parchment paper. Carefully place the cheesecake layer on top of the frosted red velvet layer.
- Apply another thin layer of frosting on top of the cheesecake layer.
- Place the second red velvet cake layer on top of the cheesecake layer, bottom side up (this gives you a nice flat top).
- Apply a thin crumb coat of frosting all over the cake and refrigerate for 30 minutes.
- Apply the final layer of frosting, smoothing the sides and top.
- Decorate as desired with extra frosting, red velvet cake crumbs, or fresh berries.
- Refrigerate the assembled cake for at least 2 hours before serving to allow all the layers to set.
Pro Tips for Perfect Assembly:
- Freeze the red velvet cake layers for 30 minutes before assembly to make them easier to handle
- Use a cake turntable if you have one for easier frosting application
- A bench scraper works wonderfully for smoothing the sides of the cake
- If the cheesecake layer is slightly larger than the cake layers, trim it to match the size
Make-Ahead and Storage Information
One of the best things about this cake is that you can break up the work over several days:
| Component | Make-Ahead Time | Storage Method |
|---|---|---|
| Red Velvet Cake Layers | Up to 2 days ahead | Wrap tightly in plastic wrap and store at room temperature |
| Red Velvet Cake Layers (longer storage) | Up to 1 month ahead | Wrap tightly in plastic wrap and aluminum foil and freeze |
| Cheesecake Layer | Up to 3 days ahead | Keep in springform pan, covered, in refrigerator |
| Cream Cheese Frosting | Up to 3 days ahead | Store in airtight container in refrigerator; bring to room temp and rewhip before using |
| Assembled Cake | Up to 2 days ahead | Store covered in refrigerator |
| Leftover Cake | Up to 5 days | Store covered in refrigerator |
The assembled cake can also be frozen for up to 2 months. Freeze unwrapped until solid, then wrap tightly in plastic wrap and aluminum foil. Thaw overnight in the refrigerator before serving.

Troubleshooting Common Issues
Even with the best instructions, things can sometimes go wrong. Here are solutions to common issues:
Red Velvet Cake Problems:
- Cake is dry: Most likely overbaked. Check your oven temperature with an oven thermometer and reduce baking time next attempt.
- Cake is dense: Could be overmixing after adding flour or using expired leavening agents. Make sure your baking soda is fresh.
- Color isn’t vibrant: Try gel food coloring instead of liquid, or make sure you’re using natural cocoa powder, not Dutch-processed.
Cheesecake Problems:
- Cheesecake cracked: Likely baked at too high a temperature or cooled too quickly. Make sure to use a water bath and cool gradually.
- Cheesecake is too soft: May have been underbaked or not chilled long enough. Ensure it’s refrigerated at least 6 hours before assembly.
- Cheesecake sticks to the pan: Make sure to line the bottom with parchment and run a knife around the edges before removing from the pan.
Frosting Problems:
- Frosting is too soft: Ingredients were too warm or wasn’t chilled enough. Refrigerate for 30 minutes before trying again.
- Frosting has lumps: Cream cheese or butter wasn’t softened properly, or powdered sugar wasn’t sifted. For quick fixes, sieve the frosting or blend with an immersion blender.
- Frosting slides off cake: Layers weren’t cooled completely before assembly. Chill the cake to firm everything up.
Serving Suggestions
This cake is a showstopper on its own, but here are some serving suggestions to take it to the next level:
- Serve with fresh raspberries or strawberries on the side
- Add a drizzle of high-quality chocolate sauce to each plate
- A dollop of freshly whipped cream pairs beautifully with the rich flavors
- For coffee lovers, a shot of espresso on the side creates a perfect flavor pairing
- Hot tea with milk also complements the flavors nicely
This cake should be served chilled but not ice-cold. I recommend removing it from the refrigerator about 30 minutes before serving to allow the flavors to fully develop.

Nutritional Information
For those who are curious about the nutritional content, here’s a breakdown per serving (assuming 12 slices per cake):
| Nutrient | Amount per Serving |
|---|---|
| Calories | Approximately 650-700 |
| Fat | 42g |
| Carbohydrates | 65g |
| Protein | 8g |
| Sugar | 48g |
| Sodium | 450mg |
| Fiber | 1g |
Please note that these values are approximate and can vary based on specific ingredients used.
Variations to Try
Once you’ve mastered the basic recipe, try these variations to keep things interesting:
- White Chocolate Red Velvet: Add white chocolate chips to the red velvet batter and white chocolate ganache between layers
- Chocolate Chip Cheesecake: Fold mini chocolate chips into the cheesecake batter
- Raspberry Swirl: Add a raspberry swirl to the cheesecake layer
- Oreo Crust: Add a chocolate cookie crust to the bottom of the cheesecake layer
- Salted Caramel: Drizzle salted caramel between the layers and on top of the cake
- Holiday Version: Add peppermint extract to the frosting and garnish with crushed candy canes for a festive touch
Equipment You’ll Need
Having the right tools makes this recipe much easier to execute:
- Two 9-inch round cake pans
- One 9-inch springform pan
- Electric mixer (stand or handheld)
- Large mixing bowls
- Measuring cups and spoons
- Spatulas and whisk
- Parchment paper
- Cake turntable (optional but helpful)
- Offset spatula
- Bench scraper for smooth frosting
- Roasting pan for water bath
- Heavy-duty aluminum foil
- Cooling racks
- Cake board (optional)
- Pastry bags and tips for decoration (optional)
Frequently Asked Questions
Q: Can I make this cake without food coloring?
You can skip the food coloring, but your cake won’t have the signature red color. The cake will taste the same but will be a light brown color from the cocoa powder.
Q: Can I use Dutch-processed cocoa powder instead of natural cocoa powder?
I don’t recommend it. Natural cocoa powder is acidic and reacts with the baking soda in this recipe. Dutch-processed cocoa is neutralized and won’t provide the same rise or flavor.
**Q: Can I make this in a 13