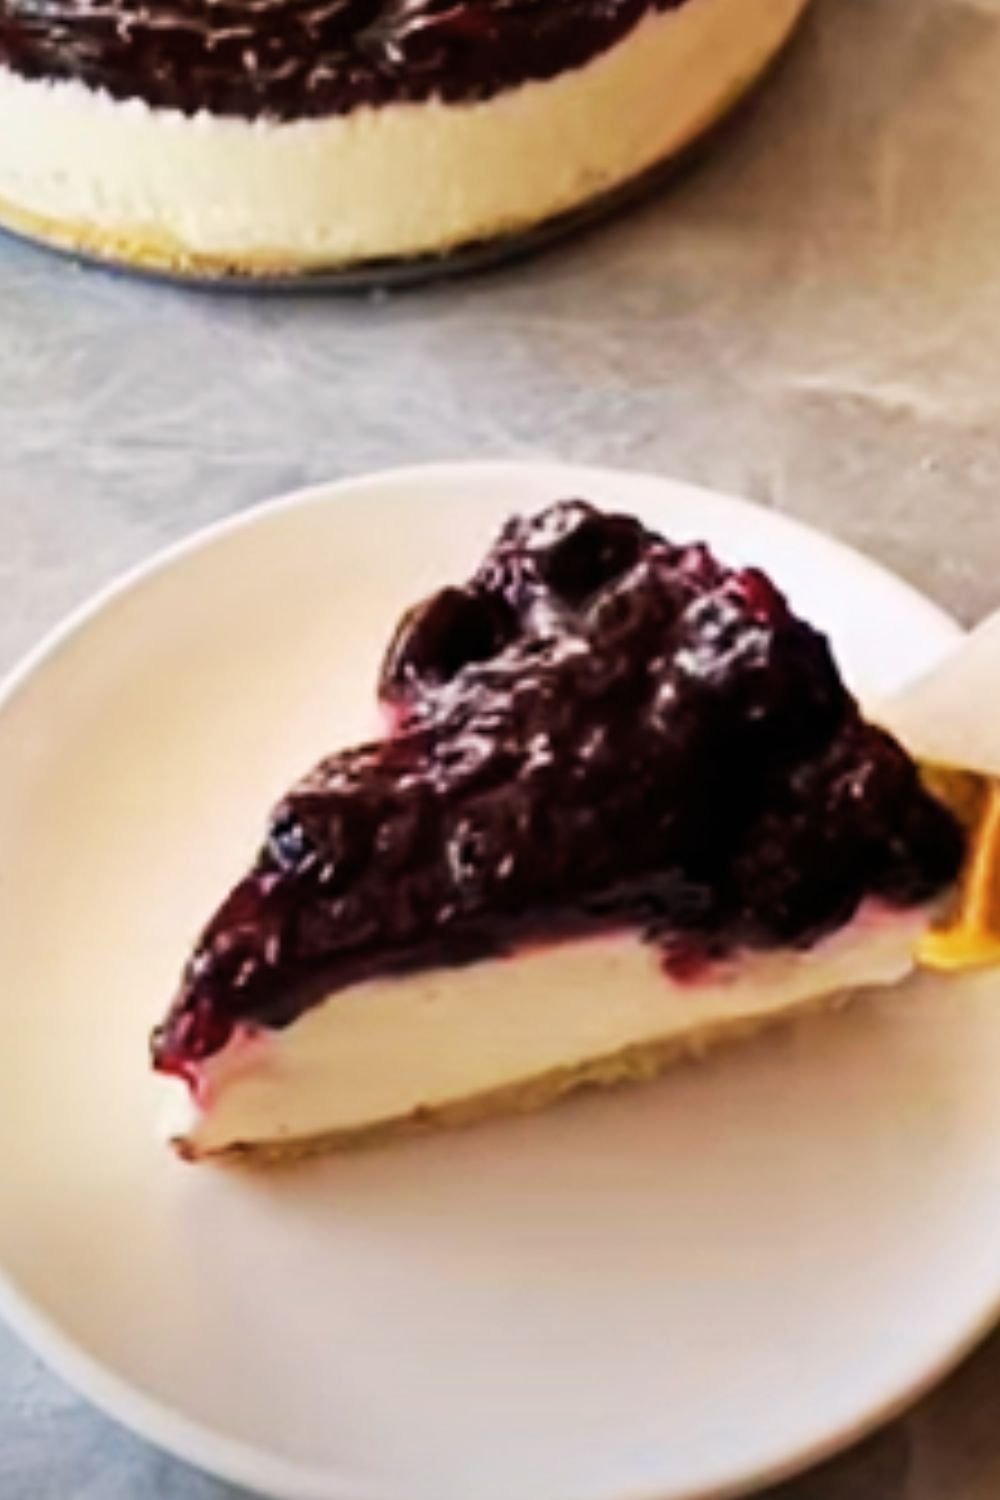
There’s something magical about the combination of creamy cheesecake and sweet-tart blueberries that makes my heart skip a beat. I’ve been perfecting my blueberry cheesecake recipe for years, and today I’m thrilled to share my foolproof method that delivers spectacular results without complicated techniques. This easy blueberry cheesecake is perfect for beginners yet impressive enough for special occasions. Let me guide you through creating this delightful dessert that will have everyone asking for seconds!
Why This Blueberry Cheesecake Recipe Works
Before diving in, let me tell you why this particular recipe stands out:
- Foolproof method: I’ve simplified traditional cheesecake techniques while maintaining that perfect texture
- No water bath required: My technique eliminates this often troublesome step
- Minimal ingredients: Everything you need is probably already in your pantry
- Make-ahead friendly: Perfect for planning your dessert in advance
- Show-stopping appearance: The vibrant blueberry topping makes this dessert truly Instagram-worthy
Essential Ingredients for Blueberry Cheesecake
Let’s break down what you’ll need to create this delicious dessert:
For the Graham Cracker Crust:
- 2 cups graham cracker crumbs (about 15-16 full sheets)
- 1/4 cup granulated sugar
- 1/2 cup (1 stick) unsalted butter, melted
For the Cheesecake Filling:
- 32 oz (4 packages) cream cheese, at room temperature
- 1 1/3 cups granulated sugar
- 1/2 cup sour cream, at room temperature
- 2 teaspoons vanilla extract
- 4 large eggs, at room temperature
- 2 tablespoons all-purpose flour
For the Blueberry Topping:
- 3 cups fresh blueberries (frozen works too)
- 1/2 cup granulated sugar
- 2 tablespoons lemon juice
- 2 tablespoons cornstarch
- 3 tablespoons water
- 1 teaspoon lemon zest
Equipment You’ll Need
A successful cheesecake requires the right tools. Here’s what I recommend having on hand:
- 9-inch springform pan
- Electric mixer (stand or handheld)
- Large mixing bowls
- Measuring cups and spoons
- Spatula
- Medium saucepan (for the blueberry topping)
- Aluminum foil
- Cooling rack
Temperature Matters: Key Ingredient Preparation
I can’t stress this enough: room temperature ingredients are crucial for a smooth cheesecake. Here’s why:
- Room temperature cream cheese: Blends smoothly without lumps
- Room temperature eggs: Incorporate evenly into the batter
- Room temperature sour cream: Mixes seamlessly with other ingredients
To quickly bring ingredients to room temperature:
- Place cream cheese blocks (still wrapped) in warm water for 10-15 minutes
- Place eggs in warm (not hot) water for 5-10 minutes
- Measure out sour cream 30 minutes before starting
Detailed Instructions: Step-by-Step Process
Preparing the Perfect Graham Cracker Crust
- Preheat your oven to 325°F (163°C).
- In a medium bowl, combine graham cracker crumbs and sugar.
- Pour in melted butter and mix until the mixture resembles wet sand.
- Press the mixture firmly into the bottom and slightly up the sides of a 9-inch springform pan. I like to use the bottom of a measuring cup for even compaction.
- Bake the crust for 10 minutes, then remove and let cool completely.
Pro Tip: For extra insurance against leaks, wrap the outside of your springform pan with aluminum foil before adding the crust.
Creating the Creamy Cheesecake Filling
- In a large mixing bowl, beat the cream cheese on medium-low speed until completely smooth and lump-free, about 2-3 minutes. Don’t rush this step – it’s essential for a silky-smooth cheesecake!
- Add sugar and beat for another 1-2 minutes until well incorporated.
- Add sour cream and vanilla extract, mixing until just combined.
- Beat in the eggs one at a time on low speed, incorporating each completely before adding the next. Over-mixing at this stage can lead to cracks, so be gentle.
- Sprinkle in the flour and mix on low just until incorporated.
- Pour the filling over the cooled crust and smooth the top with a spatula.
Pro Tip: Tap the pan gently on the counter a few times to release any air bubbles trapped in the batter.
Baking Method for Crack-Free Cheesecake
- Place the cheesecake on the middle rack of your preheated 325°F (163°C) oven.
- Bake for 55-65 minutes, or until the edges are set but the center still has a slight jiggle (it should move as one unit, not be liquidy).
- Without opening the oven door, turn off the heat and let the cheesecake sit in the cooling oven for 1 hour.
- After an hour, crack the oven door open and let the cheesecake cool for another 30 minutes.
- Remove from oven and run a thin knife around the edge of the pan to prevent sticking as it cools.
- Cool completely at room temperature (about 2-3 hours).
The Secret to Avoiding Cracks: The gradual cooling process prevents sudden temperature changes that can cause the cheesecake to crack.
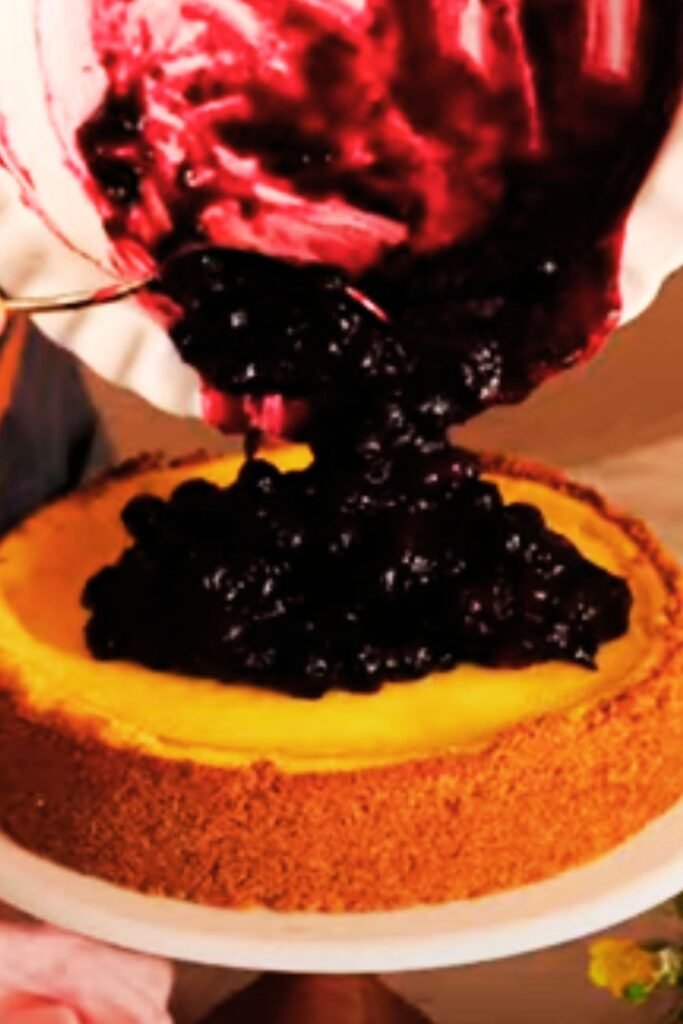
Making the Perfect Blueberry Topping
- In a medium saucepan, combine 2 cups of blueberries, sugar, and lemon juice.
- Cook over medium heat until the berries begin to break down and release their juices, about 5-7 minutes.
- In a small bowl, whisk together cornstarch and water to create a slurry.
- Slowly pour the cornstarch mixture into the blueberry mixture, stirring constantly.
- Continue cooking for another 2-3 minutes, until the mixture thickens and becomes glossy.
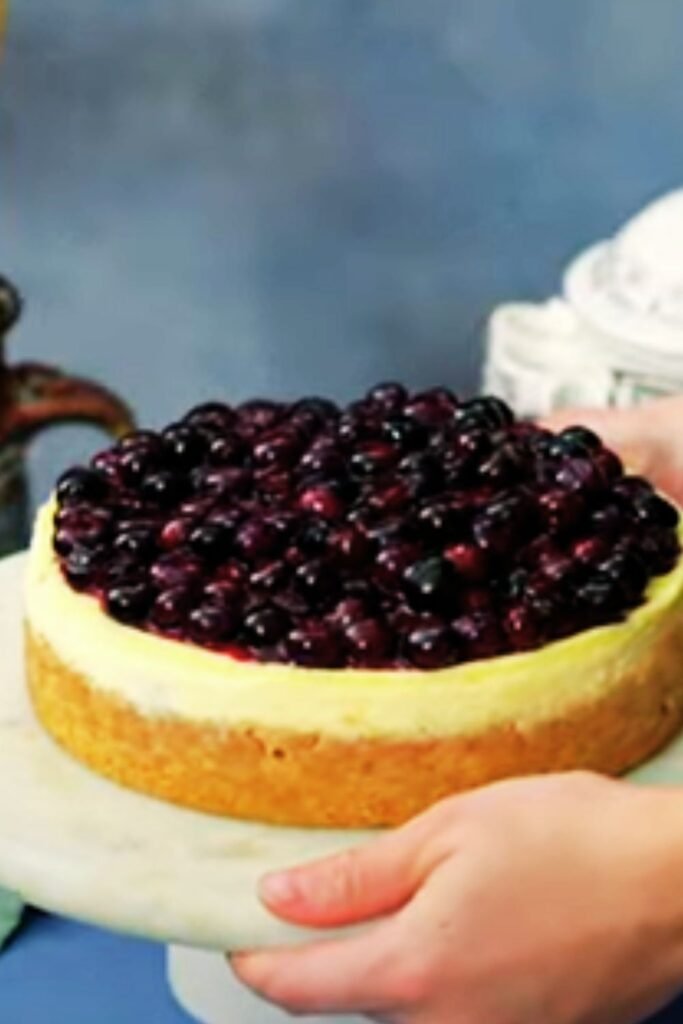
- Remove from heat and stir in lemon zest and remaining 1 cup of fresh blueberries.
- Allow to cool completely before spreading over your cheesecake.
Pro Tip: Make the topping while the cheesecake bakes, but don’t add it until the cheesecake has chilled completely in the refrigerator.
Chilling & Final Assembly
- Once the cheesecake has cooled to room temperature, cover it loosely with plastic wrap and refrigerate for at least 6 hours, but preferably overnight.
- When ready to serve, carefully remove the sides of the springform pan.
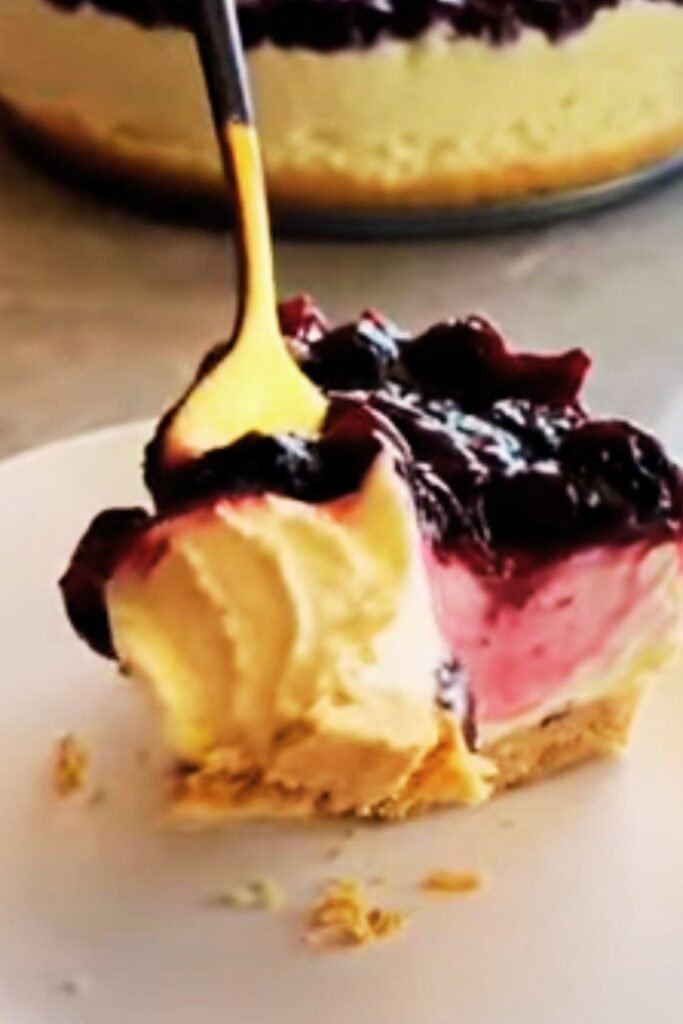
- Spoon the cooled blueberry topping over the chilled cheesecake, spreading it to the edges.
- For the best presentation, leave a small border of cheesecake visible around the edge.
Troubleshooting: Common Cheesecake Problems Solved
| Problem | Possible Cause | Solution |
|---|---|---|
| Cracked surface | Overbeating the eggs | Mix on low speed just until incorporated |
| Baking at too high temperature | Ensure oven is properly calibrated at 325°F | |
| Cooling too quickly | Follow the gradual cooling method in the recipe | |
| Lumpy filling | Cold cream cheese | Ensure all dairy is at room temperature |
| Insufficient mixing | Beat cream cheese until completely smooth before adding other ingredients | |
| Soggy crust | Underbaking | Pre-bake the crust for the full 10 minutes |
| Filling leakage | Wrap the outside of the pan with foil | |
| Topping too runny | Insufficient cornstarch | Add an extra teaspoon of cornstarch slurry |
| Undercooked | Continue cooking until properly thickened | |
| Cheesecake too soft | Underbaking | Look for set edges but slightly jiggly center when done |
| Insufficient chilling | Chill for at least 6 hours, preferably overnight |
Smart Make-Ahead Options
One thing I love about cheesecake is its make-ahead friendly nature. Here’s my timeline for stress-free preparation:
- Up to 2 days before serving: Bake the cheesecake and store in the refrigerator, covered
- Up to 1 day before serving: Prepare the blueberry topping and store separately
- 4-6 hours before serving: Add the blueberry topping to the chilled cheesecake
- Just before serving: Let the cheesecake sit at room temperature for 30 minutes for the best flavor and texture
Creative Variations to Try
Once you’ve mastered the basic recipe, try these delicious variations:
Lemon Blueberry Cheesecake
Add 1 tablespoon of lemon zest and 2 tablespoons of lemon juice to the cheesecake batter for a bright, citrusy twist.
Swirled Blueberry Cheesecake
Reserve 1/2 cup of blueberry mixture (before adding cornstarch) and swirl it into the cheesecake batter before baking.
Mini Blueberry Cheesecakes
Use a muffin tin lined with paper liners and reduce baking time to 20-25 minutes for adorable individual servings.
No-Bake Version
For hot summer days, try adapting this to a no-bake version using gelatin to set the filling instead of eggs.
Serving Suggestions
The perfect blueberry cheesecake deserves the perfect presentation. Here are my favorite ways to serve this showstopper:
- Add a dollop of freshly whipped cream on each slice
- Garnish with additional fresh blueberries and a sprig of mint
- Serve with a small pitcher of warm blueberry sauce on the side for guests to add extra if desired
- Pair with a cup of strong coffee or tea
- For a special brunch, serve alongside a sparkling non-alcoholic fruit punch
Storage & Freezing Instructions
Refrigerator Storage
- Store leftover cheesecake in an airtight container in the refrigerator for up to 5 days.
- If storing the whole cheesecake, cover loosely with plastic wrap or place in a cake keeper.
Freezing Instructions
- For the best results, freeze the cheesecake without the topping.
- Place the completely cooled cheesecake (still on the bottom of the springform pan) in the freezer until firm, about 1 hour.
- Remove from freezer, wrap tightly in plastic wrap, then in aluminum foil.
- Label with the date and freeze for up to 2 months.
- Thaw overnight in the refrigerator and add fresh blueberry topping before serving.
Pro Tip: You can also freeze individual slices! Wrap each slice separately for easy single servings.
Nutritional Information
While this cheesecake is definitely a special treat, it’s helpful to know what you’re enjoying. Here’s the approximate nutritional breakdown per slice (based on 12 slices):
| Nutrient | Amount per Slice |
|---|---|
| Calories | 450 |
| Total Fat | 28g |
| Saturated Fat | 16g |
| Cholesterol | 145mg |
| Sodium | 300mg |
| Total Carbohydrates | 42g |
| Dietary Fiber | 1g |
| Sugars | 35g |
| Protein | 7g |
Why Blueberries Make This Cheesecake Special
Blueberries aren’t just delicious – they’re nutritional powerhouses! Here’s why they’re my favorite cheesecake topping:
- Antioxidants: Blueberries have one of the highest antioxidant capacities among common fruits
- Vitamin C: Supports immune function and skin health
- Natural sweetness: Their natural sweetness means we can use less added sugar
- Color: The vibrant purple-blue hue creates a stunning presentation
- Versatility: Work beautifully whether fresh or frozen
Frequently Asked Questions
Q: Can I use frozen blueberries for both the filling and topping? A: Absolutely! No need to thaw them first. For the topping, you might need to cook it slightly longer to achieve the proper thickness.
Q: My cheesecake cracked! What do I do? A: Don’t worry! That’s exactly why we have the blueberry topping – it will cover any imperfections. Next time, try following the slow cooling method more precisely.
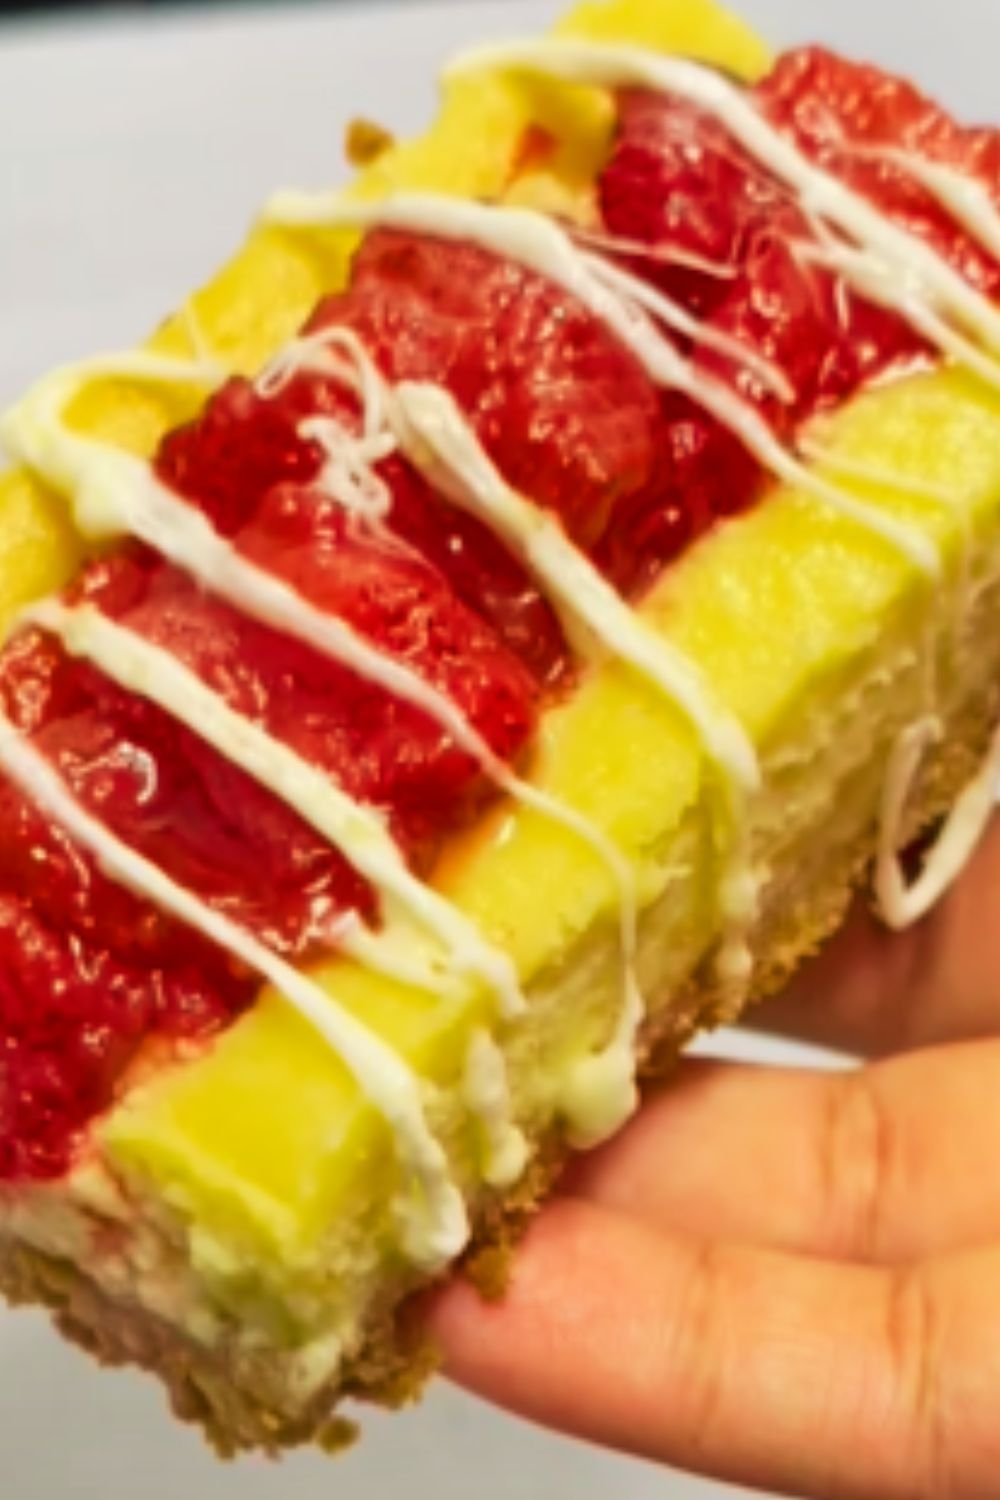
Q: Can I make this recipe with other berries? A: Yes! Strawberries, raspberries, or a mixed berry blend work beautifully with the same measurements and technique.
Q: How do I know when my cheesecake is done baking? A: The edges should be set and slightly puffed, but the center should still have a slight jiggle (like Jell-O, not like liquid). It will continue to set as it cools.
Q: Can I make this cheesecake without a springform pan? A: While a springform pan is ideal, you can use a deep-dish pie plate in a pinch. You won’t be able to remove the whole cheesecake from the pan, but it will still taste delicious!
Q: My family doesn’t like graham cracker crust. Any alternatives? A: Absolutely! Try using crushed vanilla wafers, digestive biscuits, or even gingersnaps for a different flavor profile.
Q: Can I reduce the sugar in this recipe? A: Yes, you can reduce the sugar in the filling by up to 1/4 cup without significantly affecting the texture. For the topping, the sugar helps create the proper consistency, so I wouldn’t reduce it by more than 2 tablespoons.
Q: How far in advance can I make this cheesecake? A: The cheesecake (without topping) can be made up to 3 days in advance and stored in the refrigerator. The topping can be made 1-2 days ahead and stored separately, then added before serving.
My Personal Tips for Cheesecake Success
After years of making this recipe, I’ve gathered some insider tips that make all the difference:
- Cream cheese brand matters: I find that Philadelphia cream cheese produces the most consistent results.
- Room temperature truly matters: I set out all of my refrigerated ingredients at least 2 hours before starting.
- Don’t rush the mixing: Take your time to properly beat the cream cheese until it’s absolutely smooth before adding other ingredients.
- Scrape that bowl: Use a rubber spatula to scrape down the sides and bottom of the bowl frequently to ensure everything is well mixed.
- Bake on the middle rack: This position provides the most even heat distribution.
- Judge doneness visually: Every oven is different, so watch for the signs of doneness rather than relying solely on time.
- Be patient: The hardest part is waiting for the cheesecake to chill completely, but it’s worth it!
In Conclusion
There’s something deeply satisfying about creating a perfect blueberry cheesecake from scratch. The contrast between the rich, creamy filling and the sweet-tart blueberry topping creates a dessert that’s greater than the sum of its parts. This recipe has been my go-to for years, refined through dozens of iterations to create the perfect balance of simplicity and spectacular results.
Whether you’re making this for a special occasion or just because it’s Tuesday, I hope this blueberry cheesecake brings as much joy to your table as it has to mine. Remember that even if your cheesecake isn’t picture-perfect the first time, it will still be delicious – and practice makes perfect!
Happy baking!