Have you ever tasted a dessert so velvety smooth that it feels like pure luxury dancing on your tongue? That’s exactly what you’ll experience with this authentic Italian pudding recipe I’m about to share. I’ve spent years perfecting this traditional treat, and today I’m revealing all my secrets for creating the most indulgent, silky-smooth pudding that will transport you straight to the charming streets of Italy.
The Magic Behind Italian Pudding
Italian pudding, or “budino” as it’s called in Italy, isn’t just any dessert. It’s a celebration of simplicity and quality ingredients coming together to create something truly extraordinary. Unlike many American puddings that rely heavily on cornstarch, authentic Italian pudding gets its luxurious texture from egg yolks and slow, patient cooking.
I remember the first time I tasted real Italian pudding in a tiny café tucked away in Florence. The owner, an elderly woman with hands that told stories of decades in the kitchen, served it in small glass cups with just a sprinkle of sea salt on top. That first spoonful changed everything I thought I knew about desserts. It was rich yet light, sweet but complex, and utterly unforgettable.
What Makes Italian Pudding Special?
What distinguishes Italian pudding from other custard-based desserts is its perfect balance of flavors and silky texture. The Italians have mastered the art of creating desserts that satisfy without overwhelming the palate. Here’s what makes it stand out:
- Pure Ingredients: Using the highest quality dairy, real vanilla, and farm-fresh eggs makes all the difference
- Perfect Texture: Neither too firm nor too loose, authentic budino has a consistency that’s just right
- Balanced Sweetness: Italian desserts rarely overwhelm with sugar, allowing other flavors to shine
- Versatility: While traditional flavors like vanilla and chocolate reign supreme, the base recipe adapts beautifully to seasonal ingredients
Essential Ingredients for Authentic Italian Pudding
Before we dive into the process, let’s talk ingredients. This is where your pudding’s soul is born, so I never compromise on quality. Here’s what you’ll need for the most luxurious Italian pudding experience:
| Ingredient | Quantity | Notes |
|---|---|---|
| Whole milk | 2 cups | The fat content is crucial for richness |
| Heavy cream | 1 cup | Look for cream without additives |
| Egg yolks | 6 large | Room temperature works best |
| Granulated sugar | ⅔ cup | Superfine dissolves more easily |
| Cornstarch | 3 tablespoons | Just enough for stability |
| Sea salt | ¼ teaspoon | Enhances all other flavors |
| Vanilla bean | 1 whole pod | Split and scraped (or 2 tsp pure extract) |
| Unsalted butter | 2 tablespoons | Cold, cut into small pieces |
| Dark chocolate | 4 oz (optional) | 70% cocoa solids for chocolate version |
Equipment You’ll Need
Having the right tools makes creating this pudding much easier:
- Heavy-bottomed saucepan (prevents scorching)
- Whisk (silicon-coated preferred)
- Wooden spoon
- Fine-mesh strainer
- Rubber spatula
- Glass serving dishes or ramekins
- Instant-read thermometer (optional but helpful)
The Step-by-Step Process
Now let’s get into the magical process of creating this heavenly dessert. I’ve made this countless times, and these exact steps will ensure your success.
Step 1: Prepare Your Base
- In your heavy-bottomed saucepan, combine the milk and cream
- If using a vanilla bean, split it lengthwise, scrape out the seeds, and add both the seeds and pod to the milk mixture
- Heat this mixture over medium-low heat until small bubbles form around the edges (about 180°F if using a thermometer)
- Remove from heat and let the vanilla infuse for 15 minutes (skip this waiting period if using extract)
Step 2: Prepare Your Egg Mixture
While your milk mixture is infusing with vanilla goodness, it’s time to work on the egg component:
- In a medium bowl, whisk together the egg yolks and sugar until the mixture becomes pale yellow and slightly thickened
- Add the cornstarch and salt, whisking until completely smooth with no lumps
- This is your moment to be thorough—lumps now mean lumps in your final pudding!
Step 3: The Tempering Process
This step requires patience but is absolutely crucial for that perfect texture:
- Slowly pour about ¼ of the warm milk mixture into the egg mixture, whisking constantly
- This “tempering” process prevents the eggs from scrambling
- Continue adding the milk gradually while whisking continuously
- Once fully combined, pour the entire mixture back into the saucepan
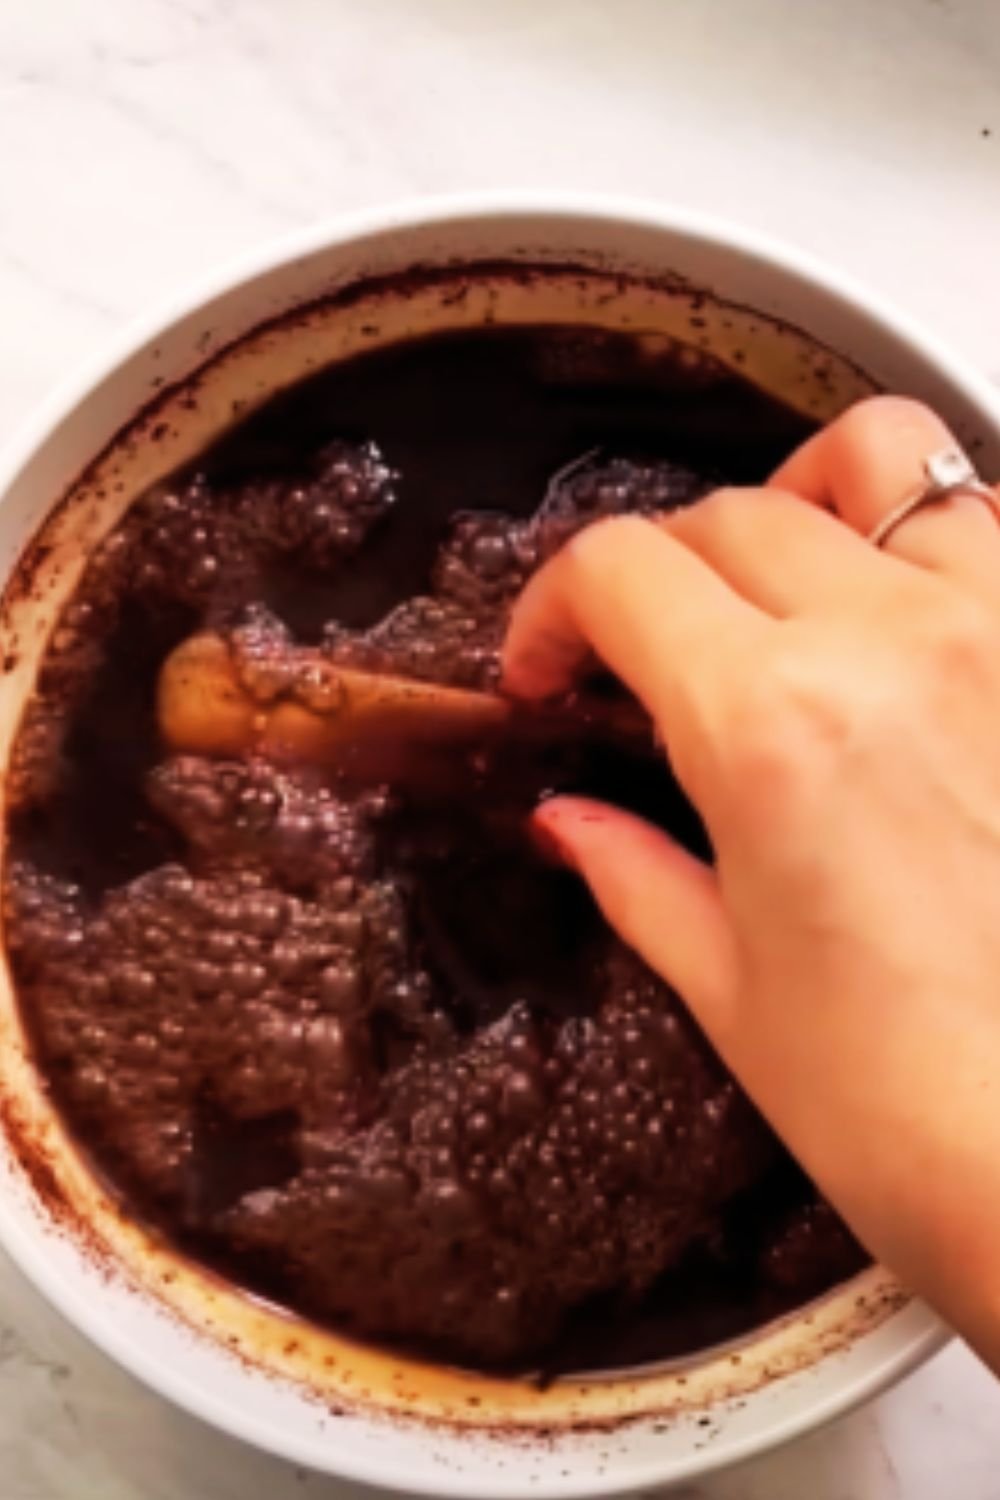
Step 4: The Cooking Magic
- Return the saucepan to medium-low heat
- Cook, stirring CONSTANTLY with a wooden spoon, in a figure-eight motion
- Pay special attention to the bottom and corners of the pan where scorching can occur
- The mixture will gradually thicken—this takes about 8-12 minutes
- You’ll know it’s ready when it coats the back of your spoon and a line drawn through it with your finger remains clear
- If using a thermometer, the pudding should reach 175-180°F
Step 5: The Finishing Touches
- Remove from heat and immediately strain through a fine-mesh sieve into a clean bowl
- This removes any potential lumps or bits of cooked egg
- Add the cold butter pieces and stir until melted and incorporated
- If making chocolate version, add the chopped chocolate now and stir until completely melted
- If using vanilla extract instead of a bean, add it at this point
- Stir gently but thoroughly to incorporate all ingredients
Step 6: Chilling and Setting
- Pour the pudding into individual serving dishes or ramekins
- To prevent a skin from forming (unless you enjoy it!), press plastic wrap directly onto the surface
- Refrigerate for at least 4 hours, but preferably overnight
- The flavors meld and develop beautifully with time

Variations to Explore
Once you’ve mastered the classic vanilla version, here are some authentic Italian variations to try:
Chocolate Budino
Simply add 4 ounces of high-quality dark chocolate (70% cocoa solids) to the hot pudding along with the butter and stir until completely melted. The result is deeply chocolatey without being overwhelmingly sweet.
Espresso Budino
Add 2 tablespoons of espresso powder to the milk and cream mixture before heating. This creates a sophisticated coffee flavor that pairs wonderfully with the vanilla.
Lemon Budino
Add the zest of 2 lemons to the milk and cream mixture during the infusion stage, and substitute 2 tablespoons of fresh lemon juice for 2 tablespoons of the cream. The result is bright and refreshing.
Orange & Rosemary Budino
Add the zest of 1 orange and 1 sprig of fresh rosemary to the milk mixture during infusion, then remove the rosemary before tempering. This sophisticated flavor combination is unexpected and delightful.
Serving Suggestions
The beauty of Italian pudding lies in its versatility. Here are my favorite ways to serve this luxurious dessert:
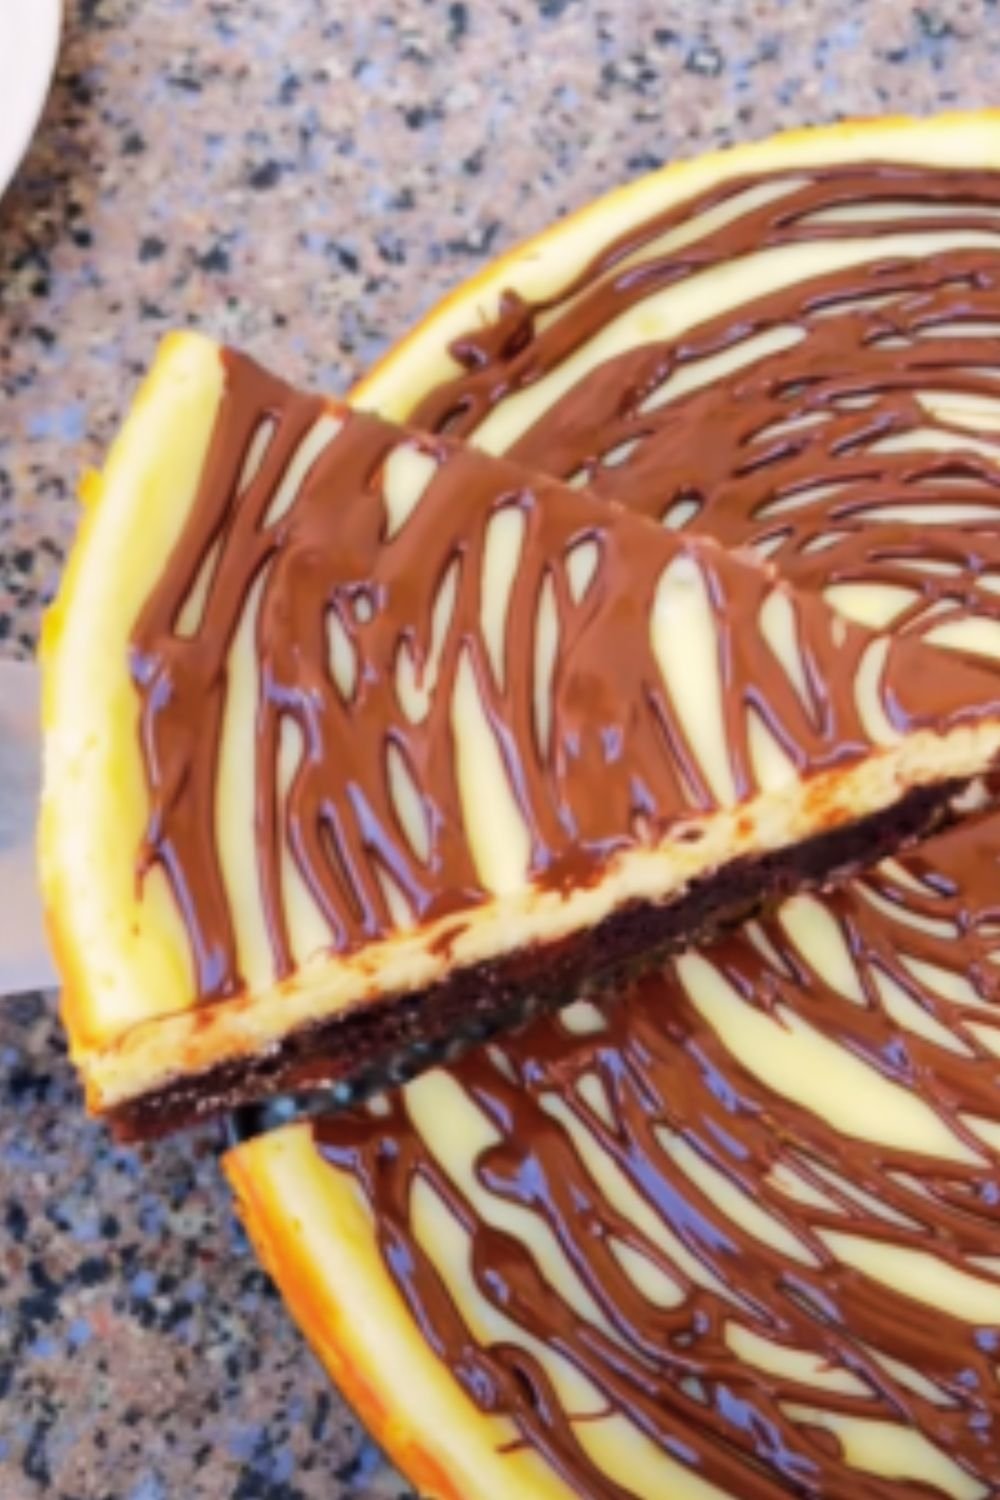
- Classic Style: Simply garnish with a light dusting of cocoa powder or grated chocolate
- Fruit Compote: Top with a spoonful of seasonal berries simmered with a touch of sugar
- Salted Caramel: Drizzle with homemade salted caramel sauce for an indulgent twist
- Toasted Nuts: Sprinkle with crushed hazelnuts or pine nuts for textural contrast
- Biscotti: Serve with a crisp almond biscotti for dipping
- Fresh Fruit: Arrange fresh berries, figs, or stone fruit slices artfully on top
- Citrus Zest: Add a pop of color and flavor with fresh lemon or orange zest
- Herb Infusion: Garnish with a tiny sprig of mint, basil, or thyme for an aromatic element

Make-Ahead and Storage Tips
One of the things I love most about Italian pudding is that it’s the perfect make-ahead dessert. Here’s how to handle storage:
- Pudding will keep in the refrigerator for up to 5 days, though it’s best within the first 3
- If you enjoy the pudding skin, leave the dishes uncovered
- For the smoothest texture, keep plastic wrap pressed directly against the surface
- Do not freeze—the texture will become grainy upon thawing
- If the pudding seems to have separated slightly after refrigeration, a gentle stir will usually restore its consistency
Troubleshooting Common Issues
Even experienced cooks can encounter challenges with pudding. Here are solutions to common problems:
Lumpy Pudding
Cause: Egg mixture not thoroughly whisked or tempering done too quickly
Solution: Always strain your final pudding. In the future, whisk egg mixture more vigorously and add hot milk even more gradually.
Runny Pudding
Cause: Not cooked long enough or to a high enough temperature
Solution: The pudding must reach at least 175°F to properly thicken. Cook a bit longer next time, and remember that it will continue to thicken as it cools.
Scorched Pudding
Cause: Heat too high or insufficient stirring
Solution: Use a heavy-bottomed pan, keep heat medium-low, and stir constantly, especially around the edges and bottom of the pan.
Skin Formation
Cause: Natural evaporation and protein coagulation at the surface
Solution: This is natural! If you dislike it, press plastic wrap directly onto the surface of the warm pudding before refrigerating.
The History Behind Italian Pudding
The roots of Italian pudding go back centuries, with variations appearing throughout different regions of Italy. Originally, these custard-based desserts were reserved for special occasions and often featured ingredients that were considered luxurious—vanilla, cinnamon, and premium-quality dairy.
What we know today as budino evolved from ancient Roman custards that were sweetened with honey rather than sugar. As trade routes expanded and sugar became more accessible, the dessert evolved into the silky, sweet treat we recognize today.
In Northern Italy, particularly around Milan and Turin, budino took on a richer character with the addition of chocolate—influenced by the region’s famed chocolate-making tradition. In Southern Italy, particularly Sicily, citrus elements became more prominent, reflecting the abundant lemon and orange groves of the area.

Nutritional Benefits
While Italian pudding is undeniably an indulgent dessert, it does offer some nutritional benefits worth mentioning:
| Nutrient | Benefit |
|---|---|
| Calcium | Supports bone health thanks to milk and cream |
| Protein | Egg yolks provide high-quality protein |
| Vitamin A | Present in egg yolks and dairy |
| Vitamin D | Found in egg yolks and fortified milk |
| Antioxidants | Present in vanilla and especially in chocolate versions |
Of course, moderation is key with any dessert, but it’s nice to know you’re getting some nutritional value along with your indulgence!
Questions & Answers
Q: Can I make this pudding dairy-free?
Yes, you can substitute the milk and cream with full-fat coconut milk (the canned variety). The flavor will be slightly different but still delicious, with a subtle coconut undertone that works beautifully with the vanilla. Use coconut oil instead of butter for the finishing touch.
Q: How do I know when the pudding is thick enough during cooking?
The perfect test is the “coating the back of a spoon” method. Dip a wooden spoon into the pudding, then run your finger through the coating on the back of the spoon. If the line remains clear and the pudding doesn’t run back together, it’s ready. This typically happens around 175-180°F.
Q: Can I make this without eggs for dietary restrictions?
Traditional Italian pudding relies heavily on egg yolks for its characteristic richness. While you can attempt versions with additional cornstarch or alternative thickeners like arrowroot, the texture and flavor will be noticeably different. If eggs are an issue, you might consider exploring Italian fruit-based desserts like panna cotta instead.
Q: My pudding seems grainy after refrigeration. What happened?
This typically happens when the pudding is overcooked or when the eggs begin to curdle during the cooking process. Next time, be even more careful during the tempering stage and consider removing the pudding from heat slightly earlier. For now, try vigorously whisking the pudding to improve the texture.
Q: Can I use this pudding as a filling for cakes or pastries?
Absolutely! Italian pudding makes an excellent filling for layer cakes, tarts, or pastries. To use as a filling, make the pudding slightly thicker by adding an additional tablespoon of cornstarch during preparation. Allow it to cool completely before using in your baking projects.
Q: How far in advance can I make this for a dinner party?
This pudding is perfect for make-ahead entertaining. I recommend preparing it 1-2 days before your event, which allows the flavors to develop fully. Keep it refrigerated with plastic wrap pressed directly against the surface, then garnish just before serving.
Final Thoughts
Creating authentic Italian pudding is truly a labor of love—one that rewards you with a dessert experience unlike any other. The process might seem meticulous, but each careful step contributes to that final moment when your spoon breaks through the surface and sinks into silky perfection.
I’ve made countless variations of this recipe over the years, serving it at everything from casual family dinners to elegant dinner parties, and it never fails to elicit sighs of pleasure and requests for seconds. There’s something almost magical about transforming such simple ingredients into something so extraordinary.
What I love most about this dessert is how it connects us to centuries of Italian culinary tradition. When you make this pudding, you’re participating in a ritual that has brought joy to generations of families gathered around tables across Italy. And now, that tradition continues in your kitchen.
So take your time, enjoy the process, and prepare to fall in love with what might just become your new favorite dessert. Buon appetito!