I’ve been maintaining my sourdough starter for over three years now, and if there’s one thing I’ve learned, it’s that sourdough discard is liquid gold. Every time I feed my starter, I’m left with this tangy, flavorful mixture that many bakers simply throw away. But not me – and after reading this article, you won’t either.
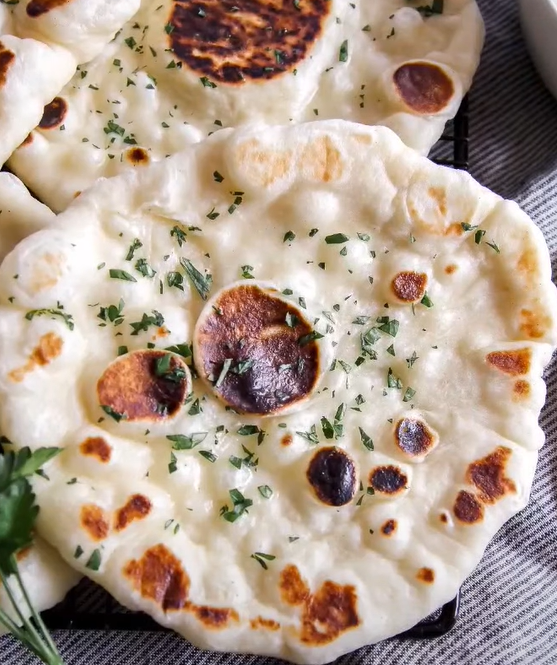
Today, I’m sharing my absolute favorite way to use sourdough discard: a simple, no-wait flatbread that’s ready in under 30 minutes. This recipe uses 100% discard (no additional flour needed!) and creates the most incredibly soft, chewy flatbread with that signature sourdough tang we all love.
What Makes This Flatbread Special
Unlike traditional sourdough recipes that require hours of rising time, my discard flatbread is what I call an “instant gratification” recipe. The beauty lies in using the discard exactly as it is – unfed, tangy, and full of flavor. The natural acids in the discard react with baking soda to create just enough lift for a perfect flatbread texture.
I discovered this recipe during one of those weeks when my discard jar was overflowing. Instead of my usual discard pancakes, I decided to experiment with something more substantial. After several attempts and tweaks, this became my go-to recipe for quick meals, snacks, and even dinner sides.
Understanding Sourdough Discard
Sourdough Discard: The portion of sourdough starter removed before feeding, typically containing flour, water, and wild yeast cultures in various stages of fermentation.
Unfed Starter: Discard that hasn’t been refreshed with fresh flour and water, usually more acidic and tangy than active starter.
Fermentation Byproducts: The natural acids (lactic and acetic) produced during the sourdough fermentation process that give discard its characteristic tang.
The key to understanding this recipe is knowing that discard varies in consistency and tang level depending on how long it’s been since your last starter feeding. I’ve successfully made this flatbread with discard that’s been in my fridge for up to two weeks – the older the discard, the more complex the flavor.
Essential Ingredients Breakdown
| Ingredient | Amount | Purpose | Substitution Notes |
|---|---|---|---|
| Sourdough Discard | 1 cup (240g) | Main structure and flavor | Must be unfed discard |
| Baking Soda | 1/2 teaspoon | Leavening agent | Cannot substitute |
| Salt | 1/2 teaspoon | Flavor enhancement | Sea salt or kosher salt |
| Olive Oil | 2 tablespoons | Moisture and richness | Avocado oil works |
| Water | 2-4 tablespoons | Dough consistency | Add gradually |
The beauty of this recipe is its simplicity. I intentionally keep the ingredient list short because the discard is doing most of the heavy lifting in terms of flavor and structure.
Step-by-Step Instructions
Mixing the Dough
I start by combining my sourdough discard with the baking soda in a medium bowl. The reaction begins immediately – you’ll see small bubbles forming as the acid in the discard reacts with the alkaline baking soda. This is exactly what we want for that perfect texture.
Next, I add the salt and olive oil, mixing everything together with a wooden spoon or spatula. The dough will look quite wet at this stage, which is normal. I then add water one tablespoon at a time until the dough just comes together. The consistency should be slightly sticky but manageable.
Kneading Technique
Unlike traditional bread dough, this mixture requires only minimal kneading. I turn it out onto a lightly floured surface and knead for about 30 seconds – just enough to bring everything together into a cohesive ball. Over-kneading will make the flatbread tough, so I keep it brief.
Rolling and Shaping
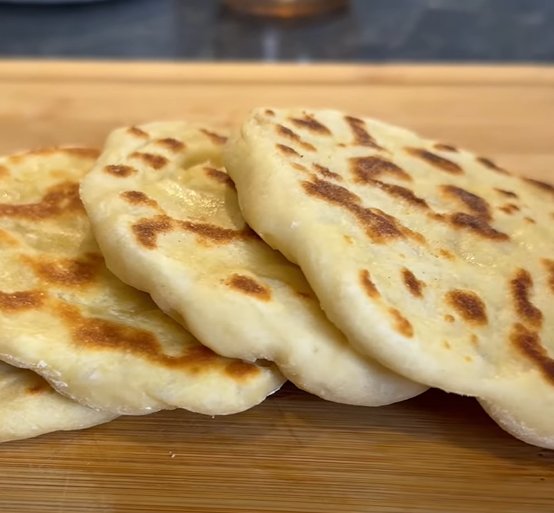
I divide the dough into 4-6 portions, depending on how large I want my flatbreads. Using a rolling pin, I roll each portion into a rough circle about 1/4 inch thick. The shape doesn’t need to be perfect – I actually prefer the rustic, irregular edges that give these flatbreads their homemade charm.
Cooking Methods Comparison
| Method | Time | Heat Level | Texture Result | My Preference |
|---|---|---|---|---|
| Cast Iron Skillet | 2-3 min per side | Medium-high | Crispy exterior, soft interior | ⭐⭐⭐⭐⭐ |
| Non-stick Pan | 3-4 min per side | Medium | Evenly soft | ⭐⭐⭐⭐ |
| Griddle | 2-3 min per side | Medium-high | Uniform browning | ⭐⭐⭐⭐ |
| Oven (450°F) | 8-10 minutes | High | Slightly drier | ⭐⭐⭐ |
My preferred method is using a well-seasoned cast iron skillet. I heat it over medium-high heat until a drop of water sizzles immediately upon contact. No oil is needed in the pan – the olive oil in the dough provides enough fat to prevent sticking.
Flavor Variations and Add-ins
One of the things I love most about this recipe is how easily it adapts to different flavor profiles. Here are my favorite variations:
Herb-Infused Flatbread
I mix in 2 tablespoons of fresh chopped herbs like rosemary, thyme, or oregano directly into the dough. The herbs distribute evenly and create beautiful flecks throughout the flatbread.
Garlic and Herb Version
For this variation, I add 2 minced garlic cloves and 1 tablespoon of dried Italian seasoning. The garlic becomes mellow and sweet when cooked, complementing the sourdough tang perfectly.
Spiced Flatbread
I incorporate 1 teaspoon each of cumin and coriander seeds (lightly crushed) for a Middle Eastern-inspired flavor. Sometimes I add a pinch of sumac for extra tang and color.
Nutritional Benefits and Analysis
| Nutrient | Per Flatbread | Daily Value % | Notes |
|---|---|---|---|
| Calories | 185 | 9% | Based on 4 servings |
| Protein | 6g | 12% | From fermented flour |
| Fiber | 3g | 12% | Varies by starter flour type |
| Iron | 2mg | 11% | Enhanced by fermentation |
| B Vitamins | Varies | 8-15% | Produced during fermentation |
The fermentation process in sourdough actually increases the bioavailability of nutrients compared to regular flour. The wild yeast and bacteria break down phytic acid, making minerals more absorbable. I find these flatbreads more satisfying and easier to digest than their commercial counterparts.
Troubleshooting Common Issues
Dough Too Sticky
If my dough feels too wet to handle, I add flour one tablespoon at a time until it’s manageable. However, I’m careful not to add too much – a slightly sticky dough produces more tender flatbreads.
Flatbread Too Dense
This usually happens when I’ve used discard that’s too thick or when I’ve over-kneaded. The solution is to add a bit more water next time and keep kneading to an absolute minimum.
Lack of Tang
If my flatbreads taste bland, it means my discard wasn’t acidic enough. I either use older discard next time or add a tablespoon of apple cider vinegar to boost the acidity.
Burning on Bottom
This indicates my heat is too high. I reduce to medium heat and cook for a slightly longer time to ensure even cooking throughout.
Storage and Reheating Guidelines
| Storage Method | Duration | Quality Retention | Reheating Instructions |
|---|---|---|---|
| Room Temperature | 2-3 days | Good | 30 seconds microwave |
| Refrigerator | 1 week | Excellent | Toaster or dry skillet |
| Freezer | 3 months | Very Good | Thaw + toaster |
| Airtight Container | 5 days | Excellent | Quick skillet warm-up |
I typically store leftover flatbreads wrapped in a clean kitchen towel at room temperature for up to three days. For longer storage, I wrap them individually in plastic wrap and freeze them. They thaw quickly and reheat beautifully in a toaster or dry skillet.
Serving Suggestions and Pairings
These versatile flatbreads work wonderfully in numerous ways:
As a Side Dish: I serve them warm alongside soups, stews, or curries. The tangy flavor complements rich, hearty dishes beautifully.
Sandwich Base: Split horizontally, these make excellent sandwich bread. I particularly love them with hummus, roasted vegetables, and fresh greens.
Appetizer Platform: Cut into wedges and topped with olive tapenade, goat cheese, or roasted red pepper spread, they make elegant appetizers.
Breakfast Option: I brush them with olive oil and sprinkle with za’atar for a Middle Eastern-inspired breakfast bread.
Pizza Base: For a quick personal pizza, I top them with sauce, cheese, and desired toppings, then broil for 2-3 minutes.
Advanced Techniques and Tips
Fermentation Enhancement
While this recipe doesn’t require waiting time, I sometimes let the mixed dough rest for 15-30 minutes at room temperature. This brief rest allows the baking soda to work more thoroughly and can result in slightly more complex flavors.
Temperature Control
I’ve found that the temperature of my discard affects the final texture. Room temperature discard mixes more easily and creates more tender flatbreads than cold discard straight from the refrigerator.
Hydration Adjustments
Different sourdough starters have varying hydration levels. My starter is maintained at 100% hydration (equal weights flour and water), but if yours is thicker or thinner, you may need to adjust the added water accordingly.
Recipe Scaling and Batch Cooking
| Batch Size | Discard Amount | Cooking Time | Storage Strategy |
|---|---|---|---|
| Single (4 pieces) | 1 cup | 15 minutes | Eat immediately |
| Double (8 pieces) | 2 cups | 25 minutes | Freeze half |
| Large (12 pieces) | 3 cups | 35 minutes | Meal prep option |
| Extra Large (16 pieces) | 4 cups | 45 minutes | Party/gathering |
I often make double batches when I have extra discard accumulating. The recipe scales perfectly, and having flatbreads in the freezer means I’m always prepared for quick meals or unexpected guests.
Seasonal and Regional Adaptations
During summer months, I incorporate fresh herbs from my garden – basil, chives, or dill work particularly well. In winter, I lean toward dried spices like smoked paprika or dried rosemary that complement hearty winter meals.
Regional flour variations also create interesting results. When I’ve used discard from starters made with whole wheat, rye, or spelt flours, each brings its own unique flavor profile to the finished flatbreads.
The Science Behind the Recipe
The magic in this recipe lies in the acid-base reaction between the sourdough discard and baking soda. The acids naturally present in fermented discard (primarily lactic and acetic acid) react with the alkaline baking soda to produce carbon dioxide gas. This creates the lift and tender texture without requiring any rising time.
The olive oil serves multiple purposes: it adds richness, helps create a tender crumb, and prevents the flatbreads from becoming too chewy. The salt not only enhances flavor but also strengthens the gluten structure, creating better texture.
Questions and Answers
Q: Can I use active sourdough starter instead of discard for this recipe?
I don’t recommend using active starter for this recipe. Active starter is at its peak fermentation and is better saved for traditional sourdough bread. Discard has the perfect acidity level for this recipe and won’t be wasted.
Q: How do I know if my discard is still good to use?
Good discard should smell tangy and yeasty, possibly with a slight alcohol smell if it’s been stored for a while. If it smells putrid, has mold, or shows any fuzzy growth, discard it completely and start fresh.
Q: Can I make this recipe gluten-free?
The recipe works best with wheat-based discard due to gluten structure. For gluten-free versions, you’d need a gluten-free sourdough starter and might need to add binding agents like xanthan gum.
Q: Why do my flatbreads turn out tough?
Tough flatbreads usually result from over-kneading or cooking at too high heat for too long. Keep kneading minimal and use medium heat for best results.
Q: Can I add cheese to the dough?
Absolutely! I’ve successfully added grated Parmesan, crumbled feta, or shredded cheddar. Add about 1/4 cup of cheese per batch and reduce salt slightly to compensate.
Q: How long can I keep discard before using it?
I’ve successfully used discard that’s been refrigerated for up to two weeks. Older discard tends to be more acidic, which actually enhances the flavor of these flatbreads.
Q: Can I cook these on a grill?
Yes! I cook them on medium heat on a clean grill grate for about 2-3 minutes per side. They develop beautiful grill marks and a slightly smoky flavor.
Q: What’s the best flour type for the starter used in this recipe?
Any flour works, but I find that bread flour or all-purpose flour creates the most reliable results. Whole grain flours add more complex flavors but may require slight hydration adjustments.
This sourdough discard flatbread recipe has become my go-to solution for using up discard while creating something genuinely delicious. The combination of simplicity, speed, and incredible flavor makes it a winner in my kitchen, and I’m confident it will become a staple in yours too. Whether you’re a seasoned sourdough baker or just starting your fermentation journey, this recipe proves that discard is anything but waste – it’s an opportunity for culinary creativity.