
The Secret to Perfectly Sautéed Spinach Every Time
Ever wondered how restaurants transform ordinary spinach into that mouthwatering side dish that has you scraping the plate clean? I’ve spent years perfecting the art of sautéed spinach, and I’m excited to share all my secrets with you today.
Sautéed spinach might seem simple, but there’s a world of difference between the limp, bland version many people make at home and the garlic-infused, perfectly wilted delight that makes you actually crave eating your greens. The good news? It takes just 5 minutes to cook and a handful of ingredients you likely already have in your kitchen.
I remember the first time I tried to cook spinach at home after having an amazing version at an Italian restaurant. What a disappointment! It was watery, flavorless, and nothing like what I’d hoped for. After countless attempts and fine-tuning my technique, I’ve nailed the process for creating restaurant-quality sautéed spinach that even vegetable skeptics will love.
In this guide, I’ll walk you through everything from selecting the best spinach to storing leftovers (though trust me, there rarely are any!). Let’s transform this humble leafy green into your new favorite side dish.
Why You’ll Love This Recipe
Before diving into the details, let me tell you why this sautéed spinach recipe deserves a spot in your regular rotation:
- Ready in 5 minutes flat – Perfect for busy weeknights when you need a quick veggie side
- Nutritional powerhouse – Packed with iron, vitamins A and C, fiber, and antioxidants
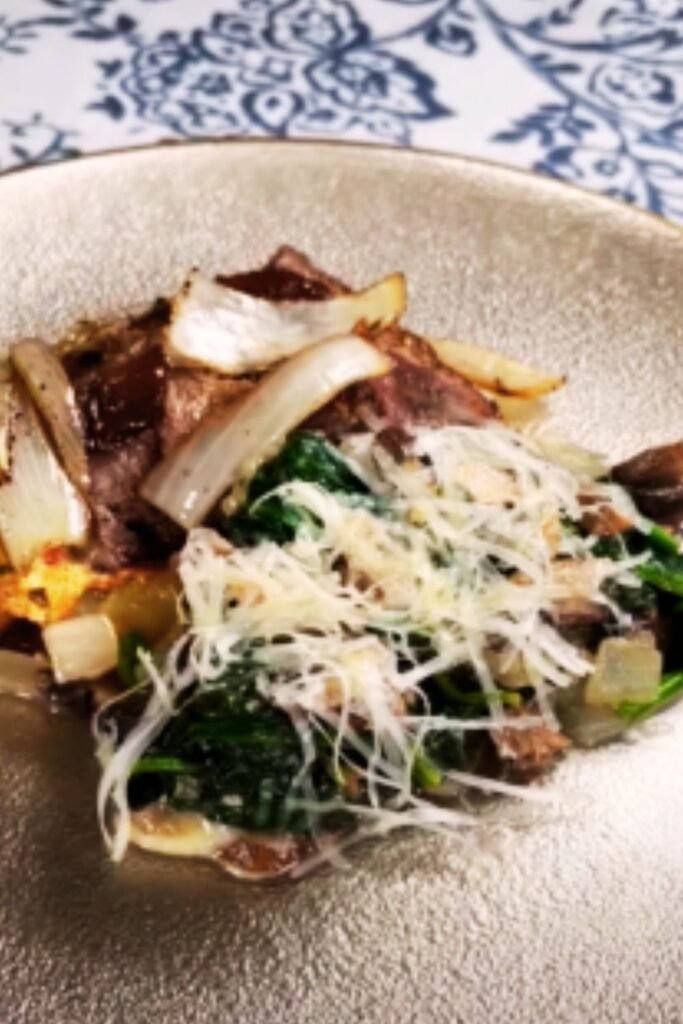
- Incredibly versatile – Pairs beautifully with everything from eggs to steak
- Naturally low-carb, keto-friendly, and gluten-free – Fits most dietary needs
- Uses just one pan – Minimal cleanup required
- Budget-friendly – A bag of fresh spinach transforms into a gourmet side dish
- Customizable – Easy to adapt with different flavors and add-ins
Ingredients You’ll Need
The beauty of perfect sautéed spinach lies in its simplicity. Here’s what you’ll need:
- Fresh spinach – 1 pound (looks enormous but cooks down dramatically)
- Extra virgin olive oil – 2 tablespoons
- Fresh garlic – 3-4 cloves, thinly sliced or minced
- Crushed red pepper flakes – ¼ teaspoon (optional, for heat)
- Sea salt – ½ teaspoon, or to taste
- Freshly ground black pepper – ¼ teaspoon
- Fresh lemon juice – From half a lemon
- Pine nuts – 2 tablespoons, lightly toasted (optional, but highly recommended)
Optional Flavor Enhancers:
- Parmesan cheese – 2 tablespoons freshly grated
- Butter – 1 tablespoon for added richness
- Shallot – 1 small, finely diced instead of or in addition to garlic
- Nutmeg – A tiny pinch (seriously, just a pinch!)
Fresh vs. Frozen Spinach: Making the Right Choice
When it comes to sautéed spinach, fresh is decidedly best. Here’s why:
| Fresh Spinach | Frozen Spinach |
|---|---|
| Maintains better texture when sautéed | Often becomes mushy when cooked |
| Brighter, fresher flavor | Can taste flat or overly earthy |
| Vibrant green color | Tends to have a duller appearance |
| Cooks in minutes | Requires thawing and squeezing out excess water |
| Can be used in both raw and cooked applications | Limited to cooked dishes only |
| Varying leaf sizes add textural interest | Uniformly chopped texture |
| Higher vitamin C content | Some vitamin loss during freezing process |
While frozen spinach is convenient and economical for certain recipes like spinach dip or stuffed pasta, fresh spinach delivers superior results for sautéing every time.
Baby Spinach vs. Regular Spinach
Both types of spinach work beautifully in this recipe, but they have some differences worth noting:
| Baby Spinach | Regular/Mature Spinach |
|---|---|
| Smaller, more tender leaves | Larger, slightly tougher leaves |
| Milder, sweeter flavor | More robust, earthy flavor |
| No stem removal required | May need stems trimmed |
| Often pre-washed and ready to use | Usually requires thorough washing |
| Cooks even faster | Takes slightly longer to wilt |
| More expensive per pound | More economical |
| Often sold in plastic containers | Usually sold in bunches or bags |
I tend to use baby spinach for convenience, but regular spinach offers a more intense flavor that some prefer. If using regular spinach, take an extra minute to trim any tough stems before cooking.
The Step-by-Step Process
Now, let’s get to the heart of creating mouthwatering sautéed spinach:
Preparation Steps:
- Wash your spinach thoroughly under cold water if not pre-washed. Even “triple-washed” spinach benefits from a quick rinse.
- Dry thoroughly using a salad spinner or clean kitchen towels. Extra moisture is the enemy of perfectly sautéed spinach!
- Remove any tough stems if using mature spinach.
- Slice your garlic thinly or mince it, depending on your preference. I prefer thin slices as they become golden and slightly crispy.
- Have all ingredients measured and ready — this recipe moves quickly once you start cooking.

Cooking Method:
- Heat your pan properly – Use a large skillet or wok (12-14 inches) over medium-high heat until hot but not smoking.
- Add the olive oil and swirl to coat the pan evenly. Allow it to heat until it shimmers, about 20-30 seconds.
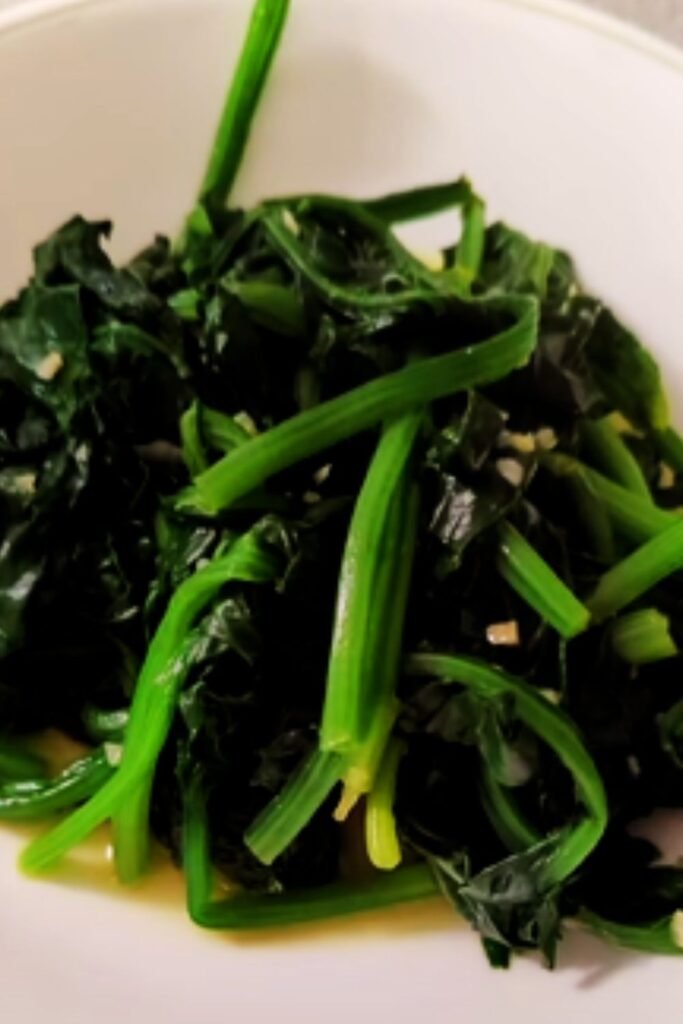
- Add the garlic and red pepper flakes (if using). Cook for just 30-45 seconds, stirring constantly, until the garlic becomes fragrant but not brown. Golden is good; brown means bitter.
- Add the spinach in batches – Don’t dump it all in at once! Add about one-third of your spinach to start, tossing it with tongs to coat with the garlicky oil. As it begins to wilt (which happens quickly!), add more spinach. Continue this process until all spinach is in the pan.
- Season properly – Once all spinach is wilted but still bright green (about 2 minutes total cooking time), add salt and pepper. The salt helps draw out excess moisture.
- Cook briefly – Continue cooking for just 1 more minute, tossing frequently.
- Finish with acid – Remove from heat and squeeze fresh lemon juice over the spinach. The acid brightens the flavor tremendously and cuts through the earthy notes.
- Optional additions – Now’s the time to stir in Parmesan, butter, pine nuts, or a tiny pinch of nutmeg if desired.
Common Mistakes to Avoid
Even this simple dish has pitfalls. Here’s how to avoid the most common mistakes:
- Overcrowding the pan – This causes steaming rather than sautéing. Use a truly large pan or cook in batches.
- Not drying the spinach properly – Excess water creates soggy spinach. Take the time to dry it thoroughly.
- Cooking too long – Spinach wilts in minutes. Overcooking results in a mushy texture and dull color.
- Underseasoning – Spinach needs adequate salt to bring out its flavor. Don’t be shy here.
- Burning the garlic – This creates bitterness that can’t be fixed. Keep the heat moderate and watch carefully.
- Forgetting the acid – A squeeze of lemon juice or splash of vinegar is transformative, not optional.
- Using low-quality olive oil – Since there are so few ingredients, quality matters. Use the best extra virgin olive oil you can afford.
Nutritional Powerhouse: Health Benefits of Spinach
Spinach isn’t just delicious—it’s incredibly good for you. Here’s a breakdown of its impressive nutritional profile:
| Nutrient | Amount per 100g | Benefits |
|---|---|---|
| Vitamin A | 469% DV | Supports eye health, immune function |
| Vitamin K | 604% DV | Essential for blood clotting, bone health |
| Folate | 49% DV | Critical for cell division, DNA formation |
| Vitamin C | 47% DV | Supports immune system, collagen production |
| Manganese | 45% DV | Helps form connective tissue, bones |
| Magnesium | 20% DV | Regulates muscle and nerve function |
| Iron | 15% DV | Crucial for oxygen transport in blood |
| Potassium | 12% DV | Helps maintain fluid balance, nerve signals |
| Calcium | 10% DV | Builds and maintains strong bones |
| Fiber | 2.2g | Supports digestive health |
| Calories | Just 23 | Very low-calorie vegetable |
Cooking spinach actually has benefits—it helps break down oxalates that can inhibit mineral absorption and concentrates certain nutrients like beta-carotene, making them more bioavailable to your body.
Serving Suggestions: Perfect Pairings
Sautéed spinach is incredibly versatile and pairs beautifully with so many dishes. Here are some of my favorite combinations:
Breakfast and Brunch:
- Alongside poached or fried eggs
- With an omelet or frittata
- As a bed for baked eggs
- Tucked into breakfast wraps or sandwiches
Protein Pairings:
- Grilled or roasted chicken
- Pan-seared salmon or other fish
- Lamb chops or roast lamb
- Steak or beef roasts
- Roasted pork tenderloin
- Seared scallops or shrimp
Grain Companions:
- Atop creamy polenta or grits
- Alongside fluffy quinoa
- Mixed into risotto just before serving
- With crusty bread for soaking up the flavorful juices
- Next to wild rice or pilaf
Cultural Inspirations:
- Mediterranean: Serve with grilled fish, lemon, and a dollop of tzatziki
- Italian: Pair with pasta and a sprinkle of Parmesan
- Middle Eastern: Alongside grilled meats with a side of hummus and pita
- Indian: Spice it differently with cumin, turmeric, and serve with dal
- Greek: Add feta cheese and serve with roasted lamb
Flavor Variations to Try
While the classic garlic-lemon combination is hard to beat, try these variations to keep your sautéed spinach exciting:
Mediterranean Inspiration:
- Add 2 tablespoons sun-dried tomatoes and 1 tablespoon capers
- Finish with a crumble of feta cheese and chopped olives
- Stir in 1 teaspoon dried oregano and a splash of balsamic vinegar
Asian Twist:
- Substitute sesame oil for olive oil
- Add 1 teaspoon grated ginger along with the garlic
- Finish with a splash of soy sauce and toasted sesame seeds
- Optional: a drizzle of chili oil for heat
Indian Flavors:
- Start with 1/2 teaspoon mustard seeds and let them pop
- Add 1/2 teaspoon each cumin and turmeric with the garlic
- Finish with a sprinkle of garam masala and fresh cilantro
Creamy Variations:
- Add 2 tablespoons heavy cream at the end of cooking
- Stir in 2 tablespoons cream cheese until melted
- Add 1/4 cup ricotta for a delicate creaminess
Nutty Additions:
- Pine nuts are classic, but also try walnuts, almonds, or pumpkin seeds
- Toast nuts separately and sprinkle on top just before serving
Storage and Reheating Tips
Sautéed spinach is best enjoyed fresh, but leftovers can still be delicious if handled properly:
Proper Storage:
- Cool completely before refrigerating to prevent condensation
- Store in an airtight container in the refrigerator for up to 3 days
- Drain any accumulated liquid before reheating for best results
Reheating Methods:
- Stovetop (preferred): Warm gently in a skillet over medium-low heat for 1-2 minutes
- Microwave: Heat in 30-second intervals, stirring between each, until just warm
- Use cold: Add to sandwiches, wraps, or grain bowls without reheating
Freezing (Yes, You Can!):
While not ideal, you can freeze sautéed spinach:
- Cool completely
- Place in freezer bags, removing as much air as possible
- Freeze flat for up to 2 months
- Thaw overnight in the refrigerator
- Reheat gently, knowing texture will be softer
Frequently Asked Questions
Q: Why does spinach shrink so much when cooked? A: Spinach contains about 90% water by weight! When heat is applied, the cells break down and release this water, causing dramatic shrinkage. This is completely normal – one pound of fresh spinach will cook down to about 1-1.5 cups.
Q: How do I prevent my sautéed spinach from becoming watery? A: Make sure to dry your spinach thoroughly before cooking, use a large enough pan so the spinach can sauté rather than steam, cook at a high enough heat to quickly evaporate moisture, and don’t cover the pan while cooking.
Q: Can I make sautéed spinach ahead of time? A: While best fresh, you can prepare it up to a day ahead. Slightly undercook it initially, cool completely, and store in the refrigerator. Reheat briefly in a hot pan just before serving.
Q: Is sautéed spinach healthier than raw spinach? A: Both have benefits! Raw spinach contains more vitamin C, while cooked spinach allows better absorption of iron, calcium, and beta-carotene. Sautéing is a good middle ground, as it breaks down some compounds while preserving most nutrients.
Q: My kids won’t eat spinach. Any tips? A: Try mixing small amounts of sautéed spinach into foods they already enjoy, like pasta sauce, scrambled eggs, or quesadillas. The garlic-butter version tends to be more kid-friendly, and calling it “power greens” sometimes helps too!
Q: Can I use the same technique for other leafy greens? A: Absolutely! This method works wonderfully for Swiss chard, kale, collard greens, and bok choy. Tougher greens may need slightly longer cooking times and possibly a splash of broth to help them tenderize.
Q: What can I do with leftover sautéed spinach? A: Incorporate it into omelets, frittatas, pasta dishes, grain bowls, sandwiches, or use as a pizza topping. It’s incredibly versatile as a leftover!
The Perfect Sautéed Spinach Recipe
Now that we’ve covered all the background information, let’s put it all together with my favorite basic recipe that you can adapt to your preferences.
Ingredients:
- 1 pound fresh spinach (baby or regular)
- 2 tablespoons extra virgin olive oil
- 3-4 garlic cloves, thinly sliced
- ¼ teaspoon crushed red pepper flakes (optional)
- ½ teaspoon sea salt
- ¼ teaspoon freshly ground black pepper
- Juice of half a lemon
- 2 tablespoons pine nuts, lightly toasted (optional)
- 2 tablespoons freshly grated Parmesan cheese (optional)
Instructions:
- Wash and thoroughly dry spinach if not pre-washed. Remove any tough stems if using mature spinach.
- Heat a large skillet (12-14 inches) over medium-high heat. Add olive oil and heat until shimmering.
- Add sliced garlic and red pepper flakes (if using). Cook for 30-45 seconds, stirring constantly, until garlic is fragrant and just starting to turn golden at the edges. Do not let it brown.
- Begin adding spinach in batches, using tongs to toss with the garlic oil. As the first batch wilts and creates room, add more spinach. Continue until all spinach is in the pan.
- Season with salt and pepper. Continue cooking, tossing frequently, for just 1-2 more minutes until all spinach is wilted but still bright green.
- Remove from heat and immediately squeeze fresh lemon juice over the spinach. Toss to combine.
- If using, add pine nuts and Parmesan cheese, tossing gently to incorporate.
- Taste and adjust seasoning if needed.
- Transfer to a serving dish immediately to prevent overcooking from the residual heat of the pan.
- Serve hot or warm.
Final Tips for Spinach Success
After years of perfecting this dish, here are my most crucial tips:
- The pan matters – A stainless steel or cast iron skillet gives the best sear and flavor development. Non-stick works too but won’t create as many flavorful brown bits.
- Don’t skimp on oil – It seems like a lot for a vegetable dish, but proper fat content is essential for both flavor and nutrient absorption.
- Watch the heat – Spinach goes from perfectly wilted to overcooked in seconds. Stay attentive and be ready to remove it from heat quickly.
- Season in stages – Add a little salt at the beginning to help draw out moisture, then adjust final seasoning after cooking.
- Let the spinach speak – While variations are wonderful, sometimes the simplest preparation with just garlic, oil, and lemon allows the spinach flavor to truly shine.
- Quality ingredients matter – With so few ingredients, each one should be the best you can afford—especially the olive oil and garlic.
- Don’t forget texture – Adding toasted nuts or seeds creates textural contrast that makes the dish more satisfying.
Sautéed spinach might seem like a humble side dish, but when prepared with care and attention to detail, it becomes a crave-worthy vegetable that might just steal the spotlight from your main course. Give this method a try, and I’m confident you’ll never look at spinach the same way again!

