I never thought I’d find myself obsessing over a single loaf of bread until I discovered the magical combination of green chiles and Gruyere cheese nestled within tangy sourdough. This isn’t just another bread recipe – it’s a culinary adventure that transforms your kitchen into a sophisticated bakery while filling your home with the most intoxicating aromas.
The first time I bit into this bread, I was transported. The sharp, nutty complexity of aged Gruyere melded seamlessly with the smoky heat of roasted green chiles, all wrapped in the signature tang of well-developed sourdough. It’s become my go-to recipe for impressing dinner guests and satisfying my own cravings for something extraordinary.
Understanding the Magic Behind This Combination
Green chiles bring more than just heat to this bread – they contribute a complex flavor profile that includes smokiness, earthiness, and a subtle sweetness that emerges during the roasting process. When paired with Gruyere, which offers nutty, fruity undertones with a pleasant sharpness, the result is a sophisticated flavor bomb that elevates simple sourdough into something spectacular.
The science behind this pairing fascinates me. The capsaicin in green chiles actually enhances our perception of other flavors, making the Gruyere taste even more complex and pronounced. Meanwhile, the fat content in cheese helps temper the heat, creating a balanced experience that’s warming rather than overwhelming.
Key Ingredients Defined
Sourdough Starter: A live culture of wild yeast and bacteria that ferments flour and water, creating the characteristic tangy flavor and natural leavening power essential for authentic sourdough bread.
Green Chiles: Typically refers to Hatch, poblano, or Anaheim varieties that are roasted until charred, peeled, and chopped, providing smoky heat and complex flavor.
Gruyere Cheese: A hard Swiss cheese aged 5-12 months, known for its nutty, slightly sweet flavor with crystalline texture that melts beautifully in bread.
Autolyse: The process of combining flour and water before adding other ingredients, allowing enzymes to break down proteins and starches for better dough development.
Essential Equipment and Preparation
Before diving into the recipe, I want to share the tools that make this process smoother and more enjoyable. You don’t need a professional bakery setup, but having the right equipment makes a significant difference in your results.
Equipment Checklist
- Large mixing bowl (preferably glass or stainless steel)
- Kitchen scale for precise measurements
- Bench scraper for dough handling
- Dutch oven or cast iron pot with lid
- Proofing basket (banneton) or bowl lined with floured cloth
- Sharp knife or bread lame for scoring
- Instant-read thermometer
- Clean kitchen towels
The Dutch oven is particularly crucial for achieving that coveted crispy crust. It creates a steam environment that mimics professional bread ovens, giving you bakery-quality results at home.
The Complete Recipe Guide
My recipe has evolved through countless experiments, and I’m excited to share the version that consistently produces the most flavorful, perfectly textured loaves.
Ingredient Proportions
| Ingredient | Weight (grams) | Volume | Percentage |
|---|---|---|---|
| Bread flour | 500g | 4 cups | 100% |
| Water | 375g | 1½ cups | 75% |
| Active sourdough starter | 100g | ½ cup | 20% |
| Salt | 10g | 2 tsp | 2% |
| Roasted green chiles (chopped) | 150g | ¾ cup | 30% |
| Gruyere cheese (cubed) | 200g | 1¼ cups | 40% |
Step-by-Step Process
Morning Preparation (Day 1)
I start by feeding my sourdough starter 8-12 hours before beginning the dough. This ensures it’s at peak activity – bubbly, doubled in size, and passing the float test when a small piece floats in water.
Autolyse Phase
Combine the bread flour and water in your mixing bowl, stirring until no dry flour remains. Cover and let rest for 30-60 minutes. This step develops gluten naturally and improves the final texture significantly.
Dough Development
Add the active starter to your autolyse mixture, followed by salt. Mix thoroughly until well combined. The dough will feel sticky and shaggy at this point – resist the urge to add more flour.
Bulk Fermentation with Folds
This is where patience pays off. Over the next 4-6 hours, perform a series of folds every 30 minutes for the first 2 hours, then let the dough rest undisturbed.
During the second fold, incorporate your roasted green chiles and cubed Gruyere. I distribute them gradually to avoid overworking the dough while ensuring even distribution.
Folding Technique Breakdown
| Fold Number | Time | Action | Purpose |
|---|---|---|---|
| 1 | 30 min | Basic letter fold | Strengthen gluten |
| 2 | 1 hour | Add chiles/cheese, fold | Incorporate ingredients |
| 3 | 1.5 hours | Gentle coil fold | Final strength building |
| 4 | 2 hours | Light stretch fold | Complete gluten development |
Pre-shaping and Final Proof
When the dough has increased by about 50% and feels jiggly and smooth, it’s ready for pre-shaping. Turn it onto a lightly floured surface and shape into a loose round. Let rest 20-30 minutes.
For final shaping, I create tension by pulling the dough toward me while rotating, forming a tight boule. Place seam-side up in your proofing basket and cover.
Cold Retardation
Refrigerate overnight (12-48 hours). This slow fermentation develops complex flavors and makes the dough easier to handle and score.
Mastering the Baking Process
Baking day is when all your patience and preparation come together. I preheat my Dutch oven to 475°F (245°C) for at least 45 minutes before baking.
Baking Timeline and Temperatures
| Phase | Temperature | Duration | Key Indicators |
|---|---|---|---|
| Preheat | 475°F (245°C) | 45 minutes | Dutch oven fully heated |
| Initial bake (covered) | 475°F (245°C) | 20 minutes | Steam development |
| Final bake (uncovered) | 450°F (230°C) | 20-25 minutes | Golden brown crust |
| Cool down | Room temp | 2+ hours | Internal temp 205°F |
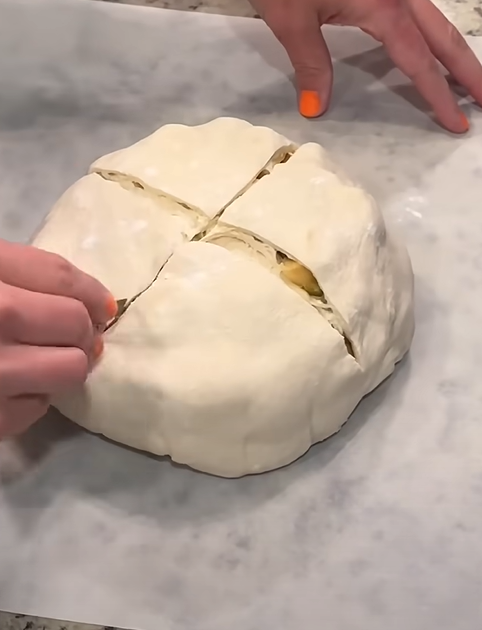
Scoring and Loading
Turn your proofed dough onto parchment paper and score with a sharp blade. I prefer a single deep slash that allows maximum expansion. Carefully transfer to the preheated Dutch oven using the parchment as a sling.
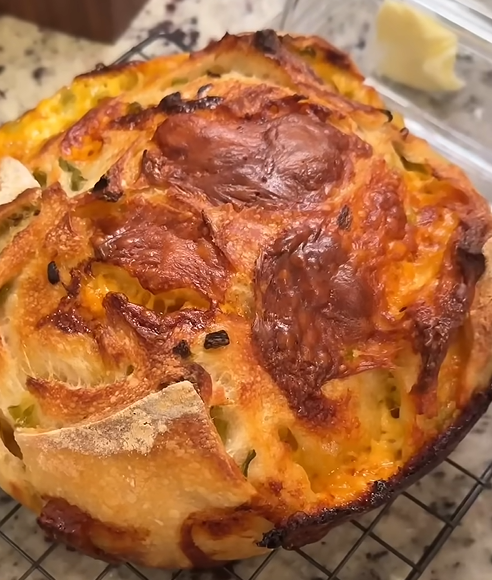
The initial covered phase creates steam, promoting oven spring and crust development. After removing the lid, watch as your loaf transforms into a beautifully golden, crackling masterpiece.
Troubleshooting Common Challenges
Through my bread-making journey, I’ve encountered and overcome numerous obstacles. Here are the most frequent issues and my solutions:
Texture and Structure Problems
Dense, Heavy Bread: Usually indicates under-fermented dough or inactive starter. Ensure your starter doubles within 4-8 hours of feeding and extend bulk fermentation time if needed.
Gummy Interior: Often results from cutting too soon. I know it’s torture, but wait at least 2 hours before slicing. The interior continues cooking from residual heat.
Uneven Distribution: Green chiles and cheese sinking or clumping together suggests insufficient gluten development before incorporation. Perform more folds before adding mix-ins.
Flavor Development Issues
Lack of Tang: Indicates insufficient fermentation time or weak starter activity. Extend cold retardation up to 48 hours for more pronounced sourness.
Overpowering Heat: Balance by reducing green chile quantity or removing seeds and membranes. Remember, you can always add more next time.
Bland Cheese Flavor: Gruyere’s flavor intensifies with age. Seek cheese aged 8-12 months for optimal impact.
Nutritional Profile and Health Benefits
This bread offers more than incredible taste – it provides substantial nutritional value thanks to fermentation and quality ingredients.
Nutritional Breakdown (per 100g serving)
| Nutrient | Amount | Daily Value % |
|---|---|---|
| Calories | 285 | 14% |
| Protein | 12.5g | 25% |
| Carbohydrates | 42g | 14% |
| Dietary Fiber | 3.2g | 13% |
| Fat | 8.5g | 13% |
| Calcium | 245mg | 25% |
| Iron | 2.8mg | 16% |
| Vitamin C | 12mg | 13% |
The fermentation process breaks down gluten proteins and phytic acid, making nutrients more bioavailable and the bread easier to digest. Green chiles contribute vitamins A and C, while Gruyere provides high-quality protein and calcium.
Creative Variations and Adaptations
Once you’ve mastered the basic recipe, experimentation becomes incredibly rewarding. I’ve developed several variations that showcase different flavor profiles:
Smoky Chipotle Version: Replace half the green chiles with rehydrated chipotle peppers for deeper, smokier heat.
Herb-Enhanced: Add fresh thyme or oregano during the final fold for Mediterranean flair.
Mixed Cheese Blend: Combine Gruyere with aged cheddar or Manchego for complexity.
Whole Grain Addition: Substitute 20% of bread flour with whole wheat or spelt for nuttier flavor and increased nutrition.
Serving Suggestions and Pairings
This bread shines in countless applications. I slice it thick for morning toast topped with avocado and a drizzle of hot honey. It makes extraordinary grilled cheese sandwiches and elevates any soup pairing.
For entertaining, I serve warm slices alongside charcuterie boards. The bread’s complex flavors complement cured meats beautifully without overwhelming delicate items.
Perfect Accompaniments:
- Creamy tomato soup
- Mixed green salads with vinaigrette
- Roasted vegetable medleys
- Soft scrambled eggs with herbs
- Fresh fruit preserves
Storage and Preservation Tips
Proper storage maintains this bread’s exceptional quality for days. I wrap cooled loaves in clean kitchen towels for the first day, then transfer to paper bags for 2-3 additional days.
For longer storage, slice and freeze portions wrapped in plastic, then foil. Frozen slices toast directly from the freezer, making quick meals possible anytime.
Storage Timeline Guide
| Storage Method | Duration | Best Use |
|---|---|---|
| Counter (wrapped) | 3-4 days | Fresh eating |
| Refrigerated | 5-7 days | Toasting, sandwiches |
| Frozen (whole) | 3 months | Special occasions |
| Frozen (sliced) | 6 months | Daily convenience |
Advanced Techniques for Bread Enthusiasts
As your skills develop, these advanced techniques can elevate your results even further:
Levain Building: Create a dedicated levain using a portion of your starter, feeding it specifically for this bread 12 hours before mixing.
Temperature Control: Monitor dough temperature throughout fermentation. Ideal bulk fermentation occurs at 76-78°F (24-26°C).
Hydration Adjustments: Experiment with higher hydration (up to 80%) for more open crumb structure, though this requires stronger gluten development techniques.
Scoring Artistry: Develop signature scoring patterns that become your bread’s visual trademark.
Questions and Answers
Q: Can I use frozen green chiles instead of fresh roasted ones?
I absolutely recommend frozen green chiles, especially if you can find quality Hatch varieties. Thaw and drain thoroughly before incorporating to prevent excess moisture from affecting dough consistency. The flavor is often more concentrated than fresh chiles that haven’t been properly roasted.
Q: What if my sourdough starter isn’t very active?
An underactive starter will significantly impact your bread’s rise and flavor development. Feed your starter daily for 3-5 days before attempting this recipe, ensuring it doubles in size within 4-8 hours. If it’s still sluggish, try switching to whole wheat flour for feeding, which provides more nutrients for the wild yeast.
Q: How do I know when the bulk fermentation is complete?
Look for a 50-70% increase in dough size, along with a jiggly, smooth texture when gently shaken. The dough should feel airy and show visible bubbles on the surface. If you’re unsure, extend the time slightly – under-fermented dough produces dense bread.
Q: Can I substitute other cheeses for Gruyere?
While Gruyere’s nutty complexity is ideal, aged Gouda, Comté, or even sharp cheddar work well. Avoid soft cheeses that might melt completely during baking. Whatever cheese you choose, cube it rather than grating to maintain distinct pockets of flavor.
Q: My bread doesn’t have enough heat – what went wrong?
Green chile heat varies significantly by variety and growing conditions. Taste your chiles before incorporating and adjust quantities accordingly. Also, seeds and membranes contain the most heat, so include them if you want more fire.
Q: Should I oil my Dutch oven before baking?
I never oil my Dutch oven for sourdough. The parchment paper provides sufficient release, and oil can interfere with proper crust development. A well-seasoned cast iron or quality enameled Dutch oven shouldn’t stick.
Q: Can this recipe be made without a Dutch oven?
While a Dutch oven produces superior results, you can bake on a stone or heavy baking sheet. Place a pan of hot water on the oven bottom during the first 20 minutes to create steam. The crust won’t be quite as dramatic, but you’ll still achieve delicious bread.
Q: How long does the active sourdough starter need to be established?
Your starter should be at least 2 weeks old and showing consistent doubling behavior after feeding. A mature starter (2+ months old) produces more complex flavors and reliable results. If your starter is newer, consider extending fermentation times.
Q: What’s the best way to incorporate the chiles and cheese evenly?
I distribute them gradually during the second set of folds, adding a portion with each fold. This prevents overworking the dough while ensuring even distribution. Lightly flour wet ingredients if they’re making the dough too sticky to handle.
Q: Can I make this bread dairy-free?
The Gruyere is integral to this recipe’s character, but you could experiment with aged, hard plant-based cheeses. The results will be different, but you might discover an interesting variation. Nutritional yeast adds umami depth if you’re avoiding cheese entirely.