Have you ever encountered a recipe that’s so simple yet so mind-blowingly delicious that you can’t help but make it repeatedly? That’s exactly what happened when I first stumbled upon the concept of mozzarella biscuit bombs. These little bundles of joy have become my go-to appetizer for gatherings, game nights, and even those quiet evenings when I’m craving something warm and comforting.
Today, I’m thrilled to share my perfected recipe for Gooey Mozzarella Biscuit Bombs with you. They’re crispy on the outside, oozing with melted cheese on the inside, and packed with herbs and garlic butter that make them downright irresistible. The best part? They require minimal ingredients and effort but deliver maximum flavor and impression.
What Are Biscuit Bombs?
Before we dive into the recipe, let’s clarify what these magical morsels actually are. Biscuit bombs are essentially refrigerated biscuit dough wrapped around a filling, then baked to golden perfection. The “bomb” part comes from their appearance and the explosion of flavors when you bite into them.
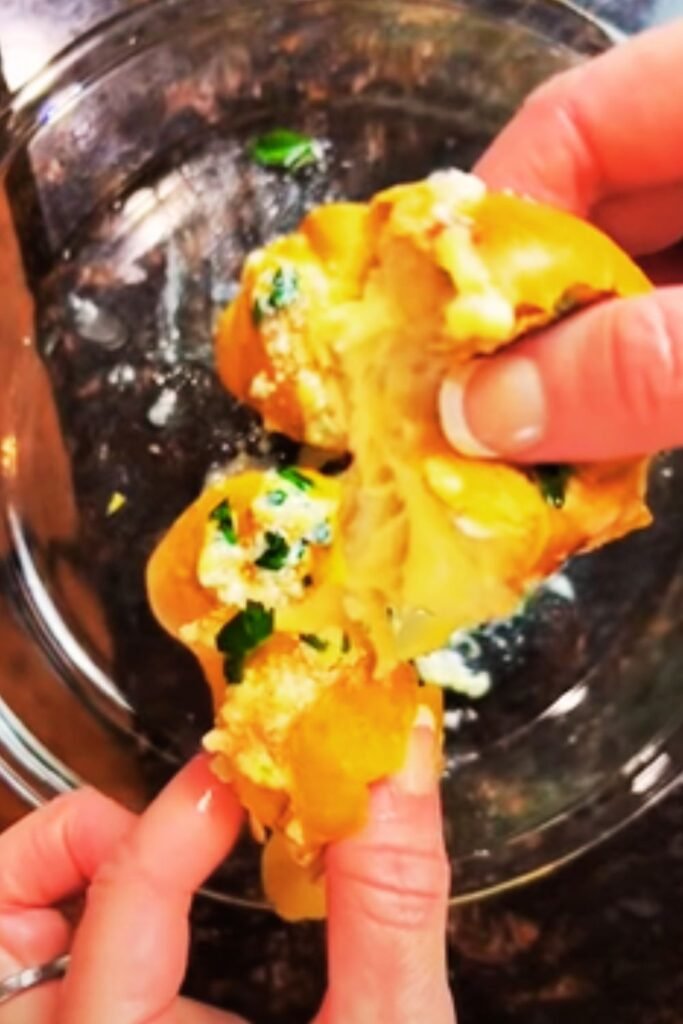
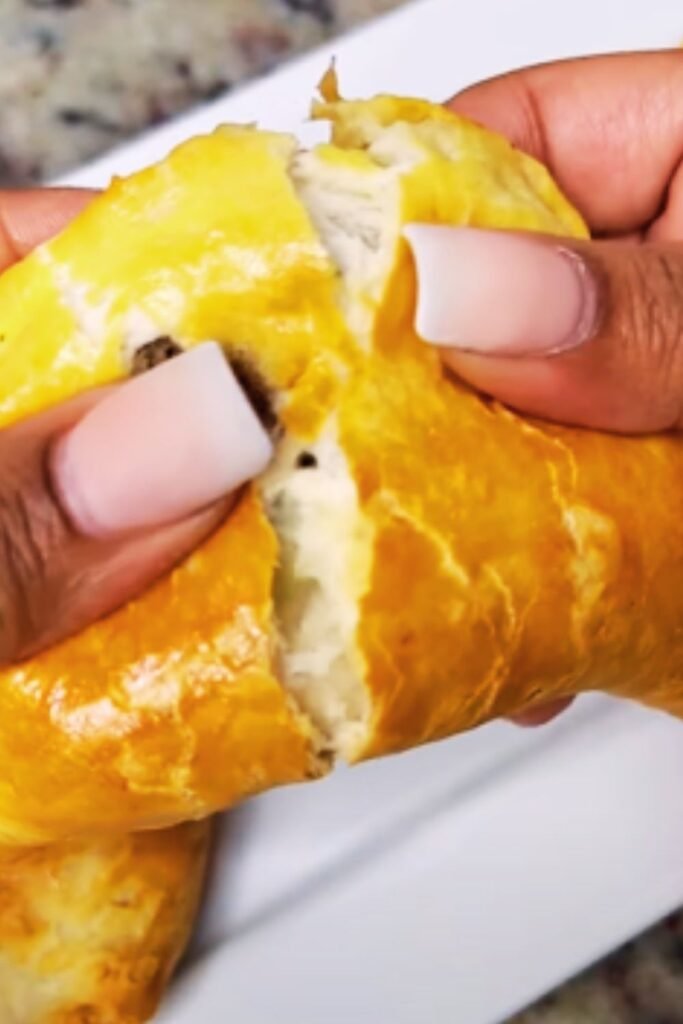
In this case, our star filling is mozzarella cheese, which creates that Instagram-worthy cheese pull when you break them open. I’ve experimented with countless variations over the years, but the combination of mozzarella, Italian herbs, and garlic butter has remained unbeaten in my kitchen tests.
Why These Biscuit Bombs Will Become Your New Obsession
There are appetizers, and then there are APPETIZERS – the kind that make people hover around the serving platter and disappear within minutes. These mozzarella biscuit bombs fall firmly in the latter category, and here’s why:
- The Cheese Factor: The mozzarella doesn’t just melt; it stretches into those long, satisfying pulls that make everyone want to snap a photo.
- Versatility: While they’re perfect as appetizers, they also work as sides to soups and salads or even as an on-the-go breakfast.
- Crowd-Pleaser: I’ve never met a person who didn’t love these, from picky kids to gourmet food enthusiasts.
- Make-Ahead Friendly: You can prepare them in advance and simply bake when guests arrive.
Ingredients Breakdown
Let’s take a closer look at what makes these biscuit bombs so special:
| Ingredient | Quantity | Notes |
|---|---|---|
| Refrigerated biscuit dough | 1 tube (16 oz) | Contains 8 biscuits |
| Mozzarella cheese | 8 oz | Cut into 16 half-ounce cubes |
| Salted butter | 4 tablespoons | Melted |
| Garlic | 3 cloves | Minced (about 1 tablespoon) |
| Italian seasoning | 2 teaspoons | Or mix of oregano, basil, and thyme |
| Fresh parsley | 2 tablespoons | Finely chopped |
| Grated Parmesan cheese | ¼ cup | For topping |
| Salt | ½ teaspoon | Adjust to taste |
| Black pepper | ¼ teaspoon | Freshly ground |
| Red pepper flakes | ¼ teaspoon | Optional, for heat |
| Marinara sauce | 1 cup | For dipping |
Essential Equipment
One of the beauties of this recipe is its simplicity, even in terms of equipment needs:
- Baking sheet: A standard sheet works perfectly
- Parchment paper: For easy cleanup
- Small mixing bowl: For preparing the garlic butter mixture
- Pastry brush: For brushing butter onto the bombs
- Knife and cutting board: For cutting the cheese (literally!)

Step-by-Step Preparation
Now, let’s get into the actual process of creating these cheesy delights:
Preparing the Biscuit Dough
- Preheat your oven to 375°F (190°C).
- Line a baking sheet with parchment paper.
- Open the tube of biscuit dough and separate the biscuits.
- Take each biscuit and flatten it with your palm until it’s about 3-4 inches in diameter.
Pro tip: If the dough is sticking to your hands, dust them lightly with flour.
Creating the Flavor Bomb (Garlic Butter Mixture)
- In a small bowl, combine the melted butter, minced garlic, 1 teaspoon of Italian seasoning, 1 tablespoon of parsley, salt, and pepper.
- Stir well to ensure all flavors are integrated.
The smell of this mixture alone is enough to make your mouth water. I sometimes make extra to brush on regular bread for a quick garlic bread side.
Assembly Process
- Place one cube of mozzarella in the center of each flattened biscuit.
- Carefully fold the edges of the dough over the cheese, pinching the seams to seal completely.
- Roll the sealed dough between your palms to form a ball shape.
- Place the balls seam-side down on the prepared baking sheet, ensuring they’re at least 2 inches apart.
Final Touches Before Baking
- Brush each ball generously with the garlic butter mixture.
- Sprinkle with the remaining Italian seasoning, parsley, Parmesan cheese, and red pepper flakes if using.
Don’t skimp on the butter brushing – this is what gives the exterior its irresistible flavor and golden color.
Baking to Perfection
- Bake in the preheated oven for 15-18 minutes until golden brown.
- Allow to cool for 3-5 minutes before serving (though I know it’s tempting to dive right in!).
Troubleshooting Common Issues
Even the most foolproof recipes can sometimes go awry. Here are solutions to potential problems:
Cheese Leakage
If your cheese is escaping during baking, it likely means the dough wasn’t sealed properly.
Solution: Make sure to pinch the seams firmly and give them an extra roll between your palms to ensure the seal is tight. Also, check that you’re using the right amount of cheese – overstuffing can lead to eruptions.
Undercooked Dough
Nothing worse than biting into doughy, undercooked biscuit bombs.
Solution: If the tops are browning too quickly but the dough still seems undercooked, lower your oven temperature to 350°F and extend the baking time by 3-5 minutes. You can also tent them with foil to prevent over-browning while they finish cooking.
Bland Flavor
If your biscuit bombs aren’t as flavorful as you’d hoped:
Solution: Don’t be shy with the seasonings. You can even mix some directly into the butter rather than just sprinkling on top. Also, using a more flavorful cheese like a sharp cheddar or pepper jack can amp up the taste.
Variations to Keep Things Interesting
While the classic mozzarella version is my absolute favorite, I’ve experimented with numerous variations over the years. Here are some crowd-tested alternatives:
Stuffing Variations
| Filling Option | Cheese Base | Additional Ingredients | Complementary Seasonings |
|---|---|---|---|
| Pepperoni Pizza | Mozzarella | Mini pepperoni slices | Italian seasoning, oregano |
| Jalapeño Popper | Cream cheese | Diced jalapeños | Garlic powder, onion powder |
| Breakfast Bomb | Cheddar | Scrambled egg, bacon bits | Paprika, black pepper |
| Mediterranean | Feta | Sun-dried tomatoes, olives | Oregano, basil |
| Buffalo Chicken | Mozzarella & blue cheese | Shredded buffalo chicken | Ranch seasoning |
| Spinach Artichoke | Mozzarella & cream cheese | Spinach, artichoke hearts | Garlic powder, onion powder |
Dietary Adaptations
- Gluten-Free: Use gluten-free biscuit dough, which is increasingly available in grocery stores.
- Lower Calorie: Opt for reduced-fat cheese and use cooking spray instead of butter (though I personally believe the butter is worth every calorie).
- Vegan: Several brands now offer vegan biscuit dough and plant-based mozzarella alternatives.
Serving Suggestions
These biscuit bombs are versatile enough to fit into various meal settings:
As an Appetizer
Serve them on a platter with small bowls of marinara sauce, ranch dressing, or pesto for dipping. I like to arrange them in a circular pattern with the dipping sauces in the center – it always makes for an impressive presentation.
As Part of a Meal
- With Soup: They pair beautifully with tomato soup or minestrone.
- With Salad: Add them to a Caesar or Italian salad for a more substantial meal.
- Brunch Spread: Include them in your next brunch gathering alongside fruit salad and frittata.
For Special Occasions
These have become a staple at my Super Bowl parties, holiday gatherings, and even as a passed appetizer at more formal events. I sometimes make mini versions using smaller portions of dough for elegant cocktail parties.
Beverage Pairings
- Non-alcoholic options: Italian soda, sparkling water with lemon, or a classic cola
- For coffee lovers: A robust cappuccino complements the savory flavors surprisingly well
Storage and Reheating Tips
While these are best enjoyed fresh from the oven, you can prepare and store them in several ways:
Make-Ahead Options
- Refrigerate unbaked: Prepare the bombs up to the point of baking, then cover and refrigerate for up to 24 hours. Bring to room temperature for about 15 minutes before baking.
- Freeze unbaked: Place prepared, unbaked bombs on a baking sheet and freeze until solid. Transfer to a freezer bag and store for up to 3 months. When ready to bake, place on a baking sheet and bake from frozen, adding 5-7 minutes to the baking time.
Storing Leftovers
- Refrigeration: Store cooled leftovers in an airtight container for up to 3 days.
- Freezing: Baked bombs can be frozen for up to 2 months in a freezer-safe container.
Reheating Methods
| Method | Time | Notes |
|---|---|---|
| Oven | 10 minutes at 350°F | Best for retaining the crispy exterior |
| Microwave | 20-30 seconds | Quickest option but will soften the outside |
| Air Fryer | 3-4 minutes at 350°F | Great compromise between speed and texture |
| Toaster Oven | 5-7 minutes at 350°F | Good option for smaller batches |
My personal preference is the air fryer method, which brings back that crispy exterior while keeping the inside gooey.
Health and Nutritional Information
Let’s be honest – these aren’t health food. But information is power, so here’s a rough nutritional breakdown per biscuit bomb:
| Nutrient | Amount | % Daily Value* |
|---|---|---|
| Calories | ~220 | – |
| Total Fat | 12g | 15% |
| Saturated Fat | 6g | 30% |
| Cholesterol | 25mg | 8% |
| Sodium | 480mg | 21% |
| Total Carbohydrate | 22g | 8% |
| Dietary Fiber | 1g | 4% |
| Total Sugars | 3g | – |
| Protein | 7g | 14% |
*Percent Daily Values are based on a 2,000 calorie diet.
Healthier Alternatives
If you’re watching your caloric intake but still want to enjoy these treats:
- Use reduced-fat cheese
- Opt for whole grain biscuit dough if available
- Make smaller portions using half a biscuit for each bomb
- Increase the herb content and decrease the cheese slightly
- Choose a lighter dipping option like a yogurt-based sauce
Why This Recipe Works
After numerous test batches (my friends certainly didn’t complain about being taste testers), I’ve identified what makes this particular recipe a standout:
- The cheese-to-dough ratio: I’ve found that a half-ounce cube of cheese per biscuit creates the perfect balance.
- Double application of flavor: Seasonings go into the butter mixture AND get sprinkled on top.
- The rest period: Those few minutes of cooling after baking allow the cheese to set slightly so it stretches rather than just runs out.
- Quality ingredients: Using fresh garlic instead of powder and freshly grated Parmesan makes a noticeable difference.
Frequently Asked Questions
Here’s a collection of questions I’ve received from readers and friends who’ve tried this recipe:
Q: Can I make these without garlic? Absolutely! You can omit the garlic entirely or substitute with a pinch of garlic powder if you prefer a milder flavor.
Q: Why did my cheese completely melt out of the dough? This usually happens when the seams aren’t fully sealed. Make sure to pinch them tightly and roll the balls well between your palms. Also, using block mozzarella cut into cubes rather than shredded helps contain the melt.
Q: Can I use crescent roll dough instead of biscuit dough? Yes! Crescent roll dough works beautifully, though the texture will be slightly different – more flaky than fluffy. If using crescent rolls, press the perforations together before cutting into appropriate-sized pieces.
Q: How do I know when they’re done baking? They should be golden brown on the outside. If you’re unsure, you can carefully lift one with a spatula – the bottom should also be golden brown, not pale.
Q: Can I prepare these the night before a party? Definitely! Prepare them through the assembly stage, cover with plastic wrap, and refrigerate. Brush with the butter mixture just before baking. You may need to add 2-3 minutes to the baking time if they’re cold from the refrigerator.
Q: What can I use instead of marinara sauce for dipping? Ranch dressing, pesto, alfredo sauce, or even a balsamic glaze all make excellent alternatives. For a spicy option, try buffalo sauce or sriracha mayo.
Q: Are these suitable for kids’ parties? In my experience, these are always a hit with children. Just be careful about serving temperature – the cheese can be very hot right out of the oven, so allow them to cool slightly longer for younger guests.
Final Thoughts
There’s something magical about pulling apart a warm biscuit bomb and watching the cheese stretch between the halves. It’s one of those simple culinary pleasures that never gets old, no matter how many times I make them.
What I love most about this recipe is its accessibility. You don’t need to be a seasoned chef to create something that will genuinely impress your guests. With minimal ingredients and straightforward techniques, you can create an appetizer that people will rave about long after they’ve gone home.
So the next time you’re hosting a gathering, or simply want to treat yourself to something special, I hope you’ll give these Gooey Mozzarella Biscuit Bombs a try. And when you do, I’d love to hear about your experience, any adaptations you made, and how your guests reacted to that first cheesy, garlicky bite!
Remember, cooking should be fun and delicious – and this recipe delivers on both counts. Happy baking!