There’s something magical about the aroma of fresh bread wafting through my kitchen, and nothing quite compares to the pillowy softness of a perfectly baked milk bread loaf. After years of experimenting with different bread recipes, I’ve discovered that milk bread stands in a league of its own – tender, slightly sweet, and with a texture so soft it practically melts in your mouth.
What makes milk bread so special? The secret lies in its unique combination of milk, butter, and a special technique that creates an incredibly soft crumb. Unlike regular white bread, milk bread has a richer flavor profile and stays fresh longer, making it perfect for everything from morning toast to gourmet sandwiches.
I remember my first attempt at making milk bread – it was a disaster. The loaf came out dense and disappointing. But through trial and error, I’ve perfected this recipe to ensure you’ll get bakery-quality results every single time. This comprehensive guide will walk you through every step, from understanding the ingredients to troubleshooting common issues.
Understanding Milk Bread: Key Terms and Concepts
Tangzhong Method : A Japanese technique involving cooking a small portion of flour with liquid to create a paste, which helps retain moisture and creates the characteristic soft texture of milk bread.
Gluten Development : The process of kneading dough to develop protein networks that give bread its structure and chewiness while maintaining tenderness in milk bread.
Proofing : The fermentation process where yeast creates gas bubbles, causing the dough to rise and develop flavor.
Crumb Structure : The internal texture of bread, characterized by small, even holes and a soft, tender feel in quality milk bread.
Enriched Dough : Bread dough containing fats, sugars, and dairy products that create a richer flavor and more tender texture compared to basic bread.
Essential Ingredients and Their Roles
The beauty of milk bread lies in its simple yet carefully balanced ingredient list. Each component plays a crucial role in achieving that perfect texture and flavor I’ve come to love.
Primary Ingredients Breakdown
| Ingredient | Amount | Purpose | Quality Tips |
|---|---|---|---|
| Bread Flour | 3 cups (360g) | Provides structure and chewiness | Use high-protein flour (12-14% protein) |
| Whole Milk | 3/4 cup (180ml) | Creates tenderness and flavor | Room temperature works best |
| Active Dry Yeast | 2 teaspoons (7g) | Leavening agent for rise | Check expiration date, proof first |
| Sugar | 3 tablespoons (36g) | Feeds yeast, adds sweetness | Granulated white sugar preferred |
| Salt | 1 teaspoon (6g) | Flavor enhancement, gluten strength | Fine sea salt or table salt |
| Unsalted Butter | 3 tablespoons (42g) | Richness and tender crumb | Room temperature, high quality |
| Large Egg | 1 whole | Binding, color, richness | Room temperature for better mixing |
Tangzhong Starter Ingredients
| Ingredient | Amount | Purpose |
|---|---|---|
| Bread Flour | 2 tablespoons (20g) | Thickening agent |
| Milk | 1/3 cup (80ml) | Creates paste consistency |
Step-by-Step Milk Bread Recipe
Phase 1: Preparing the Tangzhong
I always start with the tangzhong because it needs time to cool before incorporating into the main dough. This step is what sets milk bread apart from ordinary bread recipes.
- Combine flour and milk in a small saucepan, whisking until completely smooth with no lumps
- Cook over medium-low heat, stirring constantly with a whisk for 2-3 minutes
- Watch for thickening – the mixture should coat the back of a spoon and leave a trail when stirred
- Remove from heat and transfer to a bowl, covering with plastic wrap directly touching the surface
- Cool completely to room temperature (about 30 minutes)
Phase 2: Activating the Yeast
While the tangzhong cools, I prepare my yeast mixture to ensure it’s active and ready to work its magic.
- Warm the milk to approximately 105°F (40°C) – it should feel comfortably warm, not hot
- Sprinkle yeast over the warm milk and add 1 teaspoon of the sugar
- Stir gently and let stand for 5-10 minutes until foamy and bubbly
- Check for activity – if the mixture doesn’t foam, your yeast may be expired
Phase 3: Mixing the Dough
This is where everything comes together. I’ve learned that patience during this phase pays off tremendously in the final product.
- Combine dry ingredients in a large mixing bowl: flour, remaining sugar, and salt
- Create a well in the center and add the cooled tangzhong, activated yeast mixture, and beaten egg
- Mix with a wooden spoon until a shaggy dough forms
- Add softened butter and continue mixing until roughly incorporated
Phase 4: Kneading Process
Proper kneading is crucial for developing the gluten network that gives milk bread its perfect texture.
- Turn dough onto lightly floured surface and begin kneading
- Knead for 10-12 minutes by hand, or 6-8 minutes with a stand mixer using the dough hook
- Check for proper development – the dough should be smooth, elastic, and slightly tacky but not sticky
- Perform the windowpane test – stretch a small piece of dough; it should be thin enough to see through without tearing
Phase 5: First Rise
- Shape into a ball and place in a greased bowl
- Cover with damp cloth or plastic wrap
- Rise in warm place for 60-90 minutes until doubled in size
- Test for readiness by gently poking with finger – if indentation remains, it’s ready
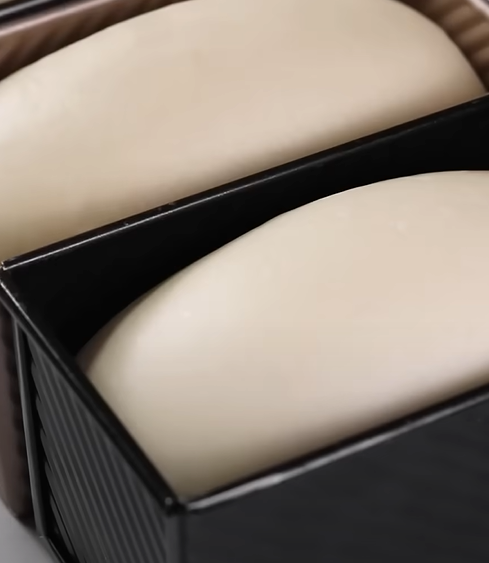
Phase 6: Shaping and Final Rise
- Punch down gently to release gases
- Turn onto lightly floured surface and divide into three equal portions
- Roll each portion into a rectangle, then roll up tightly
- Place seam-side down in greased 9×5 inch loaf pan
- Cover and rise for 45-60 minutes until dough crowns the pan edges
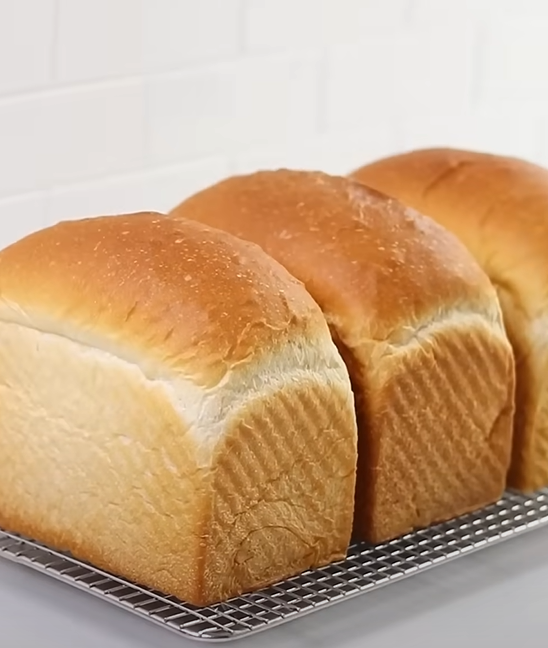
Phase 7: Baking to Perfection
- Preheat oven to 350°F (175°C) during the last 15 minutes of rising
- Brush top with beaten egg for golden color (optional)
- Bake for 30-35 minutes until golden brown and internal temperature reaches 190°F (88°C)
- Cool in pan for 10 minutes, then turn out onto wire rack
Nutritional Information and Serving Suggestions
Nutritional Breakdown (Per Slice, 12 servings)
| Nutrient | Amount | % Daily Value |
|---|---|---|
| Calories | 185 | 9% |
| Total Fat | 4.2g | 6% |
| Saturated Fat | 2.1g | 11% |
| Cholesterol | 25mg | 8% |
| Sodium | 220mg | 10% |
| Total Carbohydrates | 32g | 12% |
| Dietary Fiber | 1.2g | 4% |
| Sugars | 4.5g | – |
| Protein | 6.8g | 14% |
| Calcium | 45mg | 4% |
| Iron | 1.8mg | 10% |
Serving Suggestions
My family loves this versatile bread in countless ways. Here are some of my favorite serving ideas:
Breakfast Options:
- Toasted with butter and homemade jam
- French toast made with thick slices
- Cinnamon sugar toast for weekend mornings
- Bread pudding using day-old slices
Lunch and Dinner:
- Gourmet grilled cheese sandwiches
- Club sandwiches with fresh vegetables
- Garlic bread alongside pasta dishes
- Bread crumb coating for chicken or fish
Snack Ideas:
- Mini tea sandwiches with cream cheese and cucumber
- Bread sticks served with soup
- Sweet versions with Nutella or peanut butter
Storage and Freshness Tips
| Storage Method | Duration | Best Practices |
|---|---|---|
| Room Temperature | 3-4 days | Wrapped in plastic wrap or bread bag |
| Refrigerator | 1 week | Double-wrapped to prevent drying |
| Freezer | 3 months | Slice before freezing, wrap individually |
| Bread Box | 4-5 days | Ensure proper ventilation |
I’ve found that milk bread stays remarkably fresh compared to other homemade breads, thanks to the milk and butter content. For best results, I always let the bread cool completely before storing to prevent condensation.
Troubleshooting Common Issues
Through my bread-making journey, I’ve encountered and solved numerous problems. Here’s my troubleshooting guide:
Dense or Heavy Bread
Possible Causes:
- Expired or inactive yeast
- Over-kneading or under-kneading
- Insufficient rising time
- Too much flour added during kneading
Solutions:
- Always proof yeast before using
- Follow kneading times precisely
- Allow adequate rising in warm environment
- Use minimal flour during kneading process
Bread Collapses After Baking
Possible Causes:
- Over-proofed dough
- Oven temperature too low
- Removing from oven too early
Solutions:
- Monitor rising times carefully
- Use oven thermometer to verify temperature
- Check internal temperature reaches 190°F
Crust Too Dark or Pale
Possible Causes:
- Oven temperature issues
- Incorrect rack position
- Missing egg wash
Solutions:
- Adjust oven temperature accordingly
- Position rack in center of oven
- Apply egg wash for golden color
Variations and Flavor Enhancements
One of the reasons I adore this milk bread recipe is its adaptability. Here are some delicious variations I’ve developed:
Sweet Variations
Cinnamon Swirl Milk Bread:
- Add 2 teaspoons cinnamon to flour mixture
- Create filling with 1/4 cup brown sugar and 1 tablespoon cinnamon
- Roll filling into dough during shaping phase
Vanilla Milk Bread:
- Add 1 teaspoon vanilla extract to milk mixture
- Increases aromatic appeal significantly
Savory Options
Herb Milk Bread:
- Incorporate 2 tablespoons fresh herbs (rosemary, thyme, or oregano)
- Perfect accompaniment to soups and stews
Cheese Milk Bread:
- Fold in 1/2 cup shredded cheese during final kneading
- Creates delightful savory breakfast option
The Science Behind Perfect Milk Bread
Understanding the science helps me achieve consistent results every time. The tangzhong method works by pre-cooking starches, which then absorb more liquid and create a gel-like structure. This results in bread that stays moist longer and has that characteristic soft texture.
The milk proteins contribute to browning and flavor development, while the fat content from butter and milk creates tenderness by coating gluten strands. The sugar not only feeds the yeast but also helps with browning and moisture retention.
Equipment Recommendations
| Equipment | Purpose | My Recommendation |
|---|---|---|
| Kitchen Scale | Accurate measurements | Digital scale measuring in grams |
| Stand Mixer | Efficient kneading | KitchenAid with dough hook attachment |
| Loaf Pan | Proper shaping | 9×5 inch metal pan for even heating |
| Instant Thermometer | Temperature checking | Digital probe thermometer |
| Bench Scraper | Dough handling | Flexible plastic scraper |
Seasonal Adaptations
I’ve noticed that environmental factors significantly affect bread making. During humid summer months, I reduce liquid slightly and extend kneading time. In dry winter conditions, I increase liquid and ensure my rising environment is adequately warm and humid.
Summer Adjustments:
- Reduce milk by 1-2 tablespoons
- Use cooler liquids initially
- Monitor rising times more closely
Winter Modifications:
- Increase liquid slightly if needed
- Create warm rising environment (oven with light on)
- Allow extra time for rising
Questions and Answers
Q: Can I substitute all-purpose flour for bread flour in this recipe?
I’ve experimented with this substitution, and while possible, bread flour produces superior results. Bread flour contains higher protein content (12-14%) compared to all-purpose flour (10-12%), which develops better gluten structure. If you must use all-purpose flour, add 1 tablespoon vital wheat gluten per cup of flour to improve texture.
Q: Why is my milk bread not as soft as store-bought versions?
Commercial milk bread often contains additional emulsifiers and preservatives that enhance softness and shelf life. My homemade version focuses on natural ingredients, which may result in slightly different texture. Ensure you’re using the tangzhong method correctly and not over-baking, as these are key factors in achieving maximum softness.
Q: Can I make this recipe dairy-free?
Absolutely! I’ve successfully adapted this recipe using plant-based alternatives. Substitute the milk with unsweetened soy milk or oat milk, and replace butter with vegan butter or coconut oil. The texture will be slightly different but still delicious. Ensure your plant milk is unsweetened to maintain proper sugar balance.
Q: How do I know if my dough has been kneaded enough?
The windowpane test is my go-to method. Take a small piece of dough and gently stretch it between your fingers. Properly kneaded dough should stretch thin enough to see light through without tearing. The dough should also feel smooth and elastic, springing back when poked gently.
Q: Can I freeze the shaped dough before baking?
Yes, this is one of my favorite time-saving techniques! After shaping the loaf, wrap it tightly in plastic wrap and freeze for up to one month. When ready to bake, thaw in the refrigerator overnight, then allow to come to room temperature and complete the final rise before baking.
Q: What’s the best way to revive day-old milk bread?
I have several methods depending on intended use. For eating fresh, lightly toast slices or warm in a 300°F oven for 5-7 minutes. For French toast or bread pudding, day-old bread actually works better than fresh. You can also brush slices lightly with butter and warm in a skillet for renewed softness.
Q: Why does my bread have a gummy texture?
Gummy texture typically results from underbaking or slicing too soon after baking. The internal temperature should reach 190°F before removing from oven. Additionally, allow the bread to cool completely (at least 2 hours) before slicing to let the crumb structure set properly.
Q: Can I double this recipe to make two loaves?
Certainly! I often double the recipe for meal prep or gifting. Use the same timing for tangzhong preparation and rising, but you may need to knead slightly longer to develop gluten in the larger quantity of dough. Bake both loaves simultaneously, rotating positions halfway through for even browning.
This milk bread recipe has become a cornerstone in my baking repertoire, bringing joy to my kitchen and satisfaction to everyone who tastes it. The combination of science, technique, and quality ingredients creates something truly special – a loaf that’s tender, flavorful, and utterly irresistible. Whether you’re a novice baker or experienced bread maker, this comprehensive guide will help you achieve bakery-quality results in your own home kitchen.