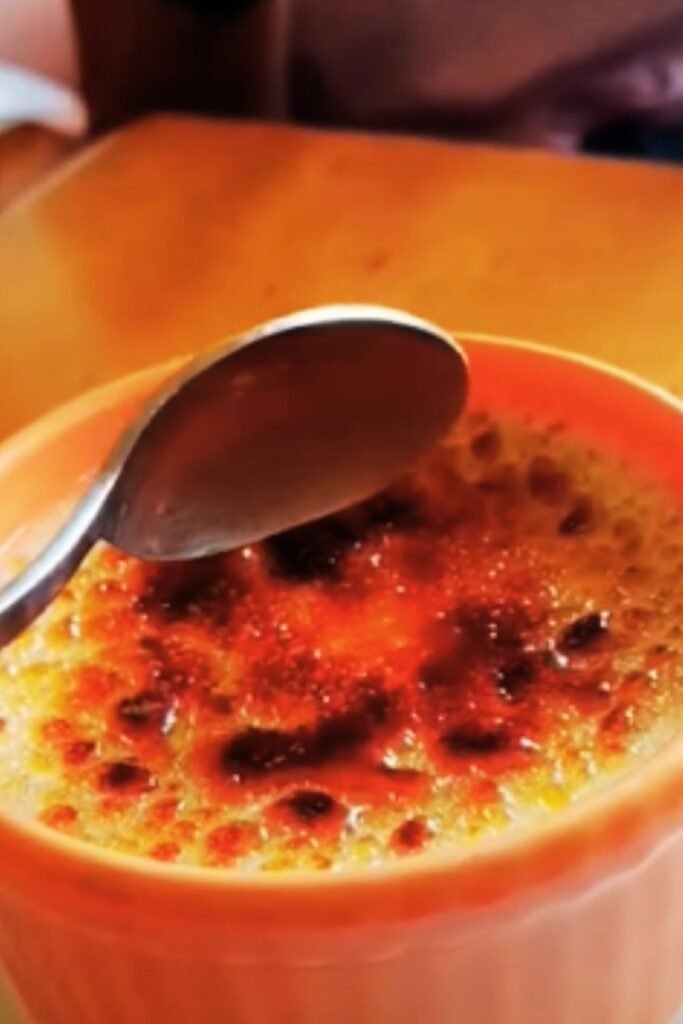
There’s something magical about that moment when your spoon cracks through the glassy caramelized sugar top of a crème brûlée, revealing the silky, vanilla-scented custard underneath. It’s a textural and flavor experience that I’ve spent years perfecting in my own kitchen. While crème brûlée might seem intimidating at first glance, I’m here to tell you that achieving restaurant-quality results at home is absolutely within your reach.
As a devoted custard enthusiast, I’ve tested countless variations and techniques to bring you this definitive guide to creating what I call “Dreams Crème Brûlée” – a dessert that consistently wows my dinner guests and has become my signature dish. The beauty of this classic French dessert lies in its simplicity: a few quality ingredients transformed into something truly extraordinary.
The History Behind the Caramelized Dream
Before diving into the recipe, I love reflecting on the rich history of this iconic dessert. Crème brûlée, which translates to “burnt cream,” has a somewhat contested origin story. While many associate it with French cuisine, similar desserts appear in culinary traditions across Europe.
The earliest known recipe for a custard topped with caramelized sugar appears in François Massialot’s 1691 cookbook, though the English claim their “Trinity Cream” or “Cambridge Burnt Cream” predates the French version. Regardless of who deserves the credit, by the 1980s, crème brûlée had become a staple on restaurant menus worldwide, cementing its status as one of the most beloved desserts of all time.
What makes my Dreams Crème Brûlée special is the perfect balance of rich, vanilla-infused custard with just the right density and a impeccably caramelized top that provides that satisfying “crack” we all crave.
Essential Ingredients for Perfect Crème Brûlée
The beauty of crème brûlée lies in its simplicity, but that means each ingredient needs to be top quality:
- Heavy Cream – The foundation of your custard, providing richness and body
- Egg Yolks – Creates that silky, luxurious texture and acts as a natural thickener
- Vanilla Bean – Real vanilla beans offer superior flavor to extract
- Granulated Sugar – For sweetening the custard base
- Superfine Sugar or Demerara Sugar – For the caramelized topping
- Salt – Just a pinch enhances all the flavors
Ingredient Quality Matters
For a truly exceptional crème brûlée, I’ve learned that ingredient quality makes all the difference:
Vanilla Bean Types: : Madagascar Bourbon vanilla beans – Offer a rich, creamy flavor profile with hints of caramel : Tahitian vanilla beans – Provide floral, fruity notes with a more delicate flavor : Mexican vanilla beans – Deliver a deeper, spicier character with woody undertones
Cream Selection: : Heavy cream (36-40% fat) – Produces the richest, most luxurious custard : Whipping cream (30-35% fat) – Creates a lighter custard but still satisfying : Half-and-half – Not recommended as it lacks sufficient fat content for proper setting
Sugar for Caramelizing: : Superfine sugar – Melts quickly and evenly for a perfect crust : Demerara sugar – Adds subtle molasses notes to the caramelized top : Regular granulated sugar – Works in a pinch but may produce an uneven caramelization
Essential Equipment
Before beginning your crème brûlée journey, gather these essential tools:
- Ramekins – Traditional shallow, wide ramekins (4-6 oz) allow for the optimal ratio of custard to caramelized surface
- Kitchen torch – Provides precise control when caramelizing the sugar
- Water bath equipment – A deep roasting pan and enough hot water to come halfway up the sides of the ramekins
- Fine-mesh strainer – Ensures a perfectly smooth custard
- Instant-read thermometer – Helps achieve the perfect custard temperature
- Vanilla bean scraper or small sharp knife – For extracting those precious vanilla seeds
Dreams Crème Brûlée Recipe
Ingredients
For 6 servings:
- 3 cups (720ml) heavy cream
- 1 whole vanilla bean
- 8 large egg yolks, room temperature
- 3/4 cup (150g) granulated sugar, divided
- 1/4 teaspoon fine sea salt
- 6 tablespoons superfine or demerara sugar (for topping)
Detailed Nutritional Information
| Nutrient | Amount per Serving | % Daily Value* |
|---|---|---|
| Calories | 575 | – |
| Total Fat | 48g | 62% |
| Saturated Fat | 28g | 140% |
| Cholesterol | 385mg | 128% |
| Sodium | 145mg | 6% |
| Total Carbohydrate | 30g | 11% |
| Dietary Fiber | 0g | 0% |
| Total Sugars | 29g | – |
| Protein | 6g | 12% |
| Vitamin D | 3.7mcg | 18% |
| Calcium | 110mg | 8% |
| Iron | 0.8mg | 4% |
| Potassium | 132mg | 3% |
*Percent Daily Values are based on a 2,000 calorie diet
Preparation Method
Step 1: Infuse the Cream
- Preheat your oven to 325°F (163°C).
- Split the vanilla bean lengthwise and scrape out the seeds using the back of your knife.
- In a medium saucepan, combine the cream, vanilla bean pod, and scraped seeds.
- Heat the mixture over medium-low heat until it just begins to simmer (small bubbles form around the edges). Do not boil.
- Remove from heat, cover, and let steep for 30 minutes to infuse the vanilla flavor.
Step 2: Prepare the Custard Base
- In a large bowl, whisk together the egg yolks, 1/2 cup (100g) of the granulated sugar, and salt until the mixture becomes pale yellow and slightly thickened (about 2-3 minutes).
- Remove the vanilla bean pod from the cream (you can rinse and dry it for future use in homemade vanilla sugar).
- Very slowly pour the warm cream into the egg mixture, whisking constantly to prevent the eggs from curdling.
- Strain the mixture through a fine-mesh sieve into a clean bowl or large measuring cup with a pour spout.
Step 3: Bake the Custards
- Arrange six 4-6 oz ramekins in a large roasting pan.
- Divide the custard mixture evenly among the ramekins.
- Carefully pour hot (not boiling) water into the roasting pan until it reaches halfway up the sides of the ramekins.
- Carefully transfer the water bath to the preheated oven.
- Bake until the custards are just set but still slightly jiggly in the center, about 35-40 minutes. The internal temperature should reach 170-175°F (77-79°C).
- Remove the ramekins from the water bath and let cool at room temperature for 30 minutes.
- Cover each ramekin with plastic wrap (directly touching the surface to prevent a skin from forming) and refrigerate for at least 4 hours or up to 3 days.
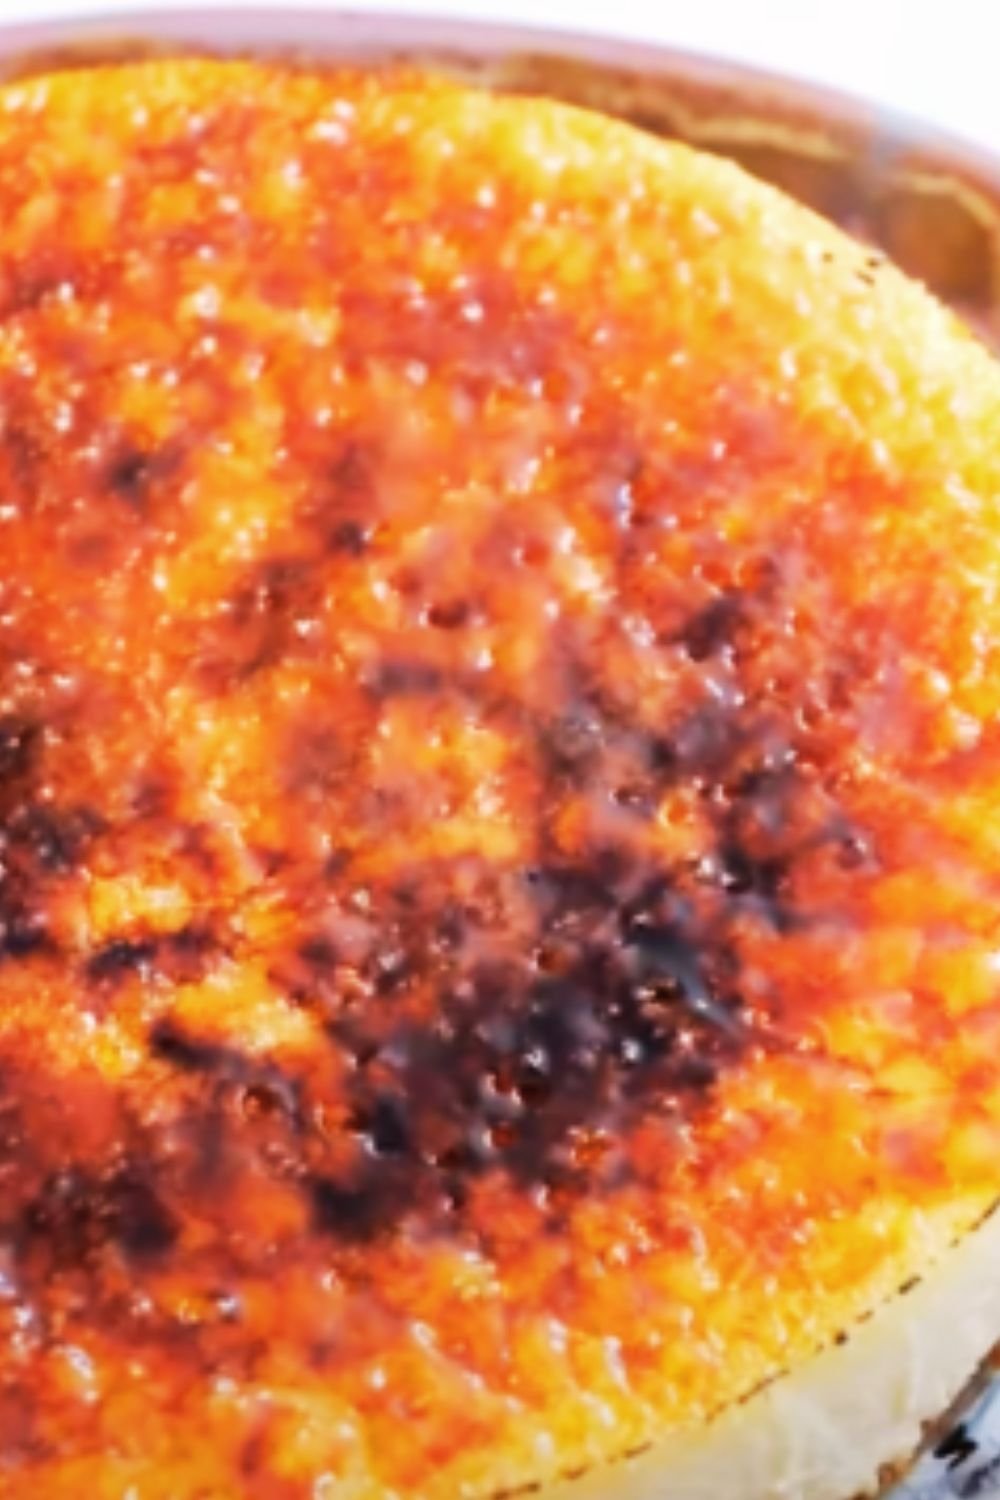
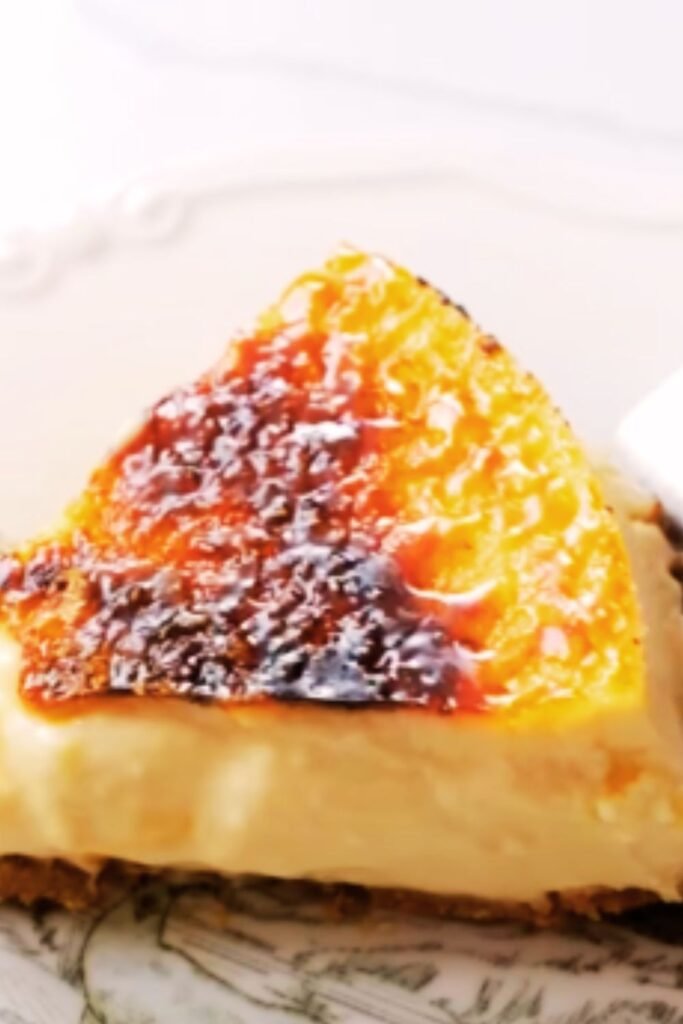
Step 4: The Perfect Caramelization
- When ready to serve, remove the custards from the refrigerator and gently blot any condensation from the surface with a paper towel.
- Sprinkle a thin, even layer of the remaining sugar (about 1 tablespoon per ramekin) over each custard.
- Hold your kitchen torch 2-3 inches from the surface and move it in small circles until the sugar melts and caramelizes to a deep amber color.
- Allow the caramelized sugar to harden for 2-3 minutes before serving.
If you don’t have a kitchen torch:
- Place the ramekins on a baking sheet.
- Position them 2-3 inches below your oven’s broiler.
- Broil for 1-2 minutes, watching constantly to prevent burning.
- Rotate the baking sheet as needed for even caramelization.
Flavor Variations to Explore
While classic vanilla crème brûlée is divine, I’ve experimented with numerous variations that have delighted my guests:
Infusion Variations
| Flavor | Infusion Method | Notes |
|---|---|---|
| Lavender | Add 1 tbsp dried culinary lavender to the cream during infusion | Remove completely before adding to egg mixture |
| Earl Grey | Steep 2 Earl Grey tea bags in the hot cream for 10 minutes | Creates a sophisticated floral background note |
| Coffee | Add 2 tbsp of freshly ground coffee beans to the cream infusion | Strain thoroughly to remove all grounds |
| Citrus | Add zest of 1 orange, lemon, or lime to the cream infusion | Remove zest before adding to egg mixture |
| Spiced | Add 1 cinnamon stick, 3 cloves, and 1 star anise to cream infusion | Perfect for fall and winter holidays |
Structural Variations
- Chocolate Dreams Crème Brûlée: Add 4 oz of finely chopped high-quality dark chocolate to the hot cream and stir until melted before infusing with vanilla.
- Fruit-Bottom Brûlée: Place a thin layer of fresh berries or poached fruit at the bottom of each ramekin before adding the custard.
- Espresso Dreams: Replace 1/4 cup of cream with freshly brewed espresso or strong coffee.
- Maple-Bourbon: Replace the granulated sugar in the custard with 1/3 cup of real maple syrup and add 1 tablespoon of bourbon.
Troubleshooting Common Issues
Even experienced bakers encounter challenges with crème brûlée. Here are solutions to the most common problems I’ve faced:
Custard Problems and Solutions
| Problem | Possible Causes | Solution |
|---|---|---|
| Custard is curdled or lumpy | Cream was too hot when added to eggs, cooking eggs | Strain mixture thoroughly; next time, add cream more slowly and whisk constantly |
| Custard didn’t set properly | Underbaking, incorrect proportions, oven temperature too low | Ensure water bath is hot, verify oven temperature with thermometer, check internal temperature of custard |
| Custard has a “eggy” flavor | Overcooking, low quality eggs | Don’t exceed 175°F internal temperature, use fresh, high-quality eggs |
| Custard has watery texture | Too much vanilla extract used instead of beans, underbaking | Use vanilla beans for flavor, ensure proper cooking temperature |
| Skin formed on custard | Surface dried out during cooling | Place plastic wrap directly on surface while cooling |
Caramelization Issues
| Problem | Possible Causes | Solution |
|---|---|---|
| Sugar won’t caramelize properly | Sugar layer too thick or uneven, moisture on surface | Apply thin, even layer of sugar; blot surface before sugaring |
| Sugar burns too quickly | Torch too close to surface, sugar layer too thin | Hold torch farther away, use slightly thicker sugar layer |
| Caramelized top becomes soft quickly | High humidity, custard not chilled enough | Serve immediately after caramelizing, ensure custard is well-chilled |
| Uneven caramelization | Broiler heat not distributed evenly | Rotate ramekins during broiling, consider using torch instead |
Make-Ahead and Storage Tips
One of the things I love most about crème brûlée is that it’s a perfect make-ahead dessert:
- Custard Base: The strained, uncooked custard base can be refrigerated for up to 24 hours before baking.
- Baked Custards: Baked custards (without the caramelized top) can be refrigerated for up to 3 days. Keep them covered with plastic wrap directly touching the surface.
- Serving: For the best texture contrast, caramelize the sugar topping just before serving.
- Freezing: While not ideal, baked custards can be frozen for up to 1 month. Thaw overnight in the refrigerator and blot any excess moisture before caramelizing the top.
Presentation Ideas
Elevate your Dreams Crème Brûlée with these elegant presentation ideas:
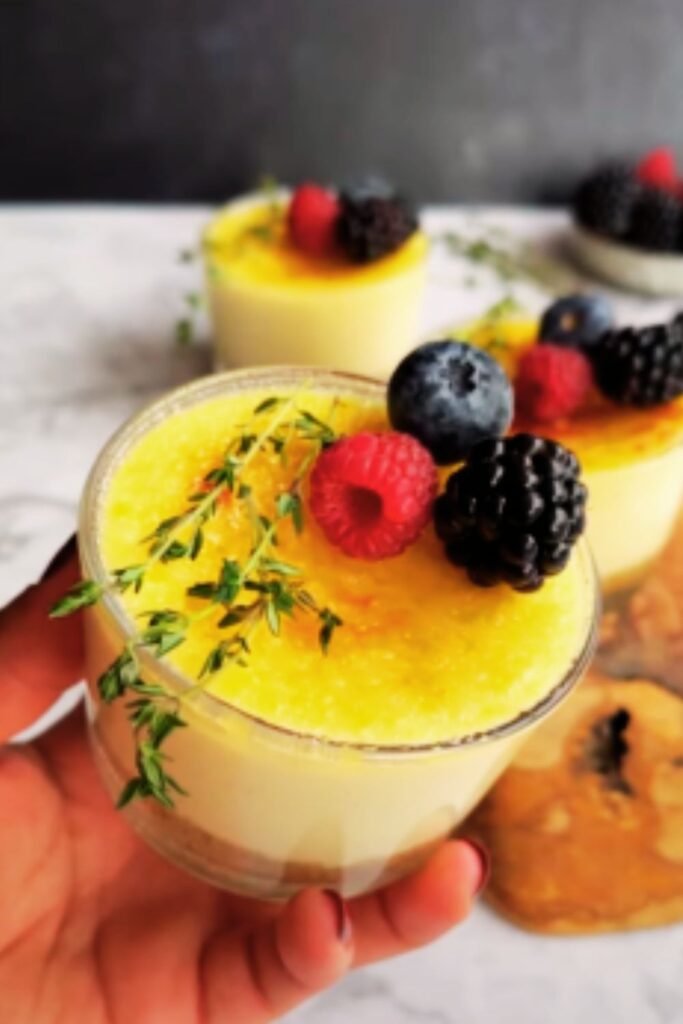
- Serve on a small plate with a dollop of lightly whipped cream and a few fresh berries
- Garnish with a small sprig of mint or edible flowers
- Add a thin butter cookie or langue de chat on the side
- For chocolate variations, dust the plate with a small amount of cocoa powder
- Serve with a trio of fresh berries macerated in a touch of Grand Marnier
- For special occasions, place a thin chocolate decoration on top after caramelization
Serving Suggestions
The perfect crème brûlée deserves thoughtful accompaniments:
- Beverages: Pair with espresso, French press coffee, or a pot of Earl Grey tea
- Fruit Accompaniments: Offer a small dish of fresh seasonal berries or a citrus supremes
- Sweet Additions: Serve alongside almond biscotti or thin shortbread cookies
- For Dinner Parties: Create a dessert trio with mini crème brûlée, a small chocolate truffle, and fresh fruit
Special Dietary Adaptations
Through extensive testing, I’ve developed these successful adaptations:
Dairy-Free Dreams Crème Brûlée
- Replace heavy cream with full-fat coconut cream (the thick part from canned coconut milk)
- Add 1 tablespoon of cornstarch to help with setting
- Increase vanilla to enhance flavor
- Note that coconut imparts its own flavor, which works beautifully with tropical variations
Reduced-Sugar Version
- Reduce the sugar in the custard to 1/3 cup
- Use allulose for the caramelized top (it caramelizes at a lower temperature than sugar)
- Add an extra pinch of salt to enhance sweetness perception
- Consider adding a splash of high-quality vanilla extract in addition to the bean

Q&A Section: Your Crème Brûlée Questions Answered
Q: Why did my custard curdle during baking? This typically happens when the eggs in the custard get too hot too quickly. Make sure you’re using a proper water bath that comes halfway up the sides of your ramekins, and verify your oven temperature with an oven thermometer. Also, never use boiling water in your water bath—hot tap water is usually sufficient.
Q: Can I make crème brûlée without a torch? Absolutely! While a kitchen torch gives you the most control, you can use your oven’s broiler. Place the chilled custards on a baking sheet about 2-3 inches below the broiler element and watch them constantly. Rotate the sheet as needed for even browning. The results won’t be quite as perfect as with a torch, but still delicious.
Q: My caramelized top gets soft quickly after serving. What am I doing wrong? This usually happens in humid environments or if there’s moisture on the surface of your custard. Make sure to blot the surface of the chilled custards with a paper towel before applying sugar. Also, caramelize the top just before serving—the longer it sits, the more the moisture from the custard will soften the crisp top.
Q: How far in advance can I make crème brûlée? The custards can be baked and chilled up to 3 days in advance, but always caramelize the sugar top just before serving. Keep them covered with plastic wrap directly touching the surface to prevent a skin from forming.
Q: What’s the best type of sugar for the caramelized top? Superfine (caster) sugar works best because it melts quickly and evenly. Demerara sugar adds a lovely flavor but may not caramelize as evenly. Regular granulated sugar works too, but may require more heat to caramelize properly.
Q: My crème brûlée has a grainy texture. What went wrong? Graininess usually comes from overcooking or cooking too quickly. Make sure your water bath is not too hot when you put it in the oven, and bake at 325°F (163°C), no higher. The custards should reach an internal temperature of about 170-175°F (77-79°C).
Q: Can I reuse the vanilla bean after making crème brûlée? Absolutely! Rinse the used vanilla bean pod, pat it dry, and add it to a jar of granulated sugar. In about a week, you’ll have vanilla sugar, which is perfect for baking or for the caramelized tops of future crème brûlées.
Q: How do I know when my custards are perfectly baked? The edges should be set, but the center should still have a slight jiggle—similar to Jell-O. If you use an instant-read thermometer, the internal temperature should be 170-175°F (77-79°C). Remember that the custards will continue to firm up as they cool.
Final Thoughts: Why This Recipe Works
After countless tests and refinements, I’ve found that this Dreams Crème Brûlée recipe succeeds where others fail for several key reasons:
- The steeping process – Allowing the vanilla to infuse into the cream for a full 30 minutes develops depth of flavor that can’t be rushed
- Temperature control – The careful water bath and precise internal temperature ensures silky smooth results every time
- The cooling process – The gradual cooling and extended refrigeration period allows the custard to develop the perfect texture
- Sugar ratio – The perfect amount of sugar in both the custard and topping balances sweetness with that essential caramelized crunch
Remember that making the perfect crème brûlée is both a science and an art. Don’t be discouraged if your first attempt isn’t perfect—each time you make this recipe, you’ll develop a better feel for the subtle cues that lead to crème brûlée nirvana. There’s a reason this dessert has endured for centuries and continues to delight diners worldwide.
The contrast between the cool, silky custard and that warm, crackling sugar top creates a moment of pure culinary bliss that few other desserts can match. Master this recipe, and you’ll have a show-stopping dessert in your repertoire that’s guaranteed to impress for years to come.