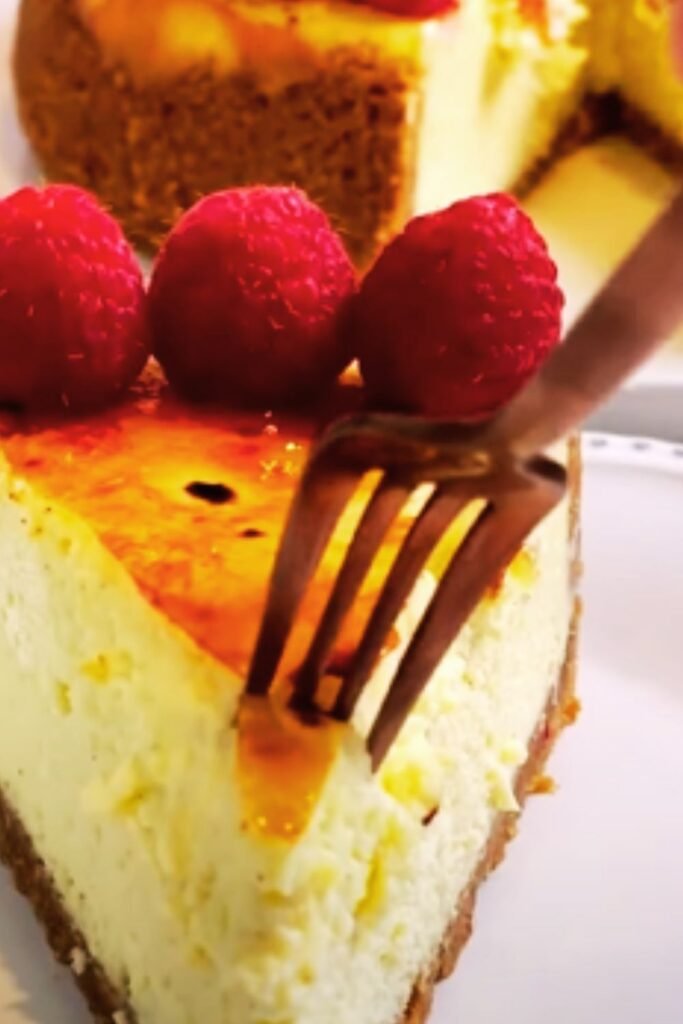
Have you ever found yourself torn between ordering crème brûlée or cheesecake for dessert? I certainly have, and after years of this delicious dilemma, I finally decided to create something that combines the best of both worlds. These Crème Brûlée Cheesecake Bars with a Crunch are the perfect marriage of velvety cheesecake, caramelized sugar, and a delightfully textured crust that adds an unexpected yet welcome crunch.
The Journey Behind the Recipe
I’ve always believed that the most memorable desserts combine contrasting textures and complementary flavors. After hosting a dinner party where half my guests favored the silky smoothness of crème brûlée while the other half couldn’t resist the creamy richness of cheesecake, I was inspired to create something that would satisfy everyone’s sweet tooth.
Several test batches later (my neighbors didn’t mind being taste-testers!), I perfected these bars that feature a buttery graham cracker crust enhanced with toasted nuts, a luxuriously smooth cheesecake filling, and that iconic crackable sugar topping that makes crème brûlée so satisfying to eat.
What Makes These Bars Special
These aren’t just any cheesecake bars. What sets them apart is the careful balance of:
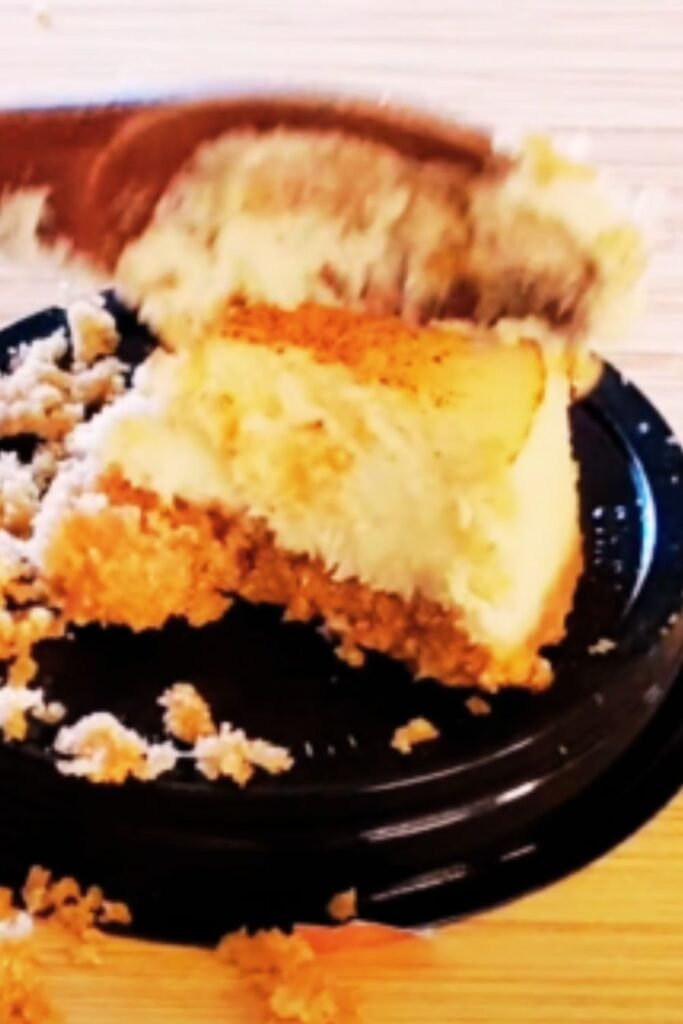
- Texture contrasts: From the crunchy base to the creamy filling to the brittle caramelized top
- Flavor complexity: Vanilla-forward with subtle caramel notes and a hint of nuttiness
- Make-ahead convenience: Perfect for entertaining since they need time to chill
- Impressive presentation: Professional-looking results that are surprisingly achievable at home
Ingredients You’ll Need
For a recipe that tastes this complex, you might expect a long list of specialty ingredients. Thankfully, most of what you need is probably already in your pantry or just a quick trip to the grocery store away.
For the Crunchy Crust:
- 1½ cups graham cracker crumbs (about 10 full sheets)
- ½ cup toasted pecans, finely chopped
- 2 tablespoons granulated sugar
- ¼ teaspoon sea salt
- 6 tablespoons unsalted butter, melted
For the Cheesecake Filling:
- 24 ounces (3 blocks) cream cheese, at room temperature
- 1 cup granulated sugar
- 3 large eggs, at room temperature
- ¼ cup heavy cream
- 2 teaspoons pure vanilla extract
- 1 vanilla bean, seeds scraped (optional but recommended)
- ¼ teaspoon sea salt
For the Crème Brûlée Topping:
- ½ cup granulated sugar
- 2 tablespoons turbinado sugar (also called Sugar in the Raw)
Essential Equipment
While you won’t need any specialized pastry tools, having these items on hand will make the process much smoother:
- 9×13-inch baking pan (preferably with straight sides)
- Parchment paper
- Food processor (optional, for making graham cracker crumbs)
- Electric mixer (stand or handheld)
- Kitchen torch
- Cooking thermometer (optional but helpful)
Don’t have a kitchen torch? I’ll share an alternative method using your broiler later in the recipe.
Detailed Instructions
I find that breaking down recipes into manageable steps makes them less intimidating. Here’s my step-by-step guide to creating these show-stopping dessert bars:
Preparing the Crunchy Crust
- Preheat your oven to 325°F (165°C). Line your 9×13-inch baking pan with parchment paper, leaving overhang on the sides for easy removal later.
- In a medium bowl, combine the graham cracker crumbs, finely chopped toasted pecans, sugar, and salt. Mix well.
- Pour in the melted butter and stir until the mixture resembles wet sand and holds together when pressed.
- Press the mixture firmly and evenly into the bottom of your prepared pan. I find using the bottom of a measuring cup helps create a smooth, even surface.
- Bake the crust for 10-12 minutes until it’s lightly golden and fragrant. Remove from the oven and allow to cool slightly while you prepare the filling. Keep the oven on.
My Pro Tip: To elevate the nuttiness in the crust, toast the pecans before chopping them. Spread them on a baking sheet and bake at 350°F for about 8 minutes until fragrant, then cool completely before chopping.
Creating the Perfect Cheesecake Filling
- In the bowl of an electric mixer fitted with the paddle attachment (or using a hand mixer), beat the cream cheese on medium speed until completely smooth, about 2 minutes. Scrape down the sides and bottom of the bowl.
- Add the sugar and beat for another 1-2 minutes until the mixture is light and fluffy.
- Reduce the speed to low and add the eggs one at a time, mixing just until each is incorporated before adding the next. Over-mixing at this stage can incorporate too much air and cause cracks.
- Add the heavy cream, vanilla extract, vanilla bean seeds (if using), and salt. Mix on low just until combined.
- Pour the filling over the par-baked crust and smooth the top with a spatula.
- Bake for 35-40 minutes, or until the edges are set but the center still has a slight jiggle when you gently shake the pan.
- Turn off the oven, crack the door open, and let the cheesecake cool in the oven for 1 hour. This gentle cooling helps prevent cracks from forming.
- After an hour, remove the cheesecake from the oven and let it cool completely at room temperature.
- Once cooled, cover and refrigerate for at least 4 hours, preferably overnight.
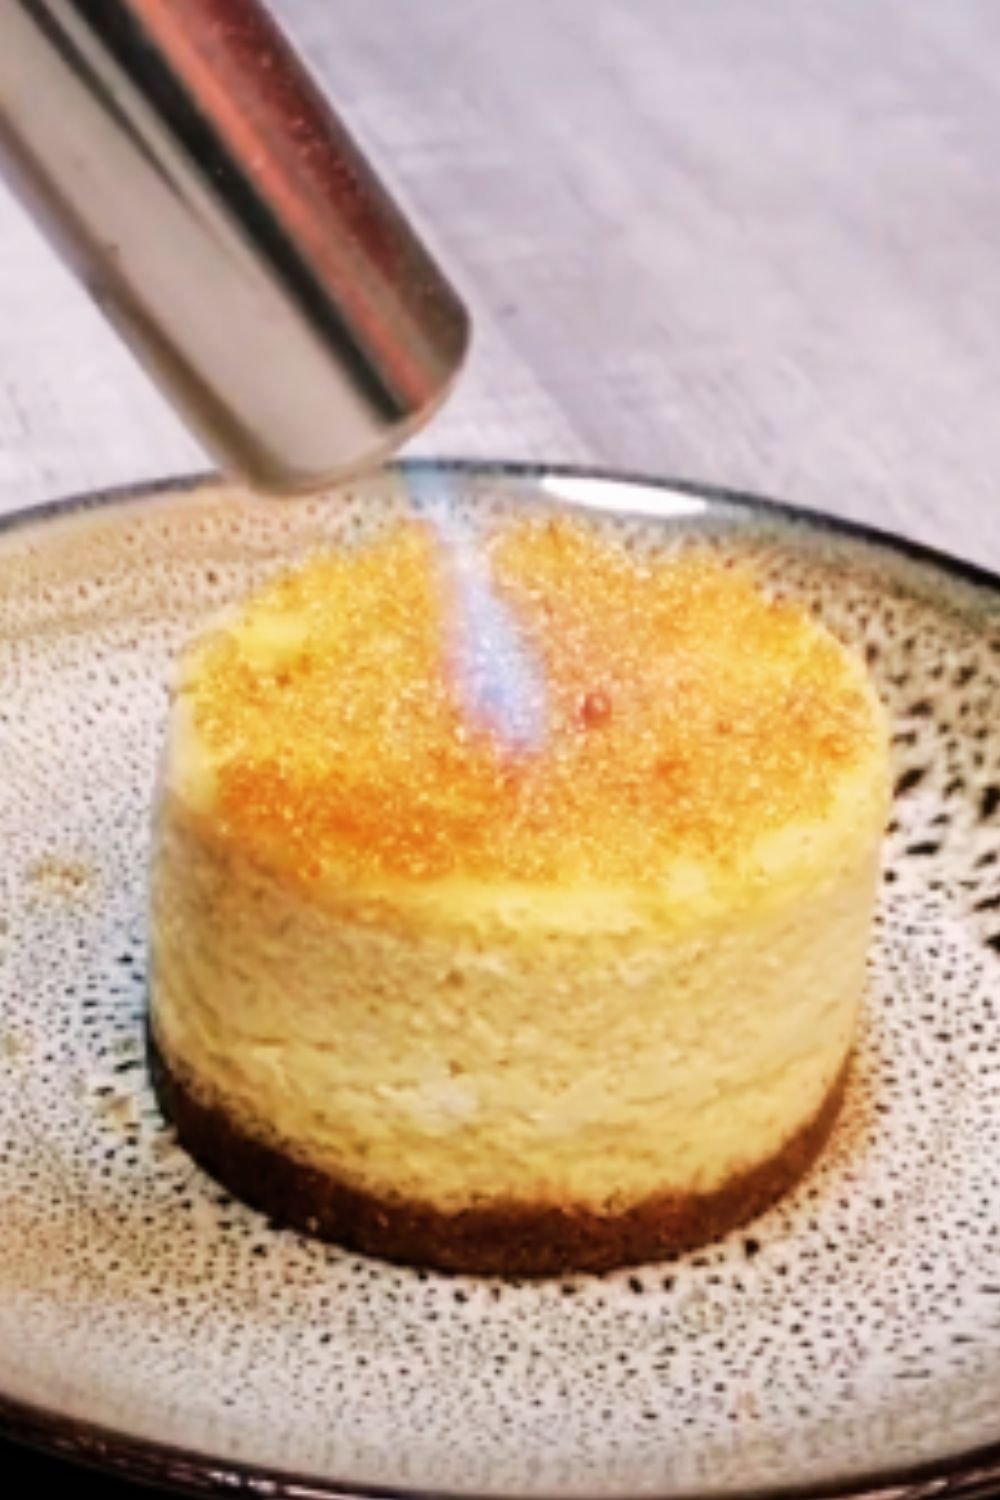
Creating the Crème Brûlée Topping
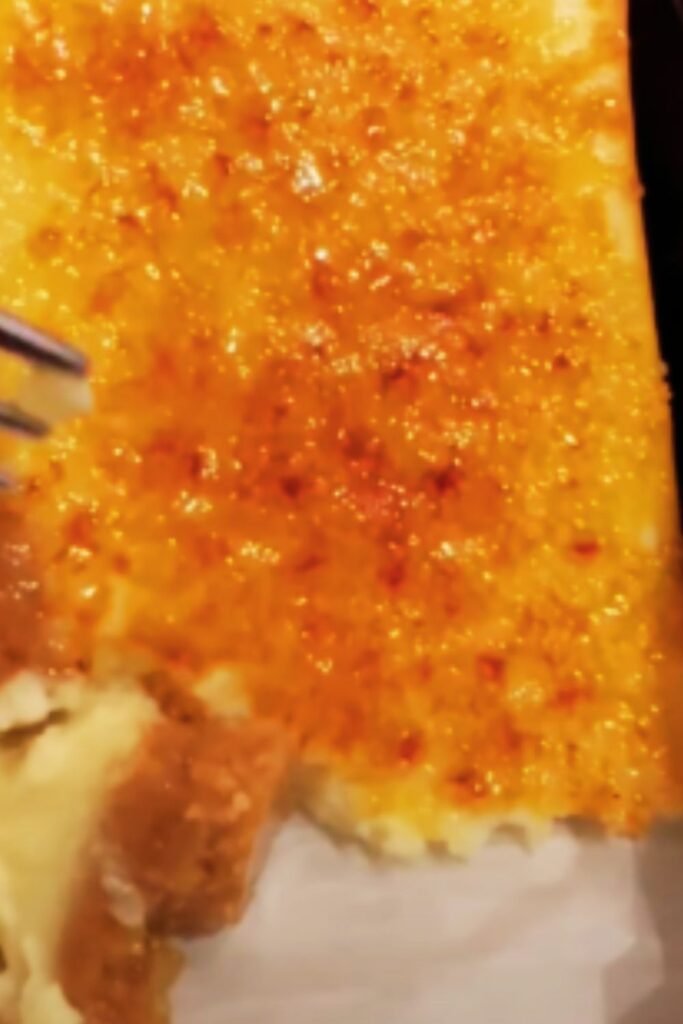
This is where the magic happens! The transformation from regular cheesecake to crème brûlée cheesecake takes place in these final steps:
- When you’re ready to serve, remove the chilled cheesecake from the refrigerator and use the parchment paper overhang to lift it out of the pan.
- Place it on a cutting board and use a sharp knife to cut it into bars. I recommend 15 bars (3 rows by 5), but you can make them larger or smaller based on your preference.
- Mix the granulated sugar and turbinado sugar together in a small bowl.
- Working with a few bars at a time, sprinkle a thin, even layer of the sugar mixture over the top of each bar.
- Using a kitchen torch, melt the sugar by moving the flame continuously across the surface until it bubbles and turns a deep amber color. Keep the torch moving to avoid burning the sugar.
- Allow the caramelized sugar to harden for about 1-2 minutes before serving.
Don’t Have a Kitchen Torch? Place the sugar-topped bars on a baking sheet and position them about 4 inches under your oven’s broiler. Watch VERY carefully and remove as soon as the sugar melts and caramelizes, usually in 1-2 minutes.
Storage and Make-Ahead Tips
These cheesecake bars are perfect for preparing in advance of special occasions:
- Without the sugar topping: The bars can be stored in an airtight container in the refrigerator for up to 5 days.
- With the brûléed topping: Best enjoyed within a few hours of torching, as the caramelized sugar will begin to soften in the refrigerator.
- Freezing option: The untopped bars freeze beautifully for up to 2 months. Wrap individual bars in plastic wrap, then aluminum foil, and store in a freezer bag. Thaw overnight in the refrigerator before adding the sugar topping.
Serving Suggestions
These luxurious bars are a showstopper on their own, but if you want to elevate them even further, consider these serving ideas:
- Add a small dollop of lightly whipped cream and fresh berries
- Drizzle with a thin stream of warm salted caramel sauce
- Serve alongside a shot of espresso for a sophisticated coffee pairing
- Garnish with a light dusting of cinnamon or freshly grated nutmeg
- Accompany with a small scoop of vanilla bean ice cream for an indulgent treat
Nutritional Information
For those who like to keep track of what they’re enjoying, here’s the approximate nutritional breakdown per bar (based on 15 bars):
| Nutrient | Amount per Serving |
|---|---|
| Calories | 387 |
| Total Fat | 27g |
| Saturated Fat | 15g |
| Cholesterol | 119mg |
| Sodium | 270mg |
| Total Carbohydrates | 31g |
| Dietary Fiber | 1g |
| Sugars | 24g |
| Protein | 6g |
| Calcium | 73mg |
| Iron | 1mg |
Troubleshooting Common Issues
Even experienced bakers encounter challenges sometimes. Here are solutions to common problems you might face:
Cheesecake Filling Cracks
- Cause: Overmixing, baking at too high a temperature, or cooling too quickly
- Solution: Mix just until ingredients are combined, ensure your oven temperature is accurate with an oven thermometer, and cool gradually as directed
Sugar Won’t Caramelize Properly
- Cause: Layer too thick or uneven, or sugar contains moisture
- Solution: Use a thin, even layer of sugar and ensure your bars are completely chilled and dry on top before adding sugar
Crust Is Too Hard
- Cause: Overworking the crust mixture or pressing too firmly
- Solution: Mix until just combined and press with moderate pressure
Filling Isn’t Setting
- Cause: Underbaking or ingredients not at room temperature
- Solution: Make sure your cream cheese is fully softened and bake until the edges are set but center still jiggles slightly
Variations to Try
While I love the classic version of these bars, here are some delicious variations I’ve experimented with:
Chocolate Crust Version
Replace half the graham crackers with chocolate wafer cookies and add 1 tablespoon of cocoa powder to the crust mixture.
Citrus-Infused Filling
Add 1 tablespoon of lemon or orange zest to the cheesecake filling for a bright, citrusy note.
Holiday Spice Edition
Add ½ teaspoon cinnamon, ¼ teaspoon nutmeg, and a pinch of cloves to the filling for a warming holiday treat.
Bourbon Vanilla
Replace 1 tablespoon of heavy cream with bourbon and double the vanilla for a sophisticated flavor profile.
Why This Recipe Works
As someone who has tested countless cheesecake recipes, I can tell you that the success of these bars comes down to a few key factors:
- Temperature control: Room temperature ingredients blend smoothly, and the gentle cooling process prevents cracks
- Texture balance: The crunchy crust provides the perfect counterpoint to the creamy filling and brittle top
- Fat content: Full-fat cream cheese and heavy cream create that luxurious mouthfeel that makes these bars irresistible
- Two-sugar topping: The combination of granulated and turbinado sugar creates the perfect crackable crust with complex caramel notes
Frequently Asked Questions
Q: Can I make these bars without nuts due to allergies? Yes! Simply replace the nuts in the crust with an equal amount of additional graham cracker crumbs or try using crushed pretzels for a different type of crunch.
Q: How far in advance can I make these for a party? The cheesecake bars (without the sugar topping) can be made up to 3 days ahead. Add the sugar and torch it just before serving for the best texture contrast.
Q: My kitchen torch is making black spots instead of an even caramel. What am I doing wrong? You’re likely holding the torch too close or keeping it in one spot too long. Keep the torch moving constantly and hold it a bit further away from the surface.
Q: Can I use low-fat cream cheese? While you technically can, I don’t recommend it. Full-fat cream cheese provides the best flavor and texture. The low-fat version contains more moisture and stabilizers that can affect the final result.
Q: Is it possible to make a smaller batch? Absolutely! Halve all the ingredients and use an 8×8-inch pan. The baking time will be similar, but start checking about 5 minutes earlier.
Q: Why did my caramelized sugar topping get soft after being in the refrigerator? Sugar naturally absorbs moisture from the environment. For the best experience, add the sugar topping shortly before serving rather than in advance.
A Few Final Thoughts
What I love most about these Crème Brûlée Cheesecake Bars is how they bring together two beloved desserts in a form that’s perfect for sharing. They’re elegant enough for special occasions but approachable enough to make when you’re simply craving something extraordinary.
The combination of the cool, creamy cheesecake with the warm, crackling sugar crust creates a sensory experience that’s truly memorable. And that added crunch from the toasted pecan crust? It’s the detail that elevates these bars from delicious to unforgettable.
So the next time you’re debating between crème brûlée and cheesecake, remember that you don’t have to choose. With this recipe in your collection, you can enjoy the best of both worlds in one perfect bite.
Happy baking, and even happier eating!