There’s something magical about the combination of rich chocolate brownies and the warmly spiced, caramelized flavor of Biscoff cookie butter. As someone who has spent years perfecting brownie recipes, I can confidently say that these Biscoff brownies are a game-changer in the world of desserts.
When I first discovered Biscoff spread (also known as cookie butter or speculoos spread), I immediately began experimenting with ways to incorporate this delightful creation into my baking. The result? These incredibly fudgy, perfectly sweet brownies with swirls of spiced cookie butter that create a dessert experience unlike any other.
In this recipe, I’ll guide you through creating these decadent treats step-by-step, sharing all my tips and tricks for achieving brownie perfection. Whether you’re already a Biscoff enthusiast or new to the cookie butter craze, these brownies are guaranteed to impress.
What Makes Biscoff Spread So Special?
Before diving into the recipe, let’s talk about what makes Biscoff spread so unique:
Speculoos cookies : Traditional Belgian spiced shortcrust biscuits Cookie butter : A creamy spread made from grinding these cookies with oils and sugar Flavor profile : Caramelized, warmly spiced with notes of cinnamon, nutmeg, and ginger Texture : Smooth, spreadable consistency similar to peanut butter
The magic of Biscoff spread lies in its versatility. It can be spread on toast, used as a dip for fruit, stirred into coffee, or—as in our case today—baked into incredible desserts.
Ingredients for Biscoff Brownies
For these indulgent brownies, you’ll need quality ingredients that complement the distinctive flavor of Biscoff. Here’s everything required:
For the Brownie Base:
- 200g (1 cup) high-quality dark chocolate (60-70% cocoa)
- 150g (⅔ cup) unsalted butter
- 3 large eggs, room temperature
- 200g (1 cup) granulated sugar
- 100g (½ cup) light brown sugar, packed
- 1 teaspoon vanilla extract
- 130g (1 cup) all-purpose flour
- 30g (¼ cup) cocoa powder, unsweetened
- ½ teaspoon salt
For the Biscoff Swirl:
- 200g (¾ cup) smooth Biscoff spread
- 8-10 Biscoff cookies, broken into pieces
For the Optional Biscoff Topping:
- 100g (⅓ cup) smooth Biscoff spread, warmed slightly
- 4-5 Biscoff cookies, crushed
I always recommend having all ingredients at room temperature before beginning, particularly the eggs, as this ensures better incorporation and a smoother batter.
Equipment Needed
To make this recipe as seamless as possible, gather these tools before starting:
- 8×8 inch (20×20 cm) square baking pan
- Parchment paper
- Large mixing bowl
- Medium heatproof bowl for melting chocolate
- Small saucepan
- Whisk
- Rubber spatula
- Electric mixer (optional but helpful)
- Cooling rack
- Sharp knife for cutting brownies
Having everything prepared ahead of time will make the baking process much more enjoyable and efficient.
Step-by-Step Instructions
Preparing Your Baking Pan
- Preheat your oven to 350°F (175°C).
- Line your 8×8 inch baking pan with parchment paper, leaving some overhang on the sides to easily lift the brownies out later.
- Lightly grease the parchment paper with butter or cooking spray.
Making the Brownie Batter
- Create a double boiler by placing a heatproof bowl over a saucepan with about an inch of simmering water (ensure the bottom of the bowl doesn’t touch the water).
- Break the dark chocolate into pieces and add to the bowl along with the butter.
- Stir occasionally until completely melted and smooth.
- Remove from heat and allow to cool slightly (about 5 minutes).
- In a large mixing bowl, whisk together the eggs, granulated sugar, and brown sugar until well combined and slightly frothy.
- Add the vanilla extract and the cooled chocolate mixture, whisking until fully incorporated.
- Sift the flour, cocoa powder, and salt directly into the bowl.
- Fold the dry ingredients into the wet ingredients using a spatula, being careful not to overmix (stop when no dry streaks remain).
Adding the Biscoff Magic
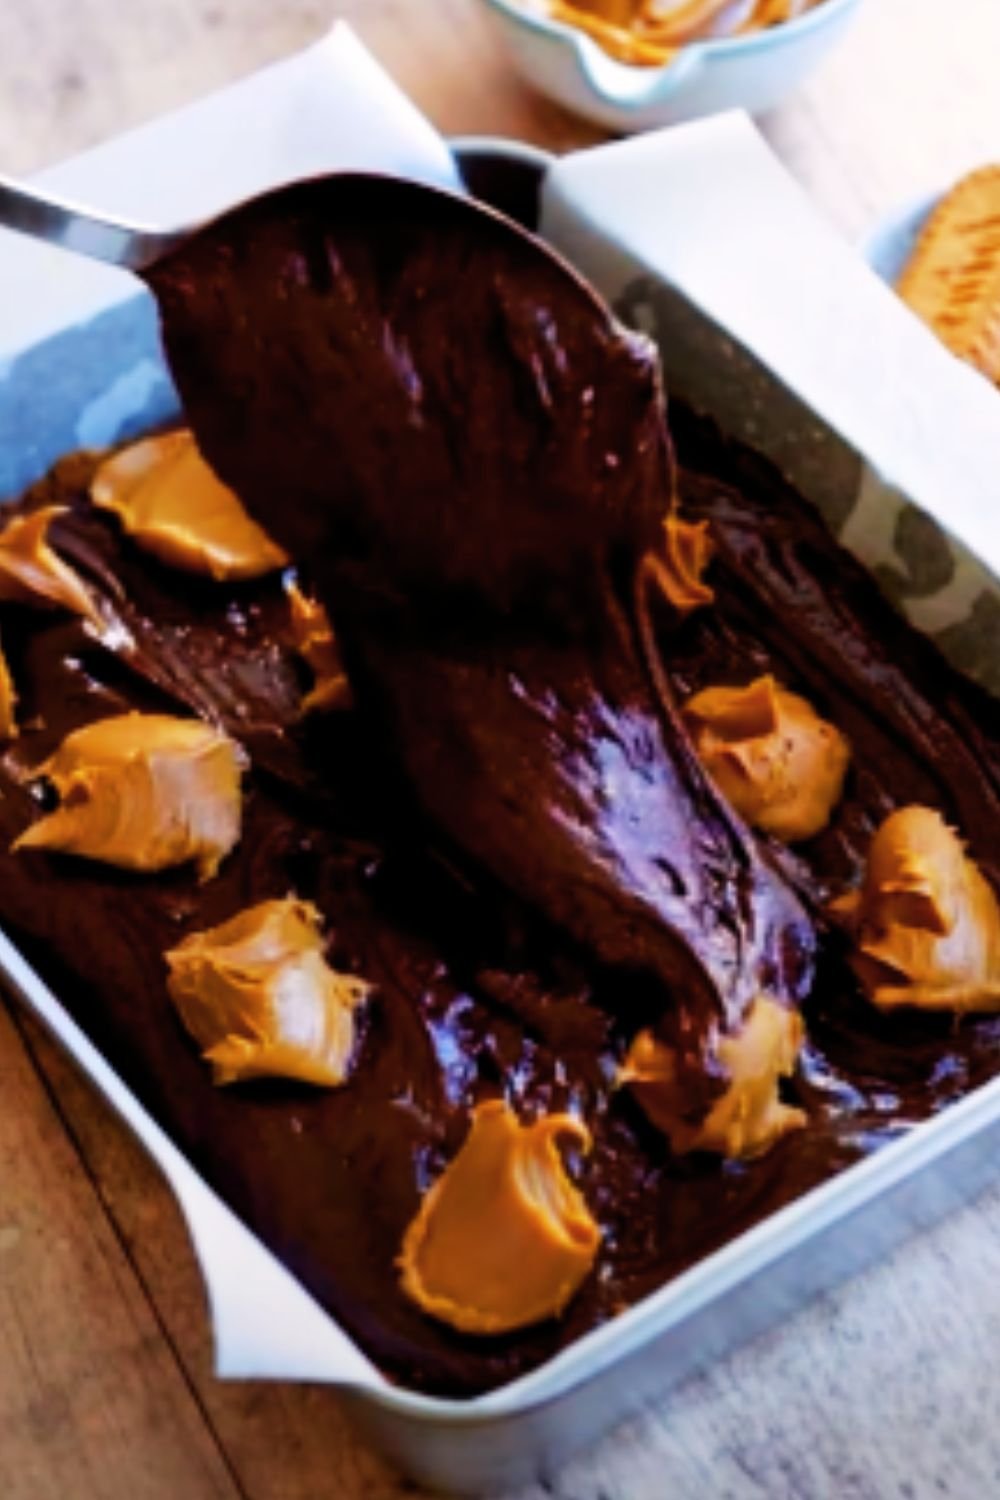
- Pour about two-thirds of the brownie batter into the prepared baking pan, spreading it evenly with a spatula.
- Warm the Biscoff spread (for the swirl) in the microwave for 10-15 seconds to make it more fluid.
- Drop spoonfuls of the warmed Biscoff spread over the brownie batter (use about half of the amount).
- Scatter half of the broken Biscoff cookies over the batter.
- Pour the remaining brownie batter on top, trying to cover most of the Biscoff layer.
- Add the remaining Biscoff spread in dollops on the surface.
- Use a knife or skewer to gently swirl the Biscoff through the top layer of brownie batter, creating a marbled effect.
- Sprinkle the remaining broken cookie pieces over the top.
Baking to Perfection
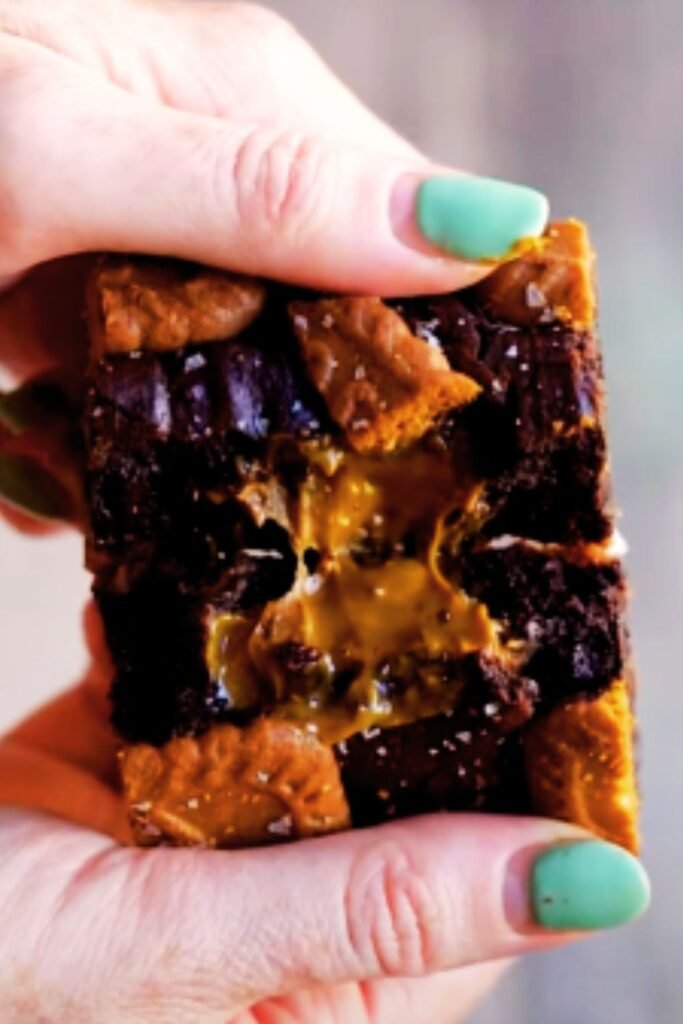
- Bake in the preheated oven for 25-30 minutes. The brownies are done when the edges are set, and a toothpick inserted into the center comes out with a few moist crumbs (not wet batter).
- Be careful not to overbake! Fudgy brownies require precision timing, and it’s better to slightly underbake than overbake.
- Once baked, remove from the oven and place the pan on a wire rack.
- Allow the brownies to cool completely in the pan (about 1-2 hours).
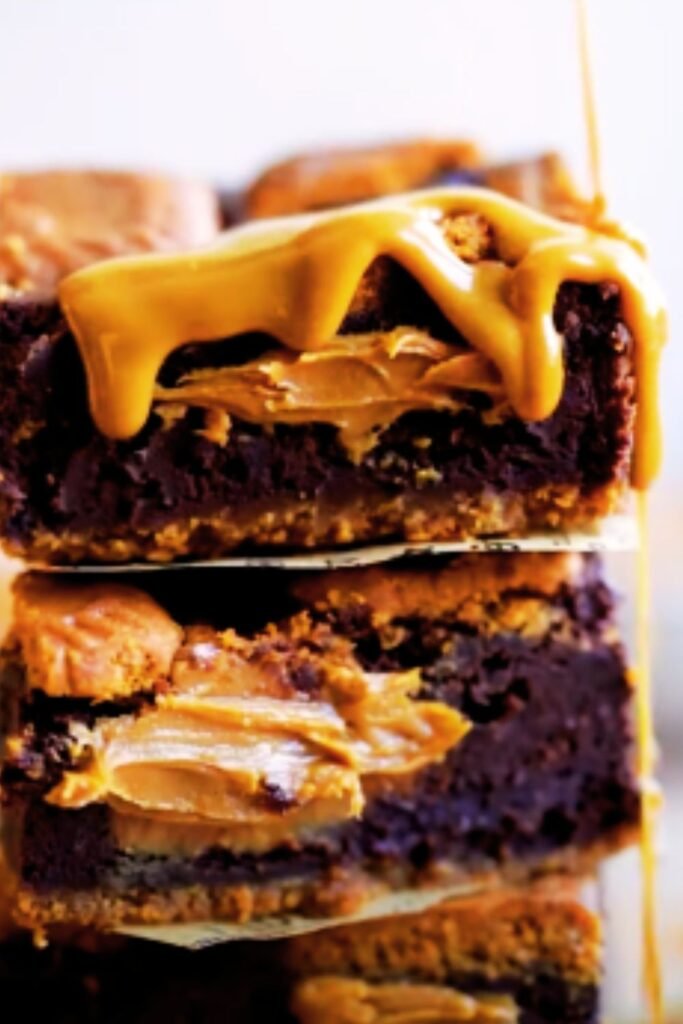
The Finishing Touch
- Once completely cooled, gently lift the brownies out of the pan using the parchment paper overhang.
- If using the optional topping, warm the additional Biscoff spread until it’s pourable but not hot.
- Drizzle the warmed spread over the brownies.
- Sprinkle the crushed Biscoff cookies on top.
- For clean cuts, use a sharp knife wiped clean between each cut, or chill the brownies in the refrigerator for 30 minutes before cutting.
Tips for Brownie Perfection
Through my many batches of experimenting with these Biscoff brownies, I’ve discovered several tips that make a significant difference:
Chocolate Selection Matters
The quality of your chocolate directly impacts your brownies’ flavor. I recommend using chocolate with 60-70% cocoa content for the perfect balance of richness without overwhelming bitterness.
Room Temperature Ingredients
Especially for the eggs, room temperature ingredients blend more smoothly and create a better texture in the final product.
Don’t Overmix the Batter
Once you add the dry ingredients, mix just until combined. Overmixing develops the gluten in the flour, resulting in tougher, cake-like brownies rather than fudgy ones.
The Toothpick Test
When testing doneness, a few moist crumbs on your toothpick means perfect fudgy brownies. A clean toothpick usually means they’ve been baked too long.
Cooling Completely
Patience is key! Allow the brownies to cool completely before cutting. This ensures the structure sets properly and gives you clean, defined slices.
Variations to Try
One of the reasons I love this recipe is its versatility. Here are some delicious variations I’ve experimented with:
Biscoff Cheesecake Brownies
Add a layer of simple cheesecake batter (8oz cream cheese, ¼ cup sugar, 1 egg) mixed with ¼ cup Biscoff spread before baking.
Double Chocolate Biscoff Brownies
Fold ½ cup chocolate chips into the brownie batter for extra chocolatey goodness.
Salted Biscoff Brownies
Sprinkle flaky sea salt on top just after baking for a sweet-salty contrast that enhances the caramel notes in the Biscoff.
Biscoff Blondie Variation
Replace the cocoa powder with additional flour and use white chocolate instead of dark for a blondie version that showcases the Biscoff flavor even more prominently.
Nutritional Information
For those who like to know what they’re consuming, here’s an approximate nutritional breakdown per serving (assuming the pan is cut into 16 brownies):
| Nutrient | Amount per Serving |
|---|---|
| Calories | 320 kcal |
| Total Fat | 18g |
| – Saturated Fat | 9g |
| Cholesterol | 55mg |
| Sodium | 180mg |
| Total Carbohydrates | 36g |
| – Dietary Fiber | 1.5g |
| – Sugars | 25g |
| Protein | 4g |
| Calcium | 30mg |
| Iron | 2mg |
Please note that these values are estimates and can vary based on specific brands and exact measurements used.
Storage and Make-Ahead Tips
These Biscoff brownies actually improve in flavor after a day, as the spiced notes from the cookie butter have time to meld with the chocolate. Here’s how to store them:
Counter Storage
Store in an airtight container at room temperature for up to 4 days. Place parchment paper between layers if stacking.
Refrigerator Storage
For longer freshness (up to 1 week), store in the refrigerator. Allow to come to room temperature before serving for the best texture.
Freezer Storage
These brownies freeze beautifully for up to 3 months:
- Cut into individual portions
- Wrap each piece tightly in plastic wrap
- Place in a freezer-safe container or bag
- Thaw overnight in the refrigerator or for 1-2 hours at room temperature
Serving Suggestions
These decadent Biscoff brownies are divine on their own, but here are some serving ideas to elevate them even further:
For Casual Enjoyment
- Pair with a glass of cold milk or hot coffee
- Warm slightly in the microwave (10-15 seconds) and top with a scoop of vanilla ice cream
- Drizzle with additional warmed Biscoff spread just before serving
For Special Occasions
- Create a Biscoff brownie sundae with vanilla ice cream, caramel sauce, whipped cream, and a Biscoff cookie garnish
- Turn into elegant dessert plates by adding a quenelle of mascarpone cream and a dusting of cocoa powder
- Serve with coffee affogato (a scoop of vanilla ice cream “drowned” in espresso)
For Gifting
These brownies make wonderful gifts:
- Stack in a clear gift box with parchment paper between layers
- Include the recipe card attached with a decorative ribbon
- Pair with a small jar of Biscoff spread and a package of Biscoff cookies for a themed gift
Why This Recipe Works
As someone who has experimented extensively with brownie recipes, I can explain exactly why this combination works so perfectly:
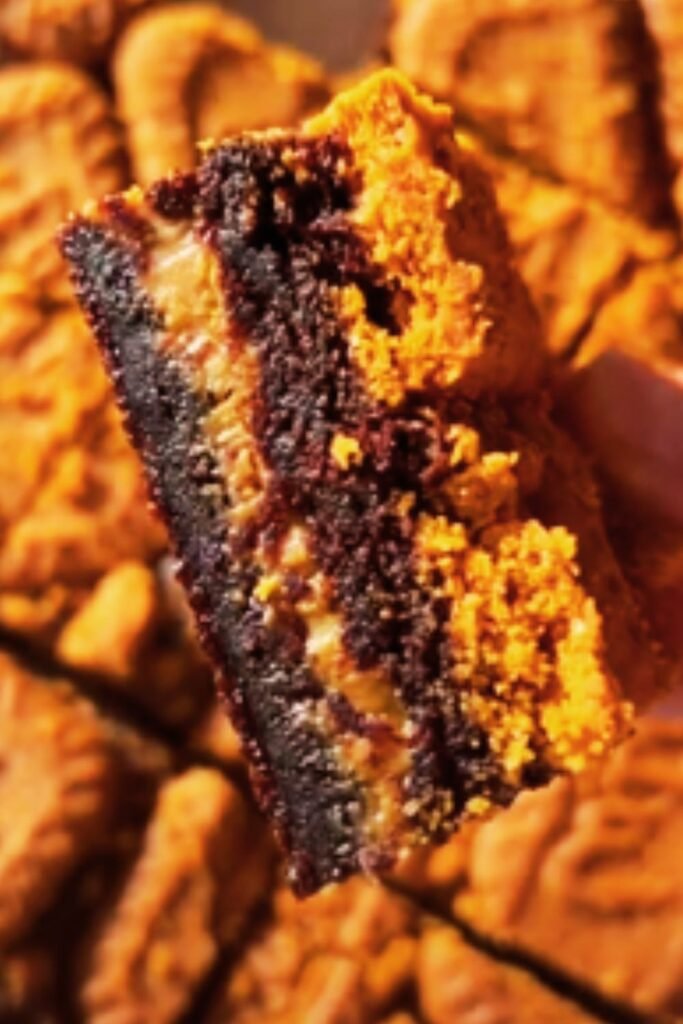
- Textural Contrast: The fudgy brownie base against pieces of crisp Biscoff cookies creates a pleasing textural experience.
- Flavor Harmony: The deep chocolate notes complement the caramelized, spiced flavor of the Biscoff, neither overwhelming the other.
- Visual Appeal: The beautiful swirls of golden Biscoff create an eye-catching marbled effect that makes these brownies as gorgeous as they are delicious.
- Balance of Sweetness: The slight bitterness from the dark chocolate balances the sweetness of the Biscoff spread, preventing the dessert from becoming cloying.
Frequently Asked Questions
Can I use crunchy Biscoff spread instead of smooth? Yes! Crunchy Biscoff spread works beautifully in this recipe and adds extra texture. Use the same amount as indicated for the smooth variety.
My Biscoff spread is too thick to swirl properly. What should I do? Microwave it for 10-15 seconds and stir before attempting to swirl. This will give it a more fluid consistency that creates beautiful marbling.
Can I double this recipe for a larger batch? Absolutely! Double all ingredients and use a 9×13 inch baking pan. You may need to add 5-10 minutes to the baking time, but still use the toothpick test to determine doneness.
I can’t find Biscoff spread. What can I substitute? While nothing perfectly replicates the unique flavor of Biscoff, you can substitute another cookie butter or speculoos spread. In a pinch, creamy peanut butter with a teaspoon of cinnamon and a tablespoon of brown sugar mixed in can provide a similar textural effect.
Why did my brownies turn out cakey instead of fudgy? This usually happens from overmixing the batter after adding the flour, using too much flour, or overbaking. Remember to mix just until combined, measure flour accurately (preferably by weight), and err on the side of underbaking rather than overbaking.
Can I make these gluten-free? Yes, substitute the all-purpose flour with a 1:1 gluten-free baking blend. However, be sure to use gluten-free Biscoff alternatives as traditional Biscoff contains wheat.
How can I tell when the brownies are perfectly baked? The edges should be set and slightly pulled away from the sides of the pan, while the center should still look slightly underdone. A toothpick inserted into the center should come out with a few moist crumbs attached, but not wet batter.
Personal Notes
I first created these brownies for a friend’s birthday who is absolutely obsessed with Biscoff cookies. The look on their face when they bit into that first brownie—the perfect balance of chocolate and spiced cookie butter—was all the confirmation I needed that this recipe was something special.
What I love most about these brownies is their versatility. They’re sophisticated enough for dinner parties but comforting enough for a cozy night in. The recipe has become my go-to when I need to impress guests or bring a dessert to gatherings, and I always keep a jar of Biscoff in my pantry specifically for this purpose.
There’s something truly magical about the way the warm, spiced flavors of the cookie butter complement the rich chocolate of the brownie base. It’s a combination that feels both innovative and familiar at the same time—like a favorite comfort food you never knew you were missing.
I hope this recipe brings as much joy to your kitchen as it has to mine. Happy baking!
Final Thoughts
Creating these Biscoff brownies is more than just following a recipe—it’s an experience. From the moment the rich aroma of chocolate and spiced cookie butter fills your kitchen to the first fudgy, flavorful bite, these brownies create moments worth savoring.
What makes this recipe truly special is its ability to transform simple ingredients into something extraordinary. The humble brownie, elevated with swirls of caramelized, spiced Biscoff, becomes not just a dessert but a conversation starter.
Whether you’re an experienced baker or trying brownies from scratch for the first time, this recipe offers both accessibility and impressive results. The techniques are straightforward, but the flavor combination feels sophisticated and unique.
I encourage you to make these brownies your own. Perhaps you’ll add a pinch of extra cinnamon to enhance the spice notes, or maybe you’ll experiment with a white chocolate drizzle on top. The foundation is solid, but there’s always room for personal creativity in baking.
Remember that patience is key—from allowing ingredients to reach room temperature to letting the brownies cool completely before cutting. These small details make a significant difference in the final product.
Most importantly, enjoy the process. There’s something deeply satisfying about creating something delicious with your own hands, especially when it brings joy to those you share it with. These Biscoff brownies aren’t just about the perfect bite—they’re about creating sweet memories in your kitchen.